
FAQs
Kindly review the items listed below.
- Ensure your internet connection is active.
- Verify your internet speed by accessing the following links or any other website you prefer:
- For tecgym.app to function correctly, your internet connection must have a minimum speed of 16MB (Mbps).
- It is recommended to use Google Chrome browser for tecgym.app.

If you are facing any problem, please contact the support team for further assistance.
Kindly review the items listed below.
- Verify your internet speed by accessing the following links or any other website you prefer:
- For tecgym.app to function correctly, your internet connection must have a minimum speed of 16MB (Mbps).
- It is recommended to use Google Chrome browser for tecgym.app.
If you are facing any problem, please contact the support team for further assistance.
If you're unable to login, please follow the below steps:
- Ensure your internet connection is active.
- Please make sure to enter correct Username and Password, otherwise you will see the error displayed in the screenshot (a).

(a) Authentication Error
- Ensure that you've input the correct Domain in the username. An incorrect domain entry will result in the error shown in the screenshot (b).

(b) Domain Error
- If your gym license has expired, you will not be able to login as shown in the screenshot (c).

(c) License Error
If you are facing any problem, please contact the support team for further assistance.
Click here to watch the video explanation.Following are the steps to change user's password for tecgym.app:
- Login to the tecgym.app and navigate to
the User Management section from the Settings left menu.

- This will open the Users list.
- Select user from the Users list, or use the search functionality as depicted in screenshot (a).
- Click on your user's icon to access the detail page.
- On the detail page, go to the Change Password tab,
- In the provided fields, enter your New Password and Confirm Password, and then click the Change Password button, as demonstrated in screenshot (b).

(a) Users List
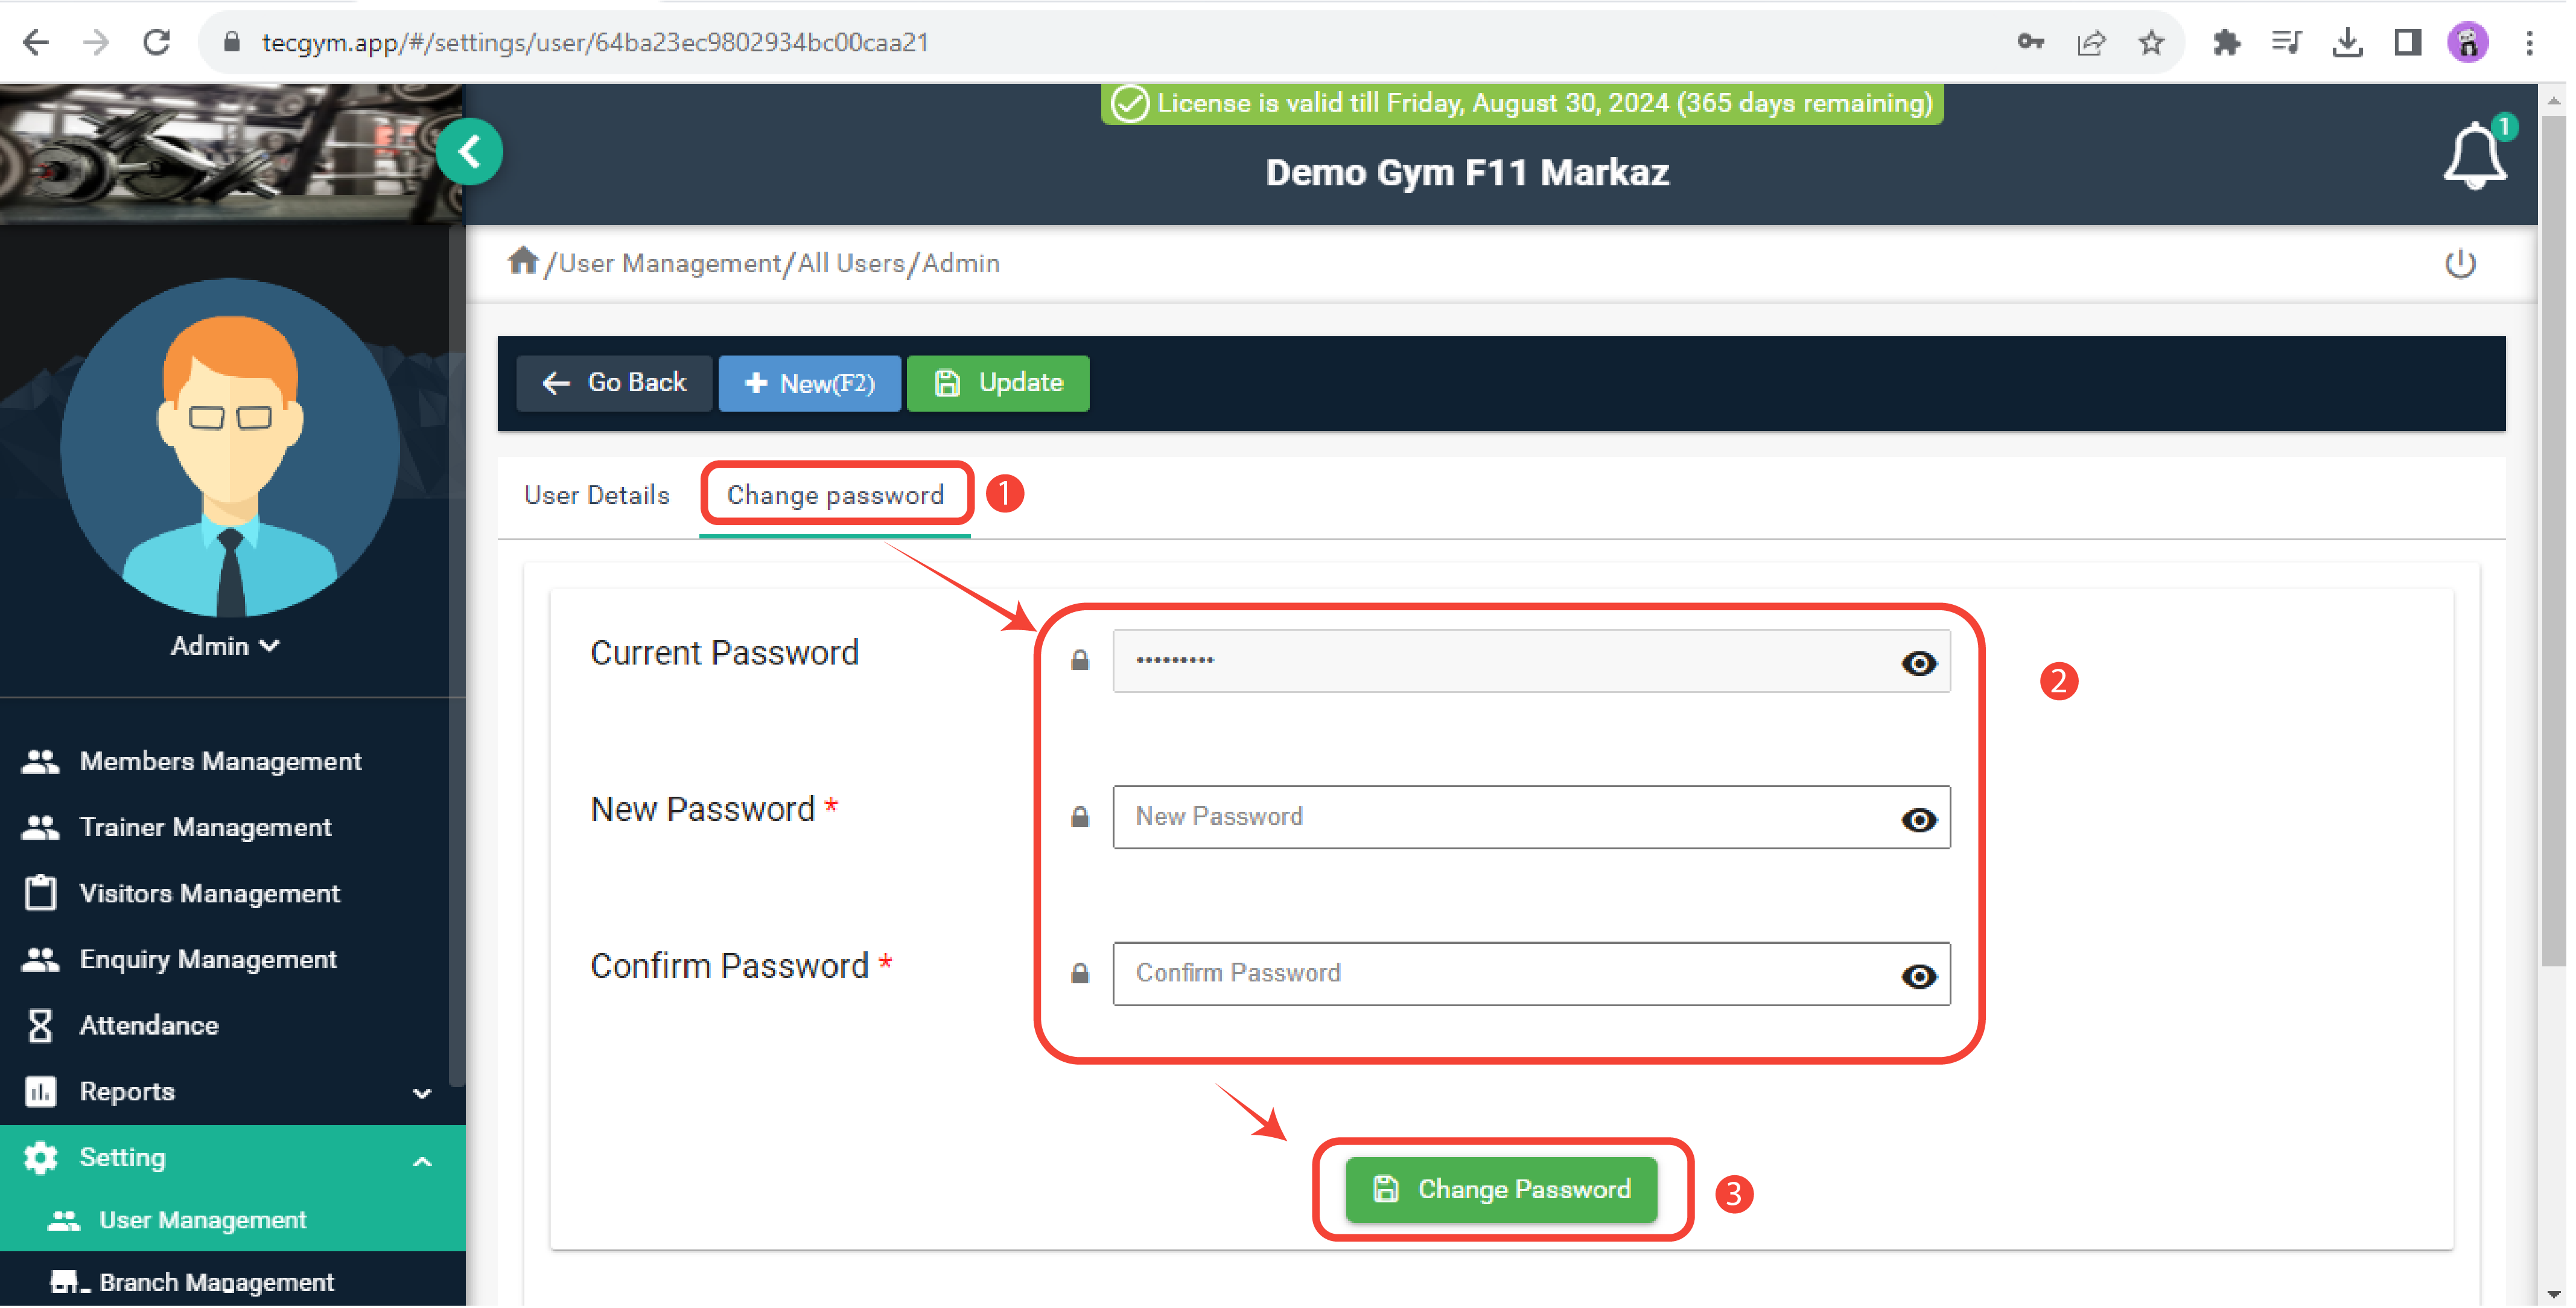
(b) Change Password
If you are facing any problem, please contact the support team for further assistance.
Click here to watch the video explanation.It is recommended to contact the support team or share the updated packages details or brochure through the support WhatsApp group. Your packages modifications will be implemented within 24 hours.
To add a new member, please follow the below steps:
- Click on the Add New button, as illustrated in the screenshot
- Next, select your desired package from the available list as shown in screenshot. (b)
- Enter the member's details. Please note that the Name and Contact fields are required, so ensure they are filled accurately as shown in screenshot. (c)
- Any fields marked in red indicate that the provided information may be incorrect, so review and correct them.
- Once you've filled in all the necessary information, click on Proceed button
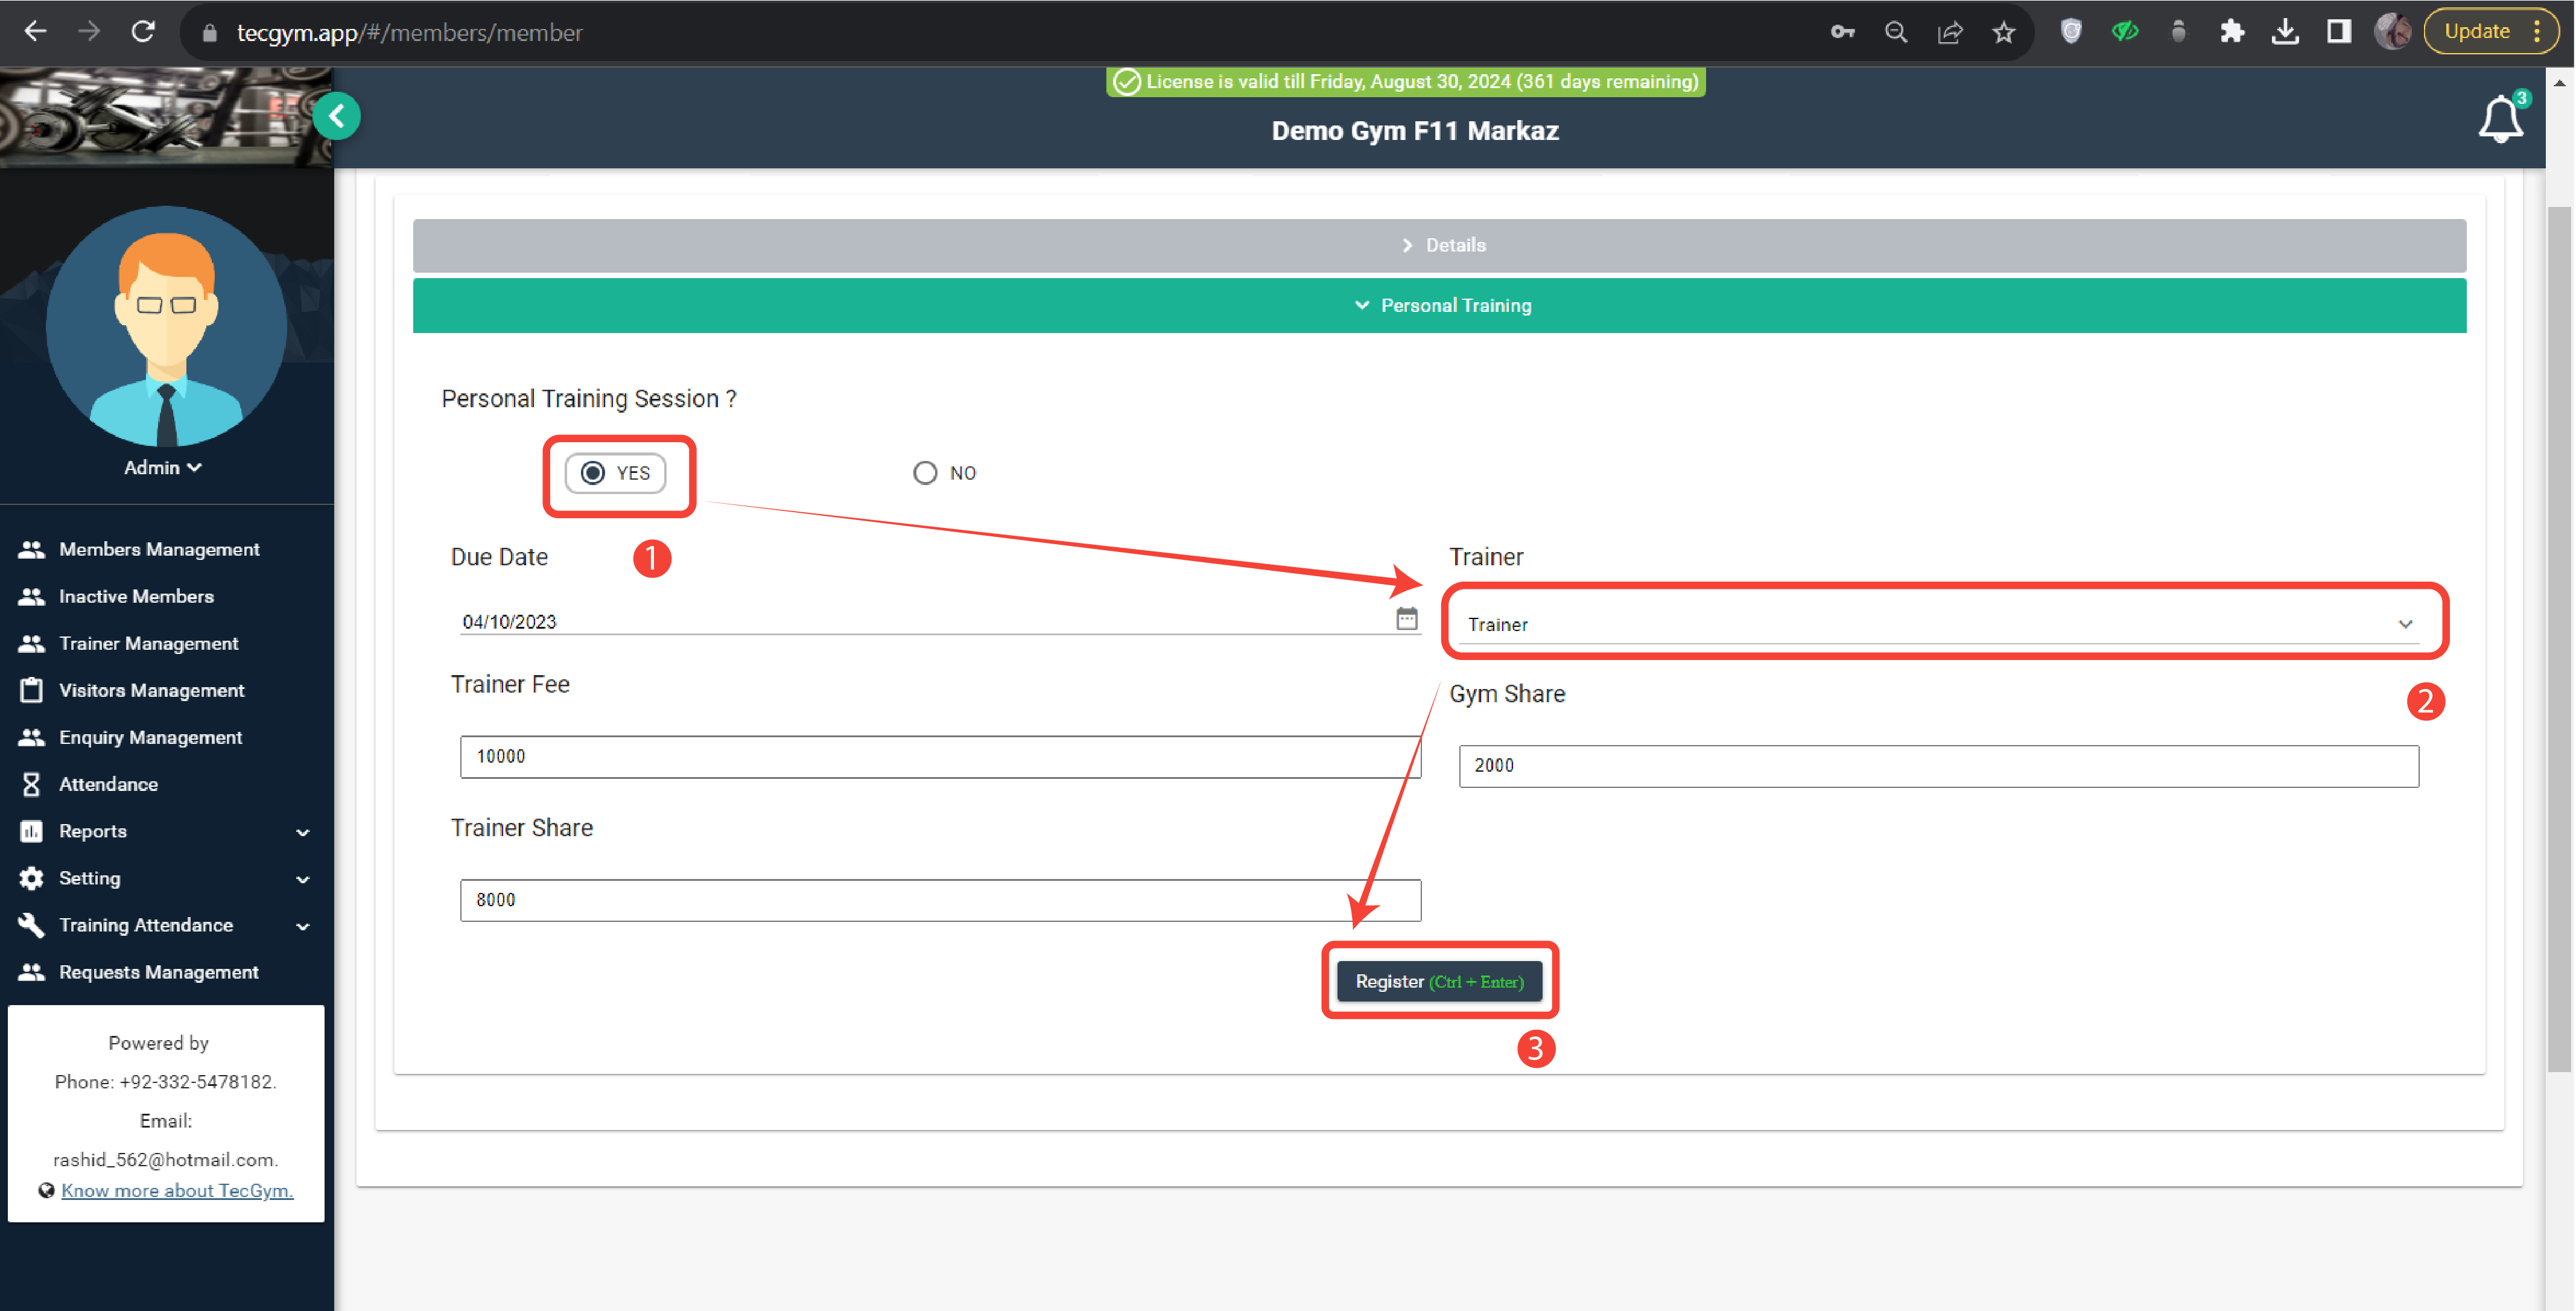
- You'll then have the option to assign a Trainer to the member. Choose Yes if you want to assign a Trainer, otherwise select " No.
- After making your selection, click Register button
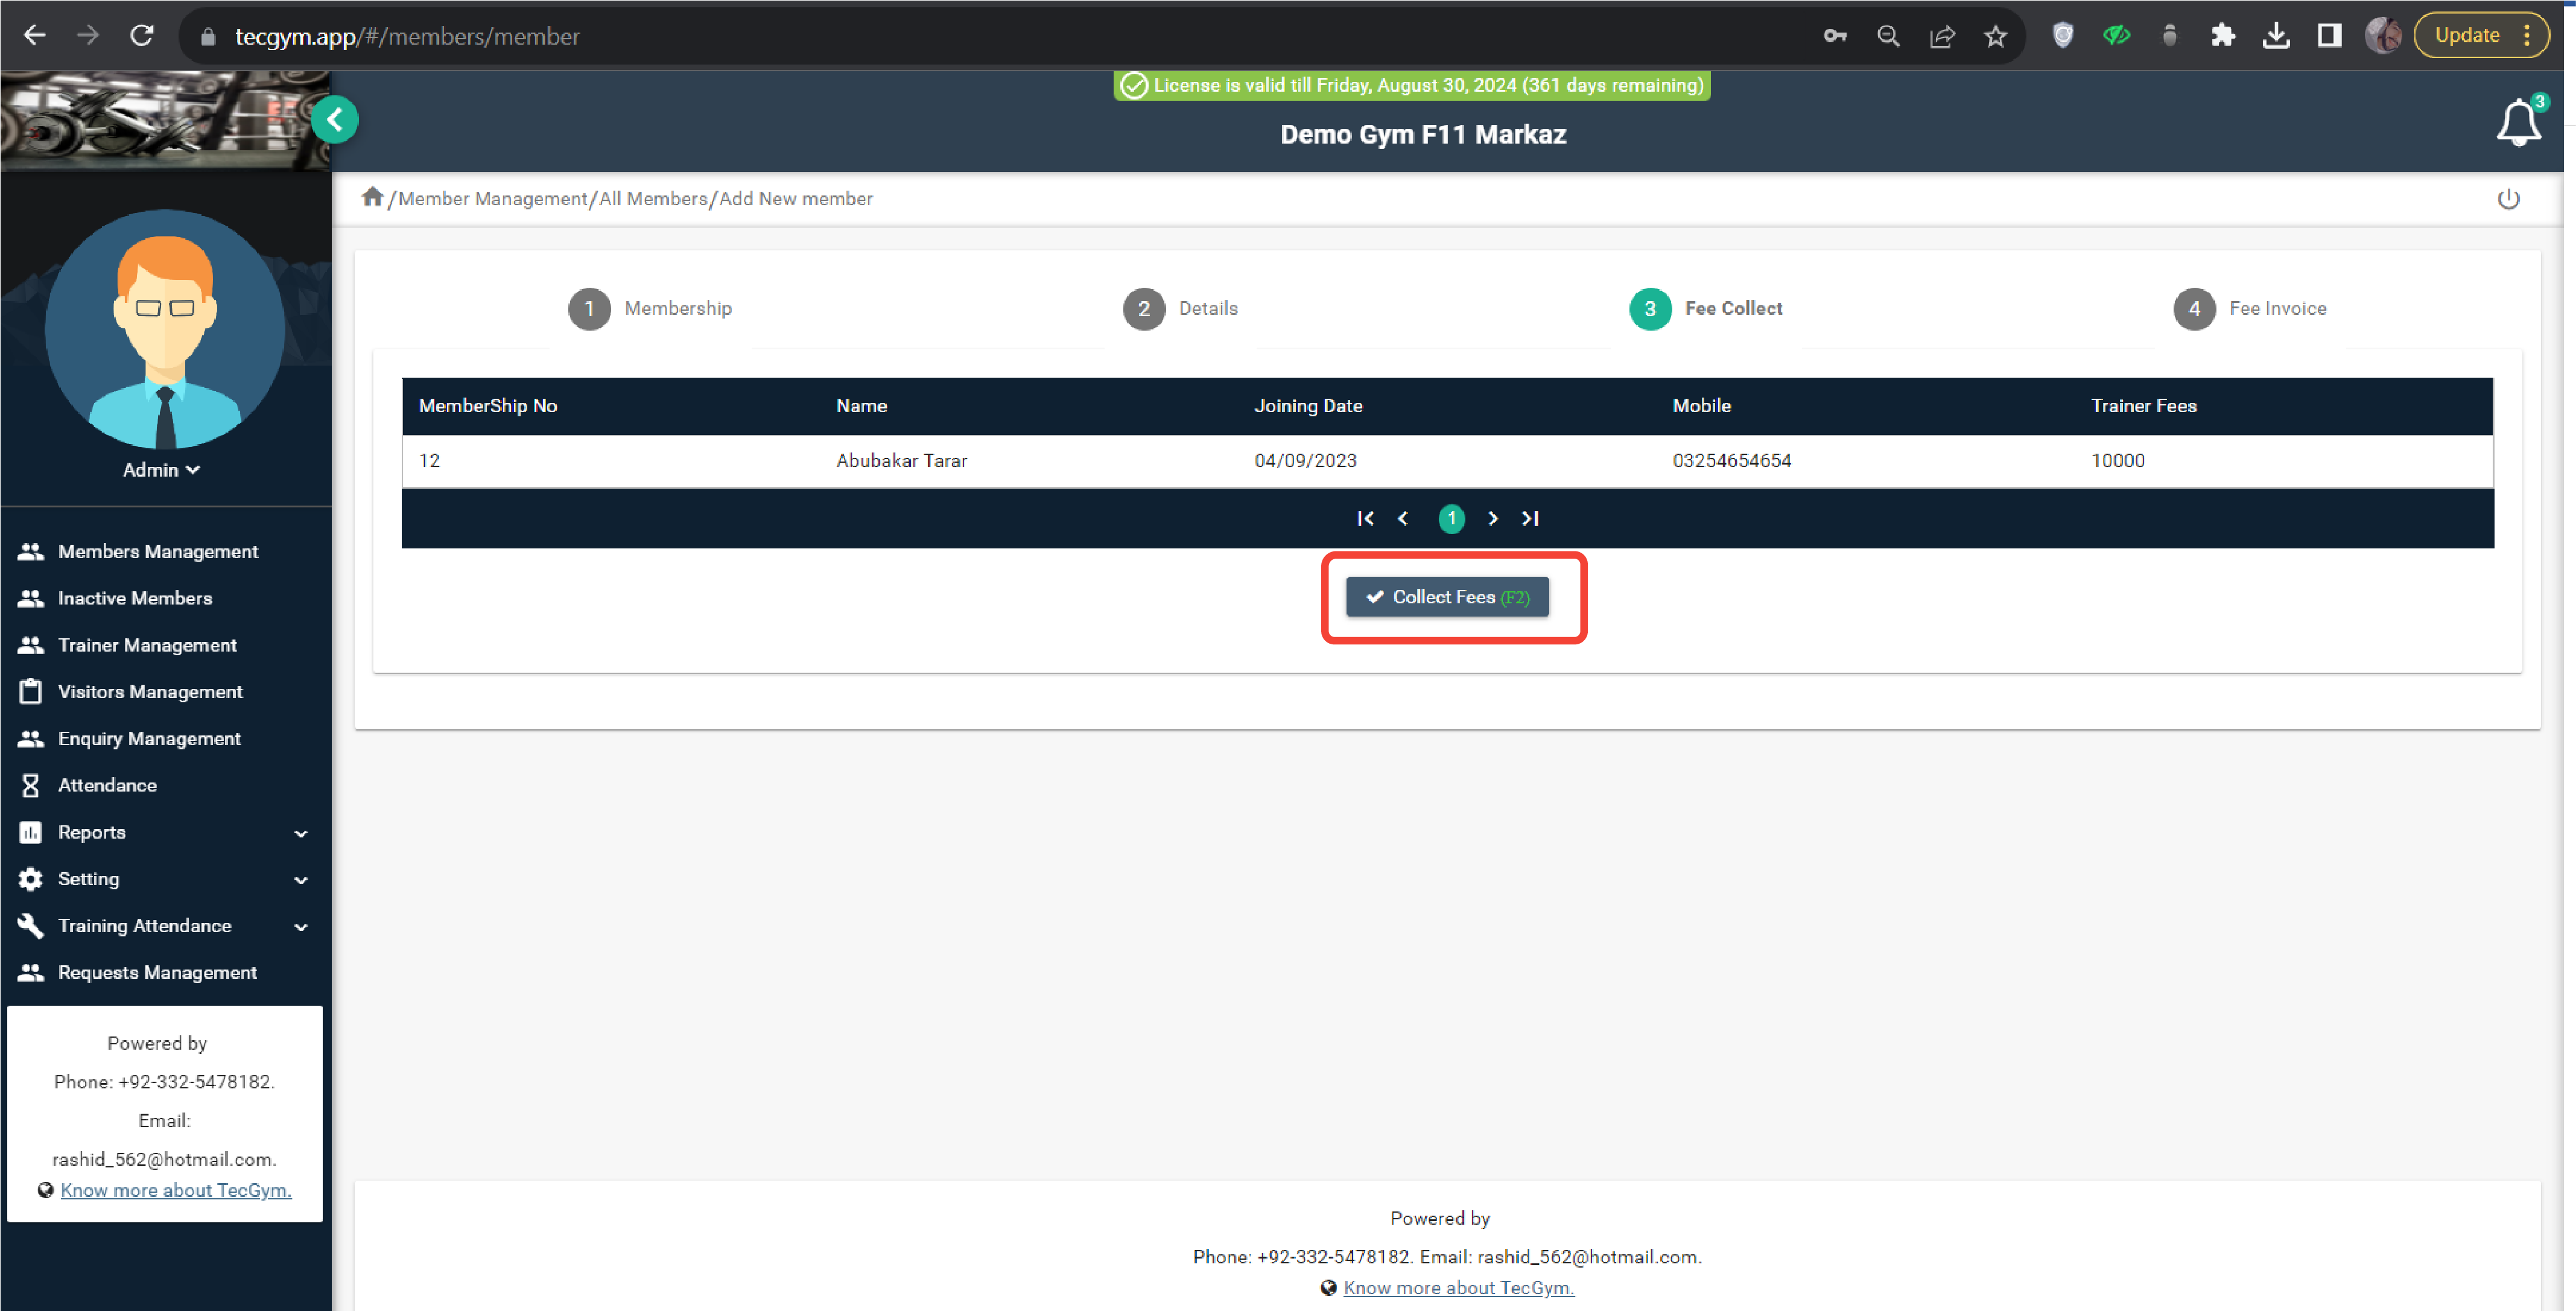
- You will be directed to a screen displaying fees information.
- Click Collect Fees.
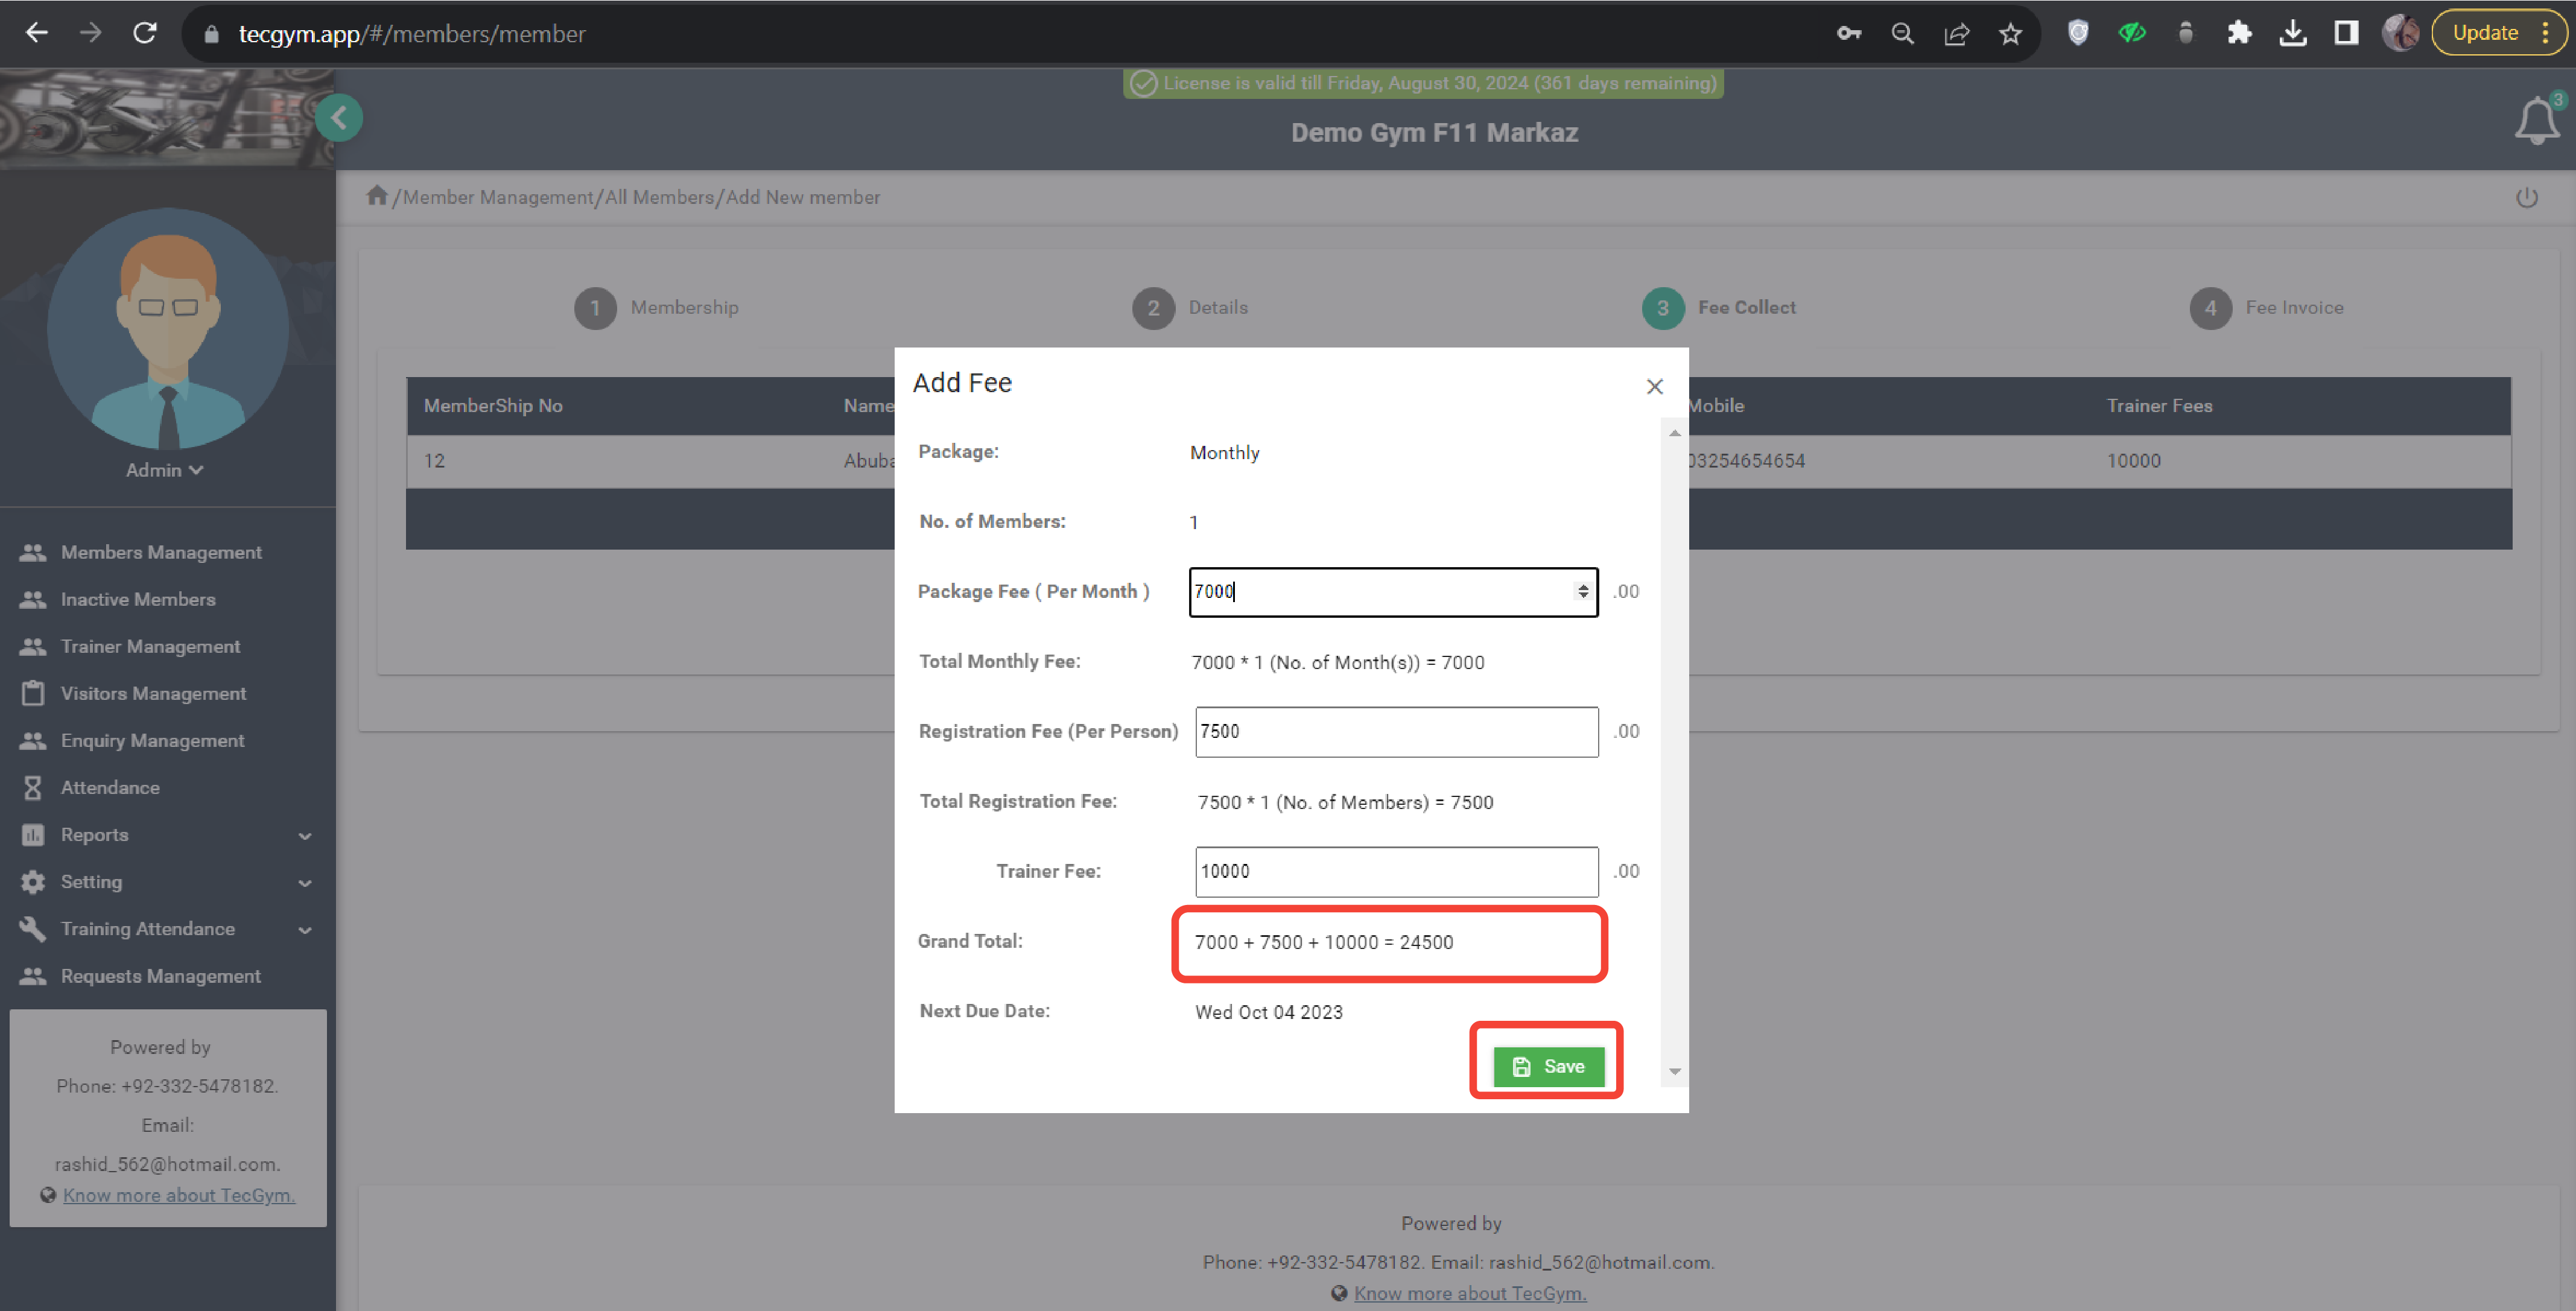
- A pop-up window will appear which has all the information about fees that you need to collect from customer, as shown in the screenshot (f).
- Click Save.
- Congratulations, your new member is now successfully registered.
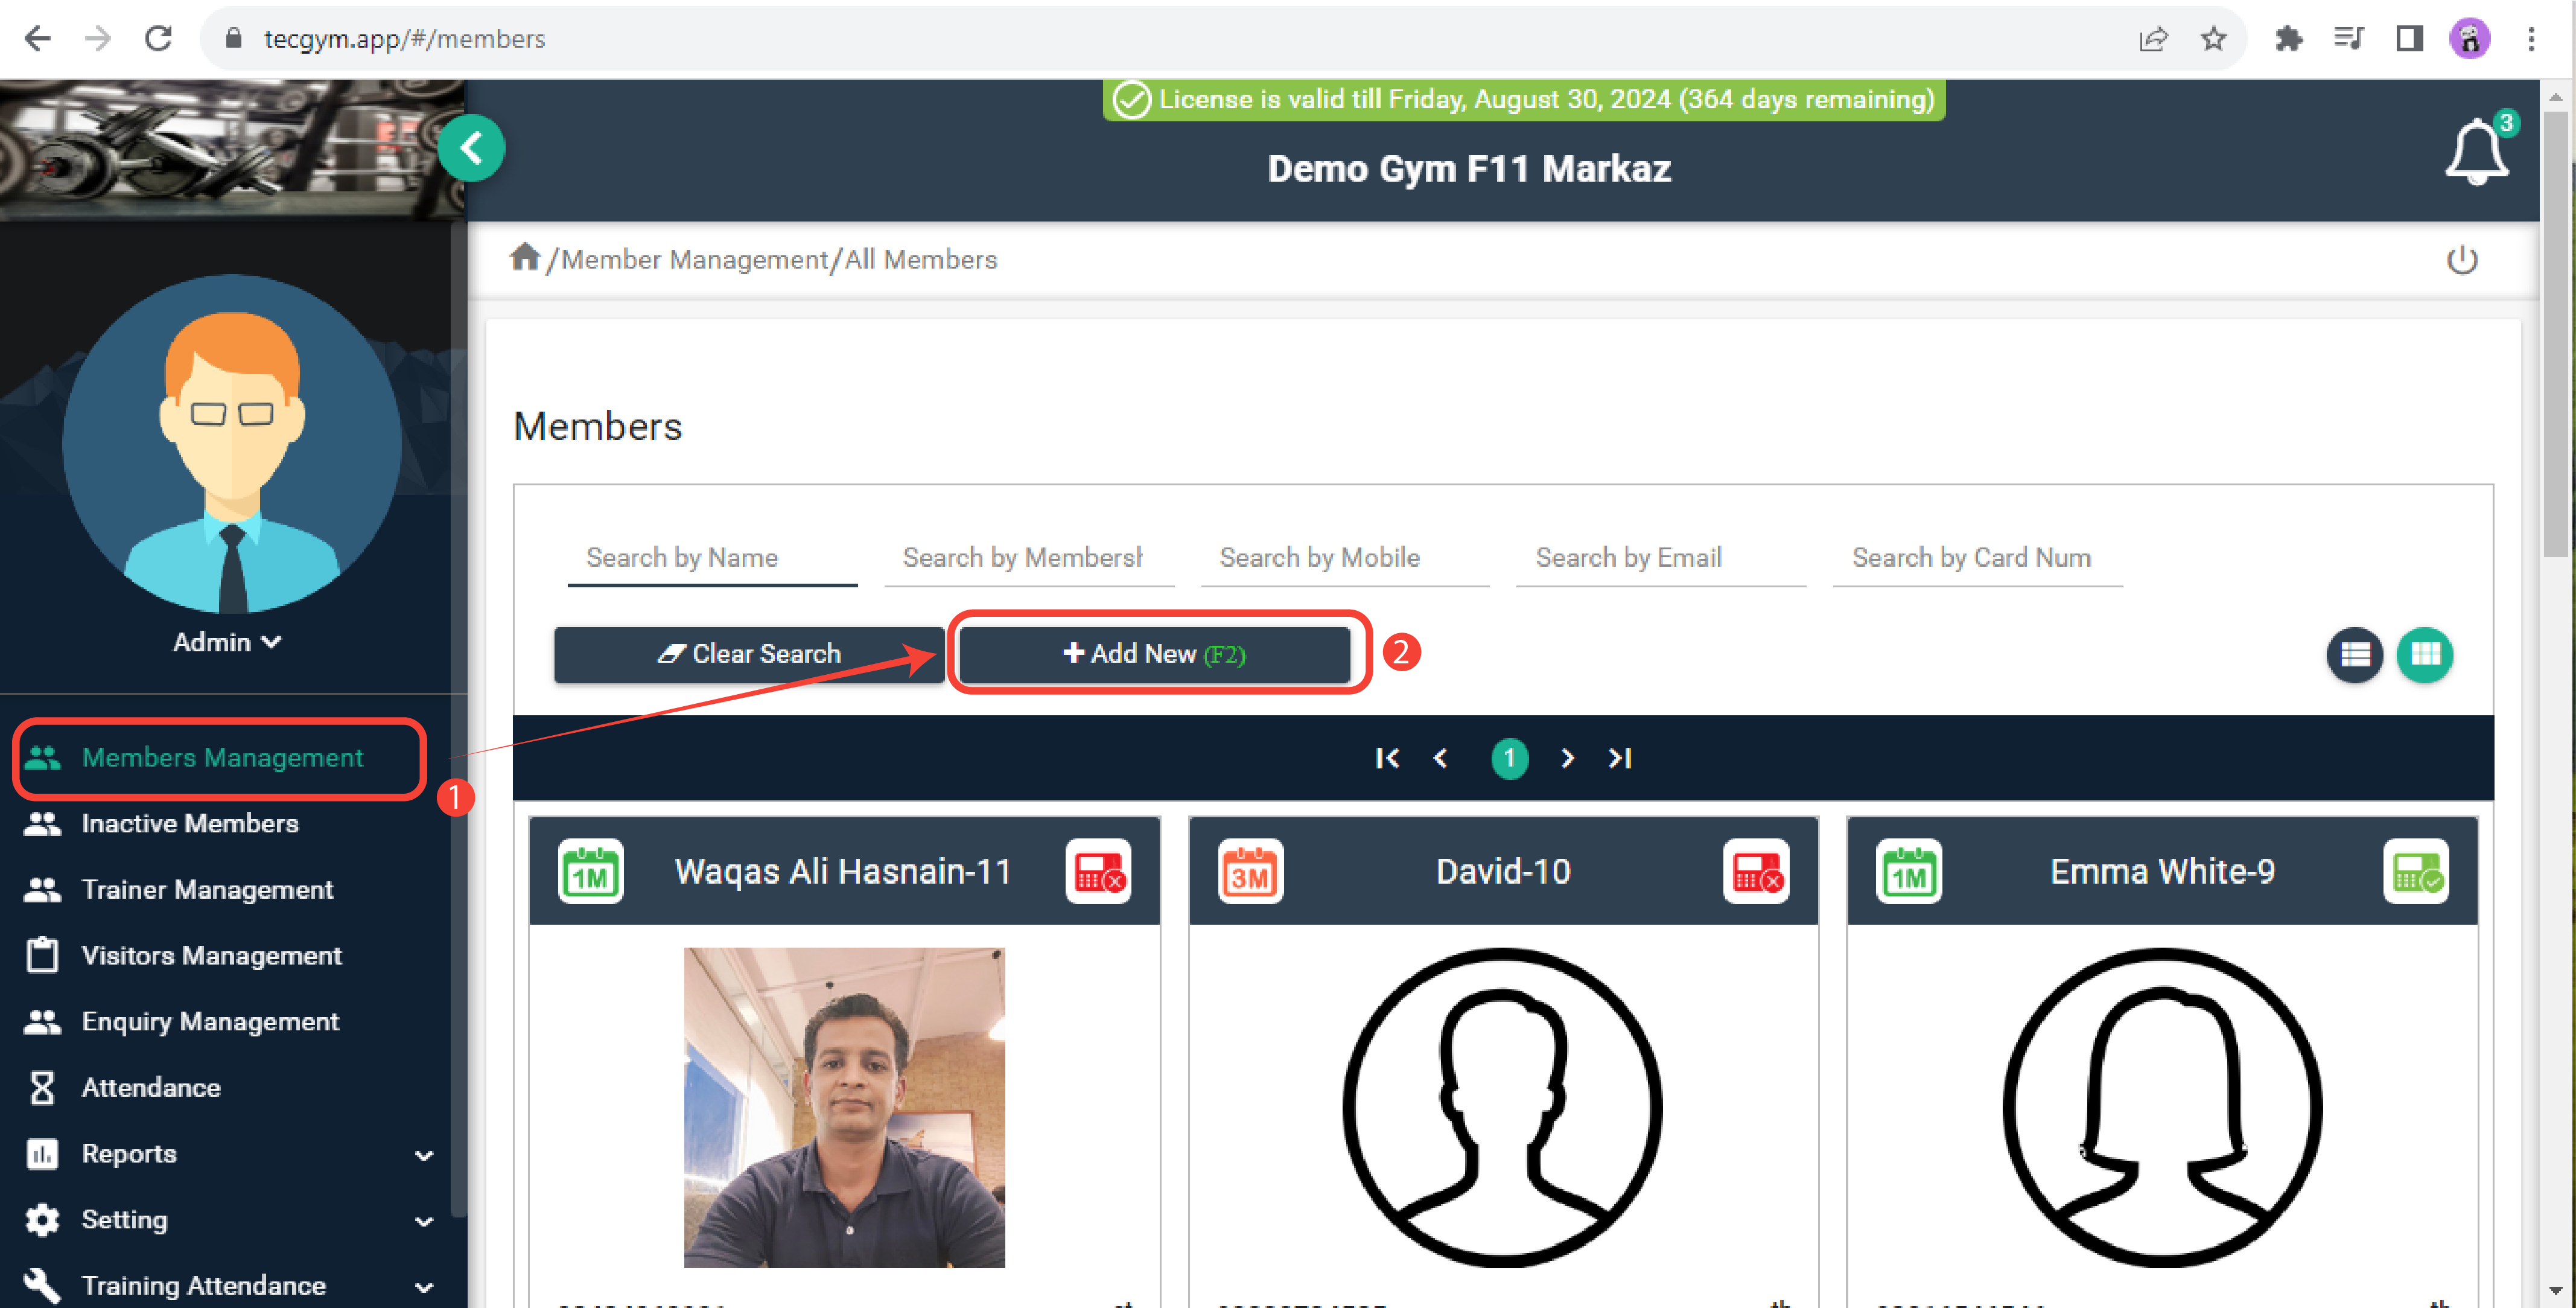
(a) Add New
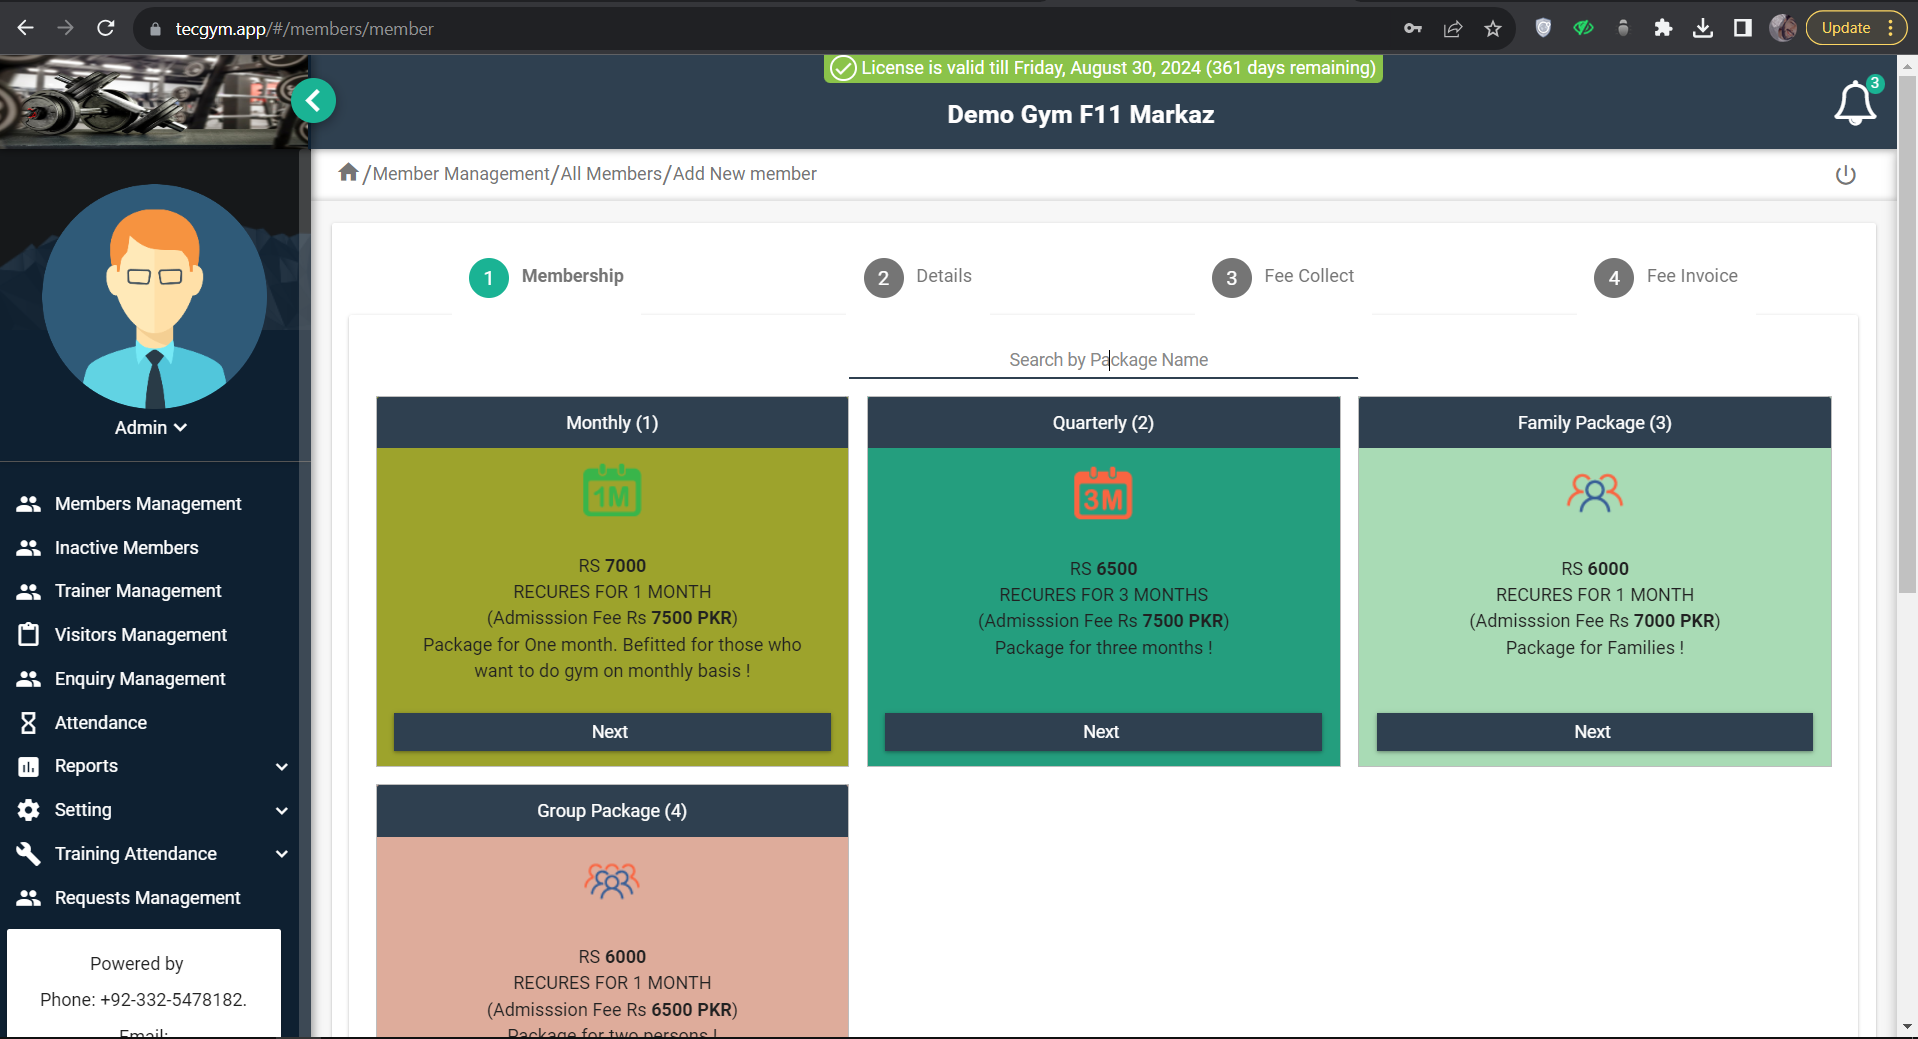
(b) Select Package
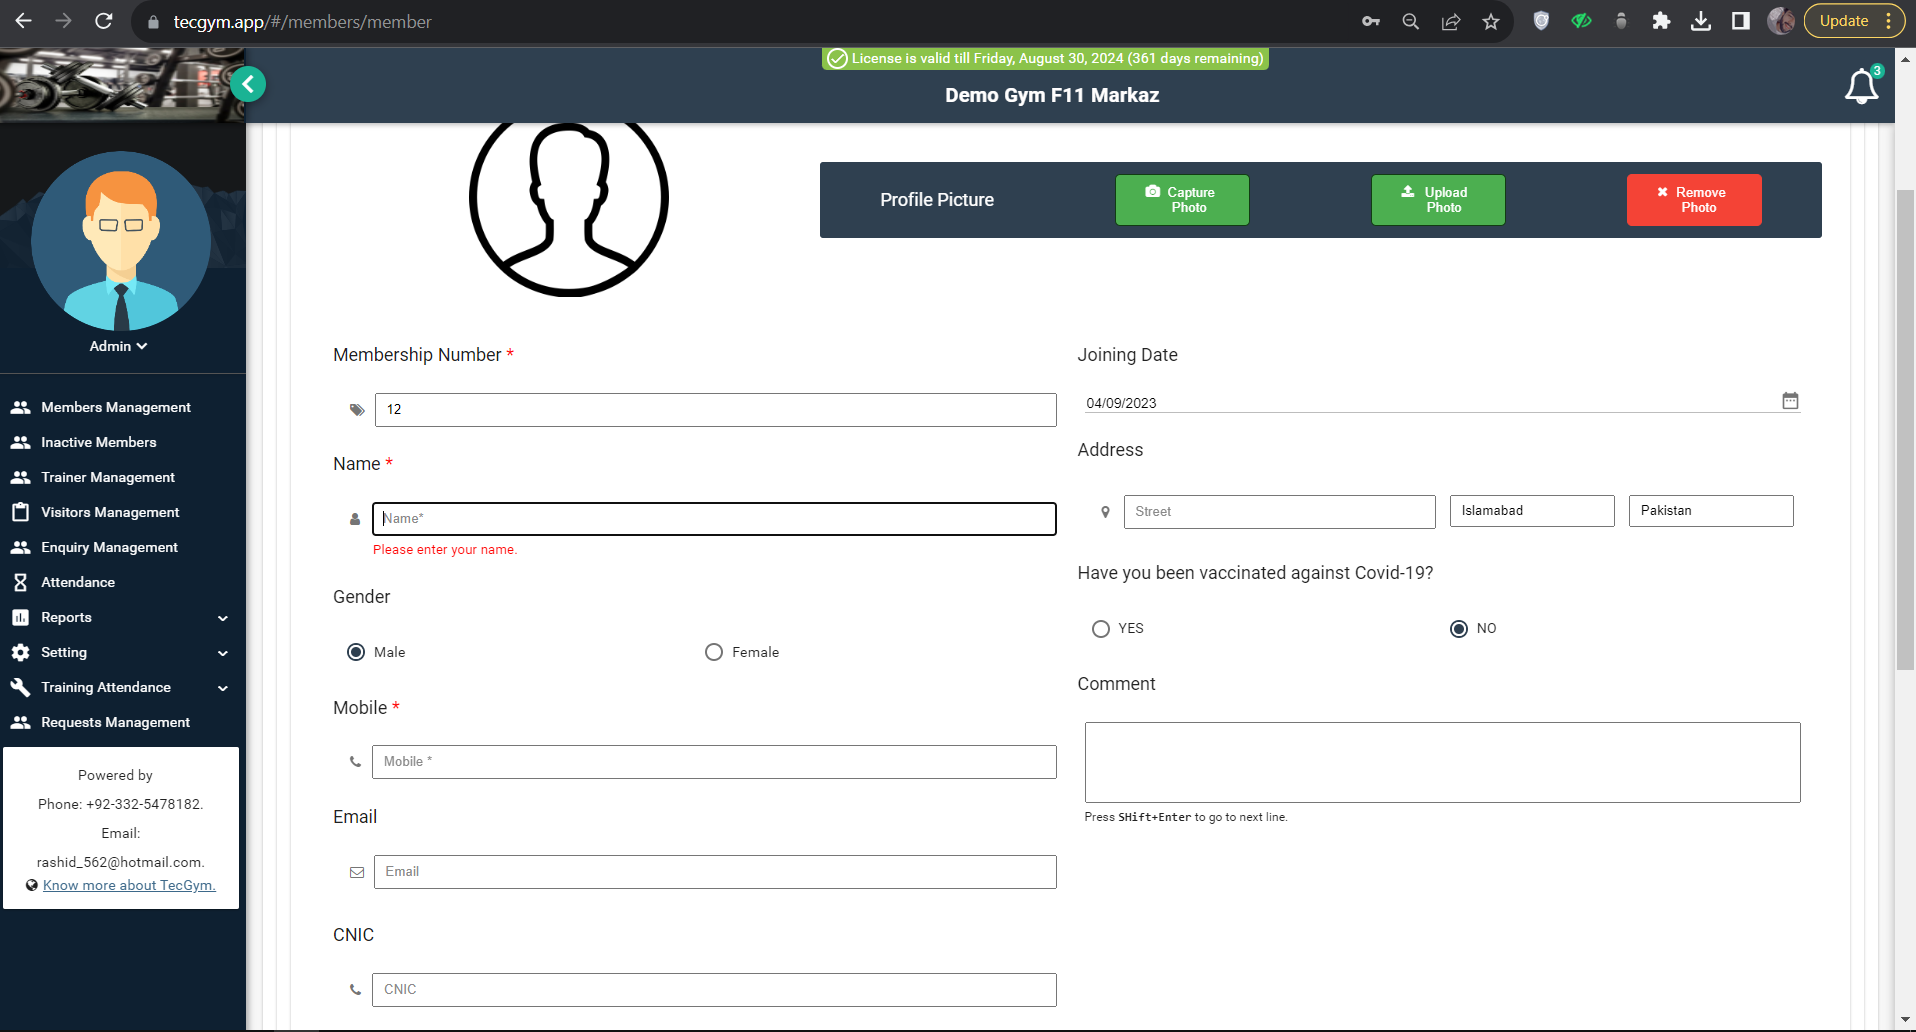
(c) Member's Details
(d) Select Trainer
(e) Collect Fees
(f) Screenshot
You should follow the below steps:
- In the New Member wizard, click on the Capture Photo option, as shown in the screenshot (a).
- A notification popup will appear as shown in screenshot (b), proceed by clicking the Allow button.
- Select the Take Picture option as shown in screenshot (c).
- Click on Crop Picture as illustrated in screenshot (d).
- Choose the Upload Picture as shown in screenshot (e).
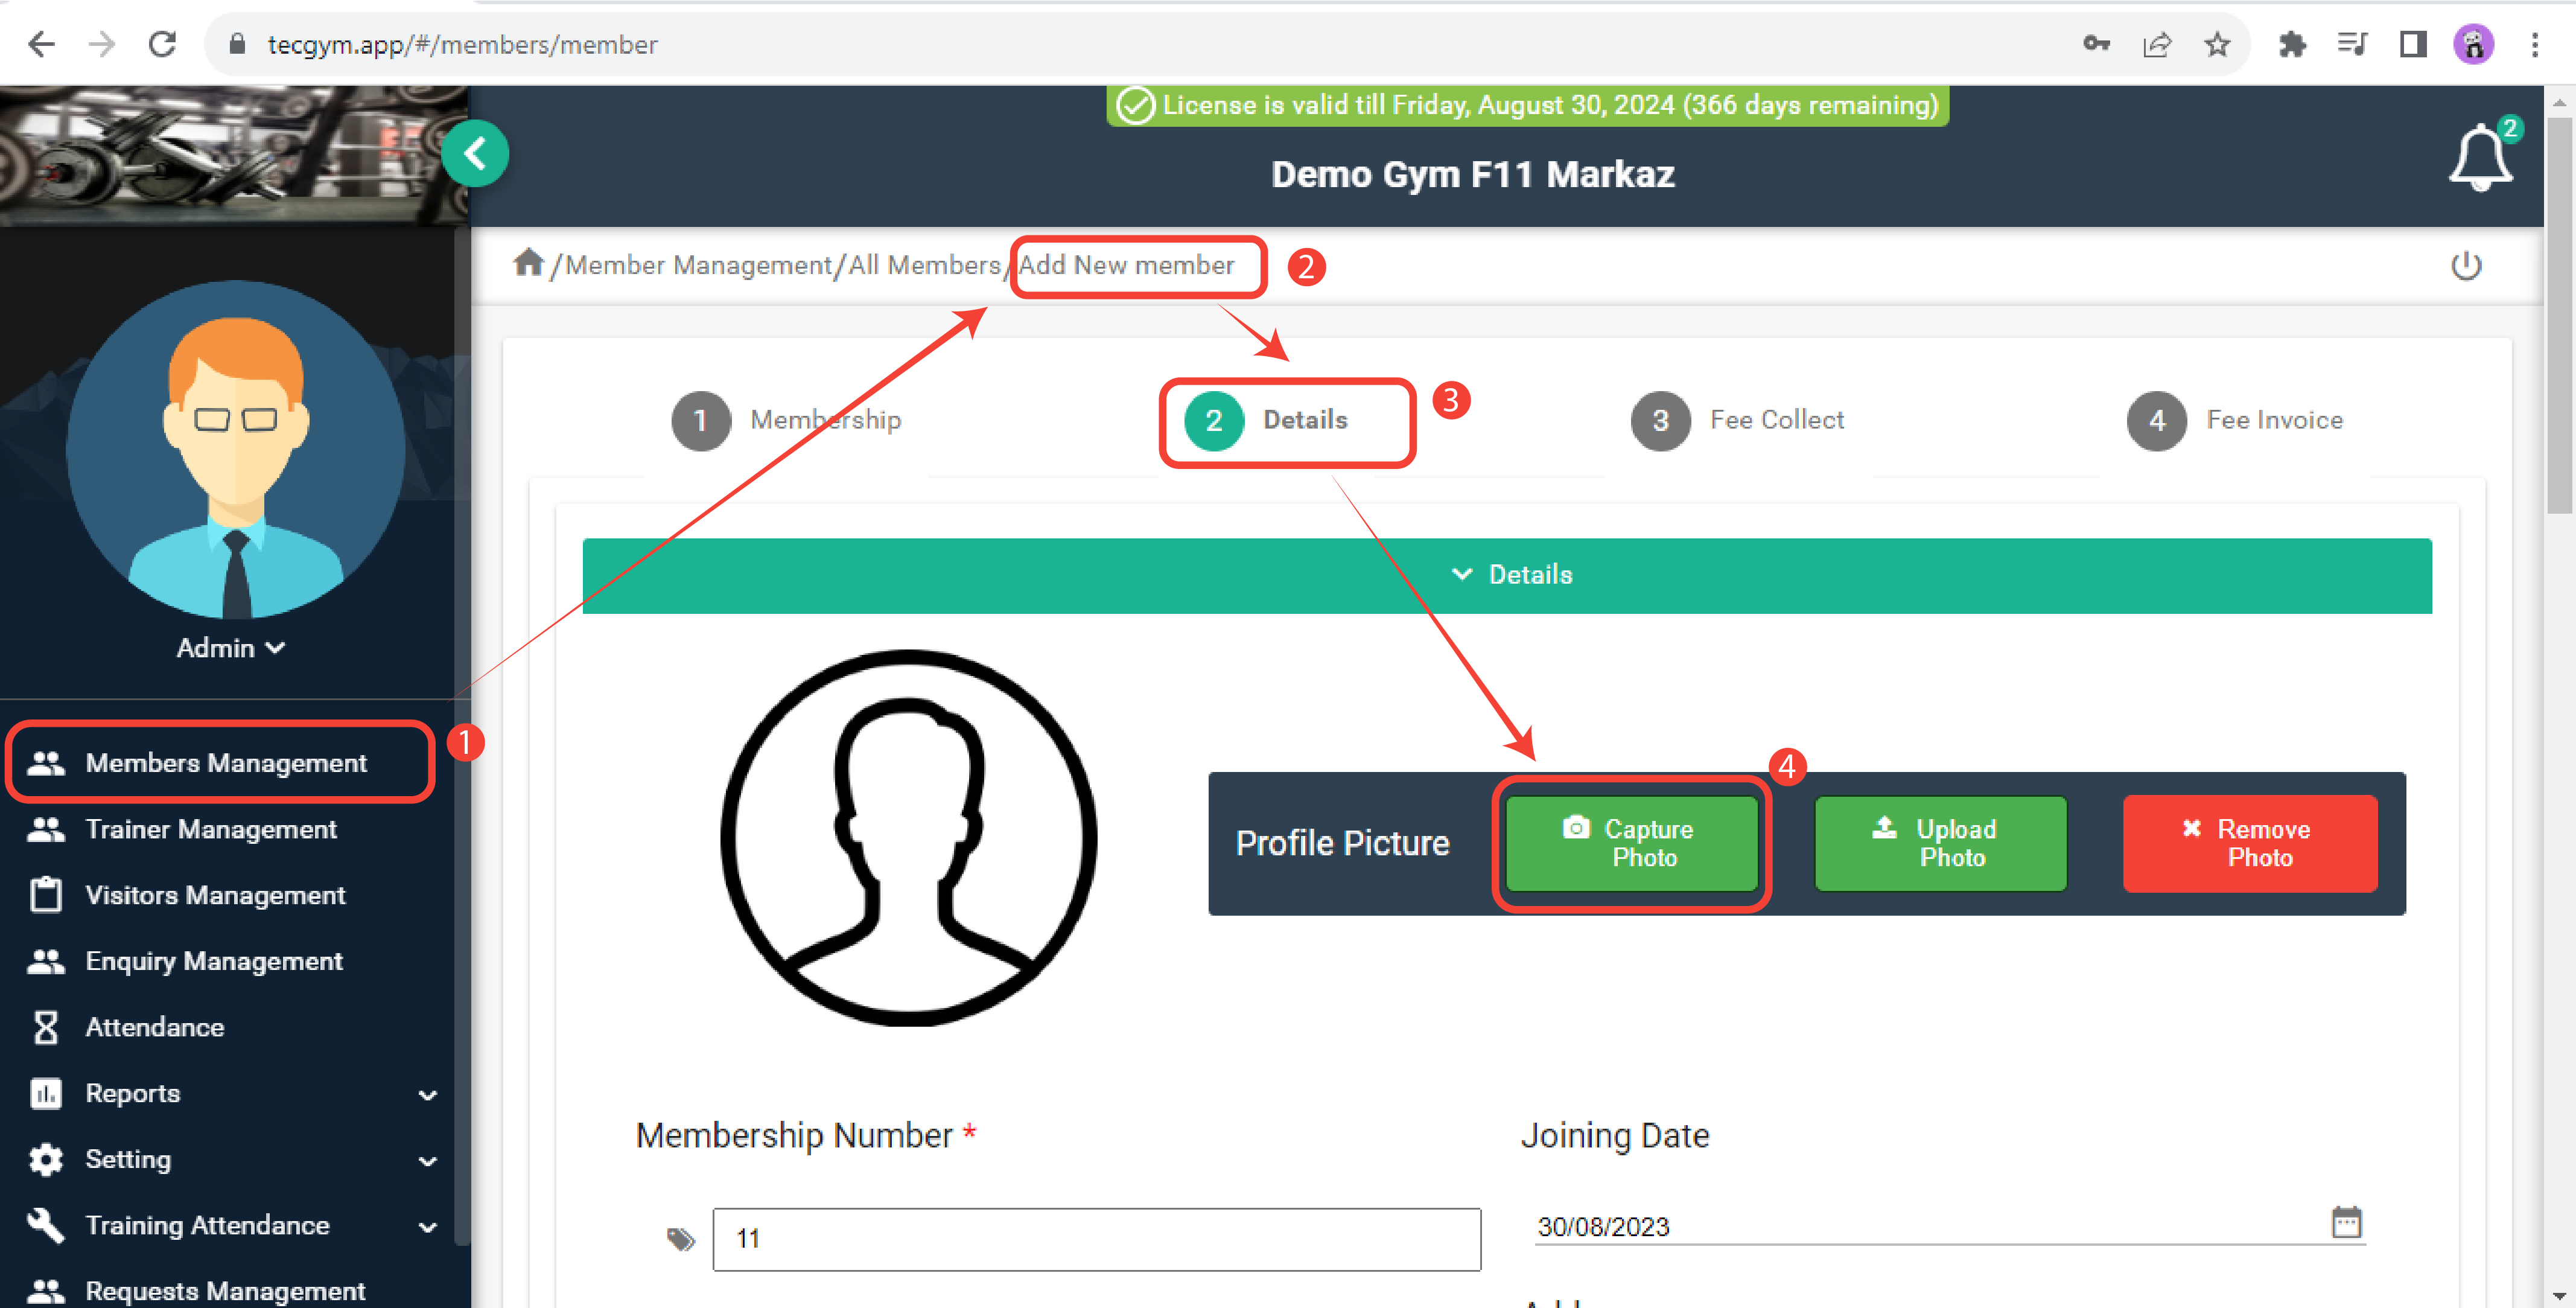
(a) Capture Photo
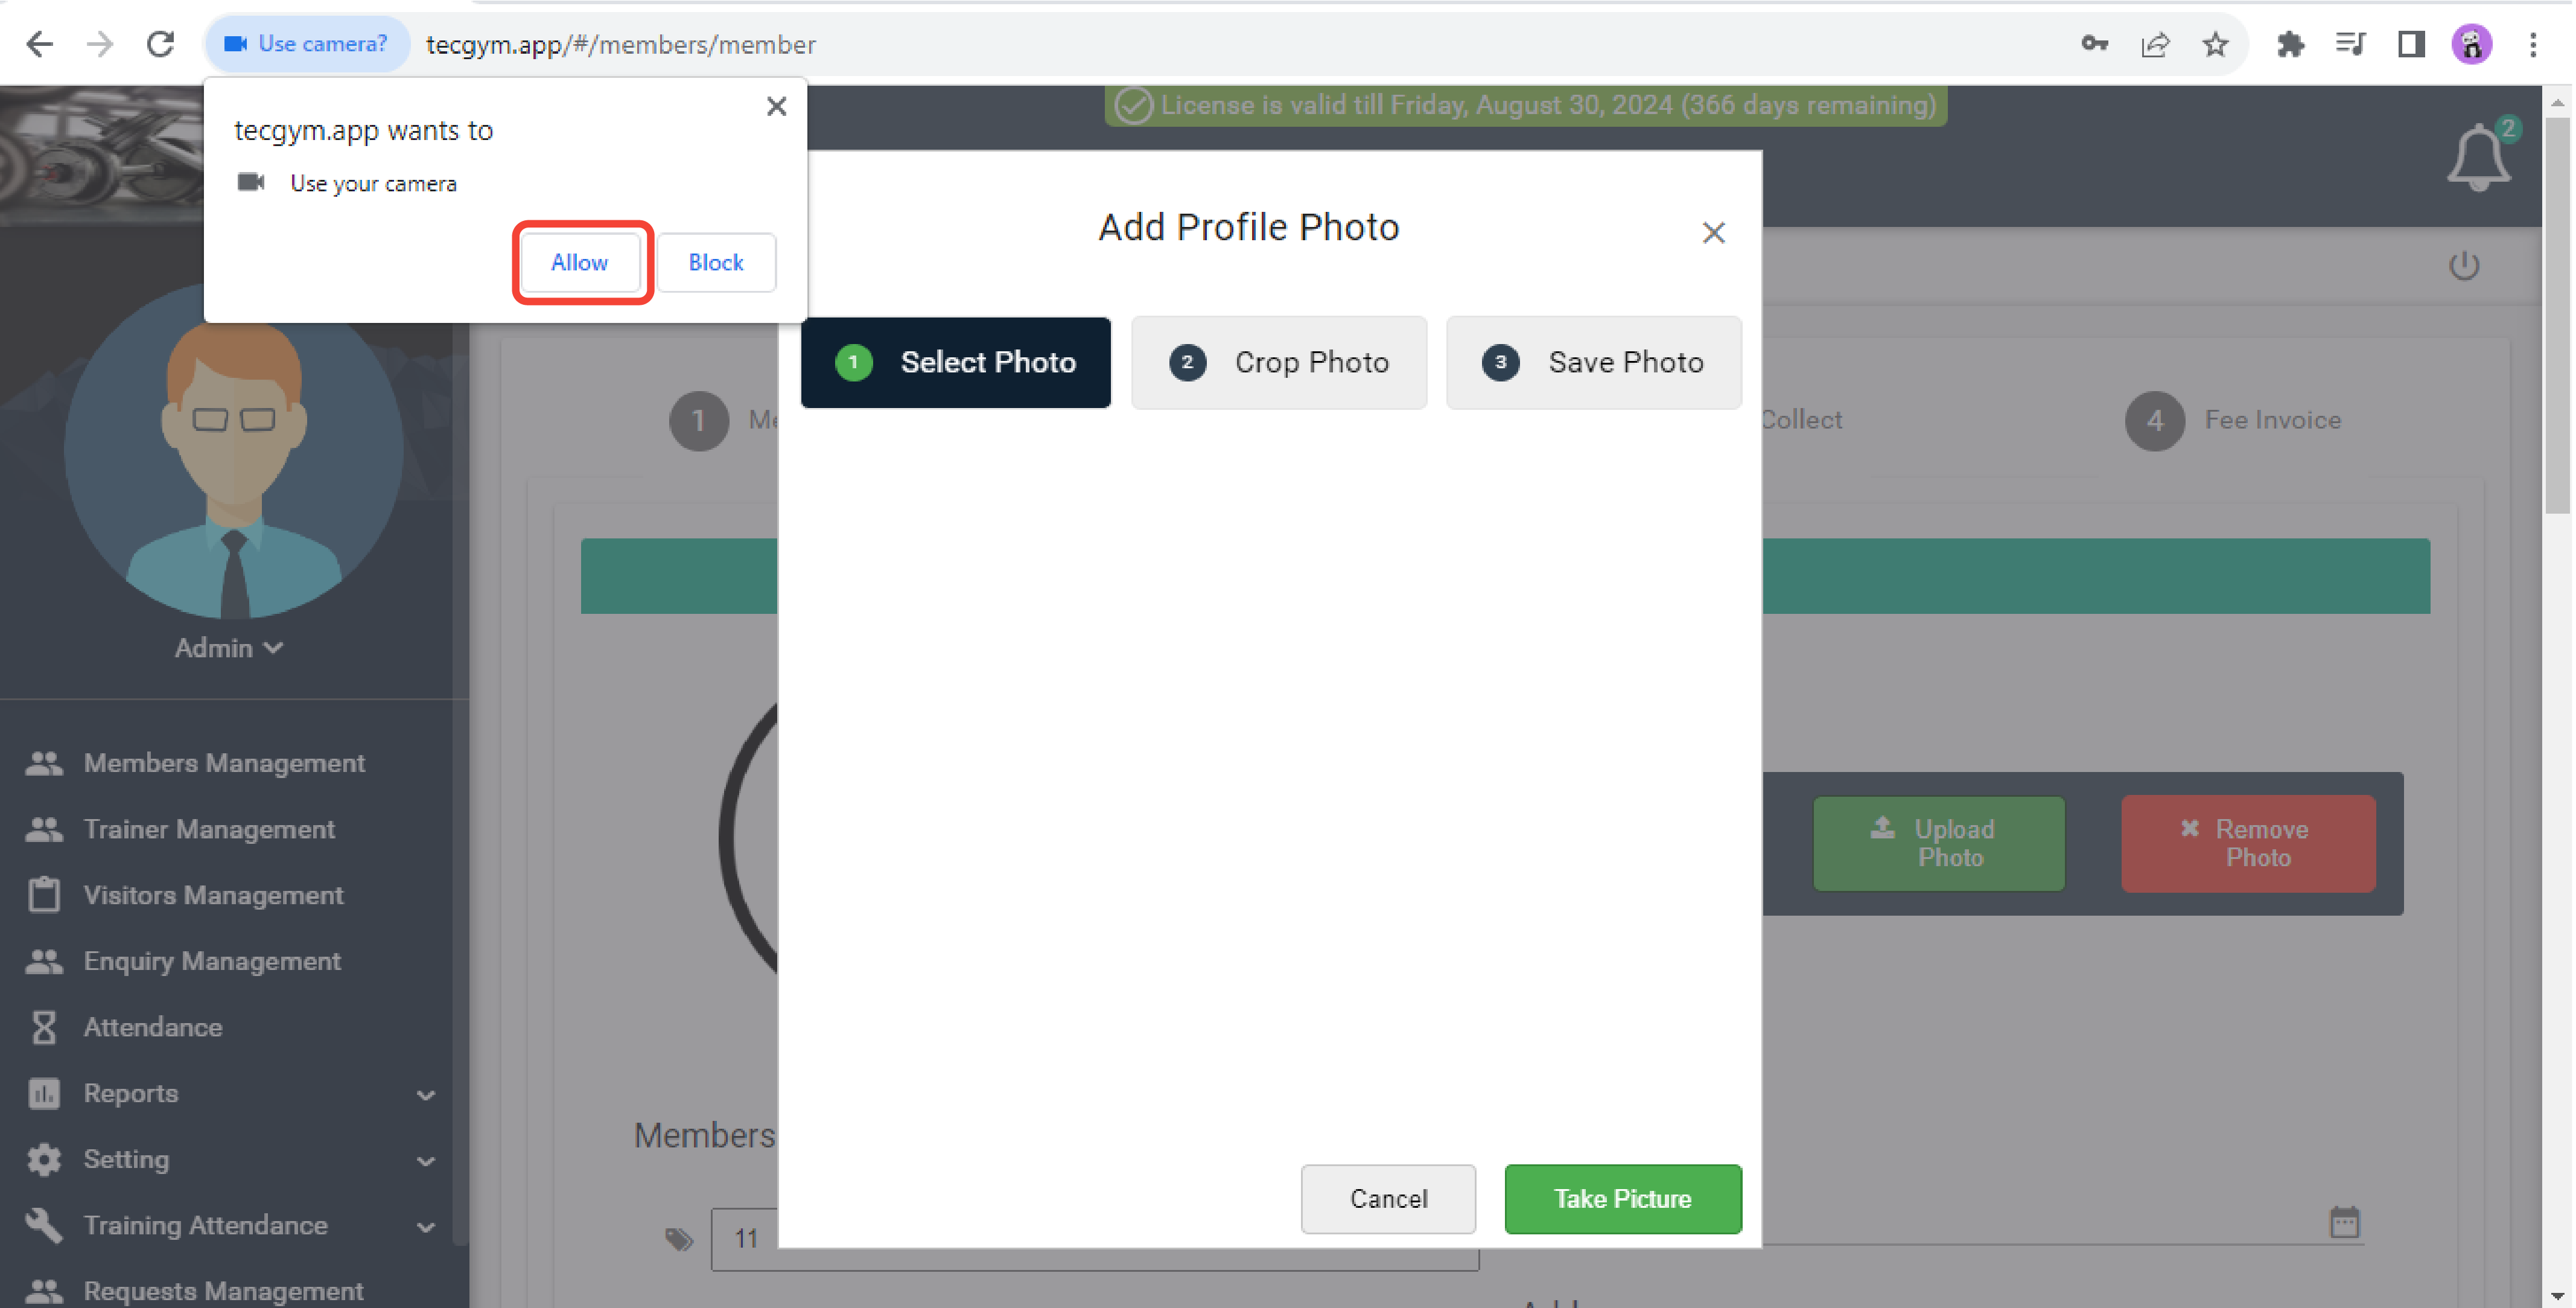
(b) Notification

(c) Take Picture
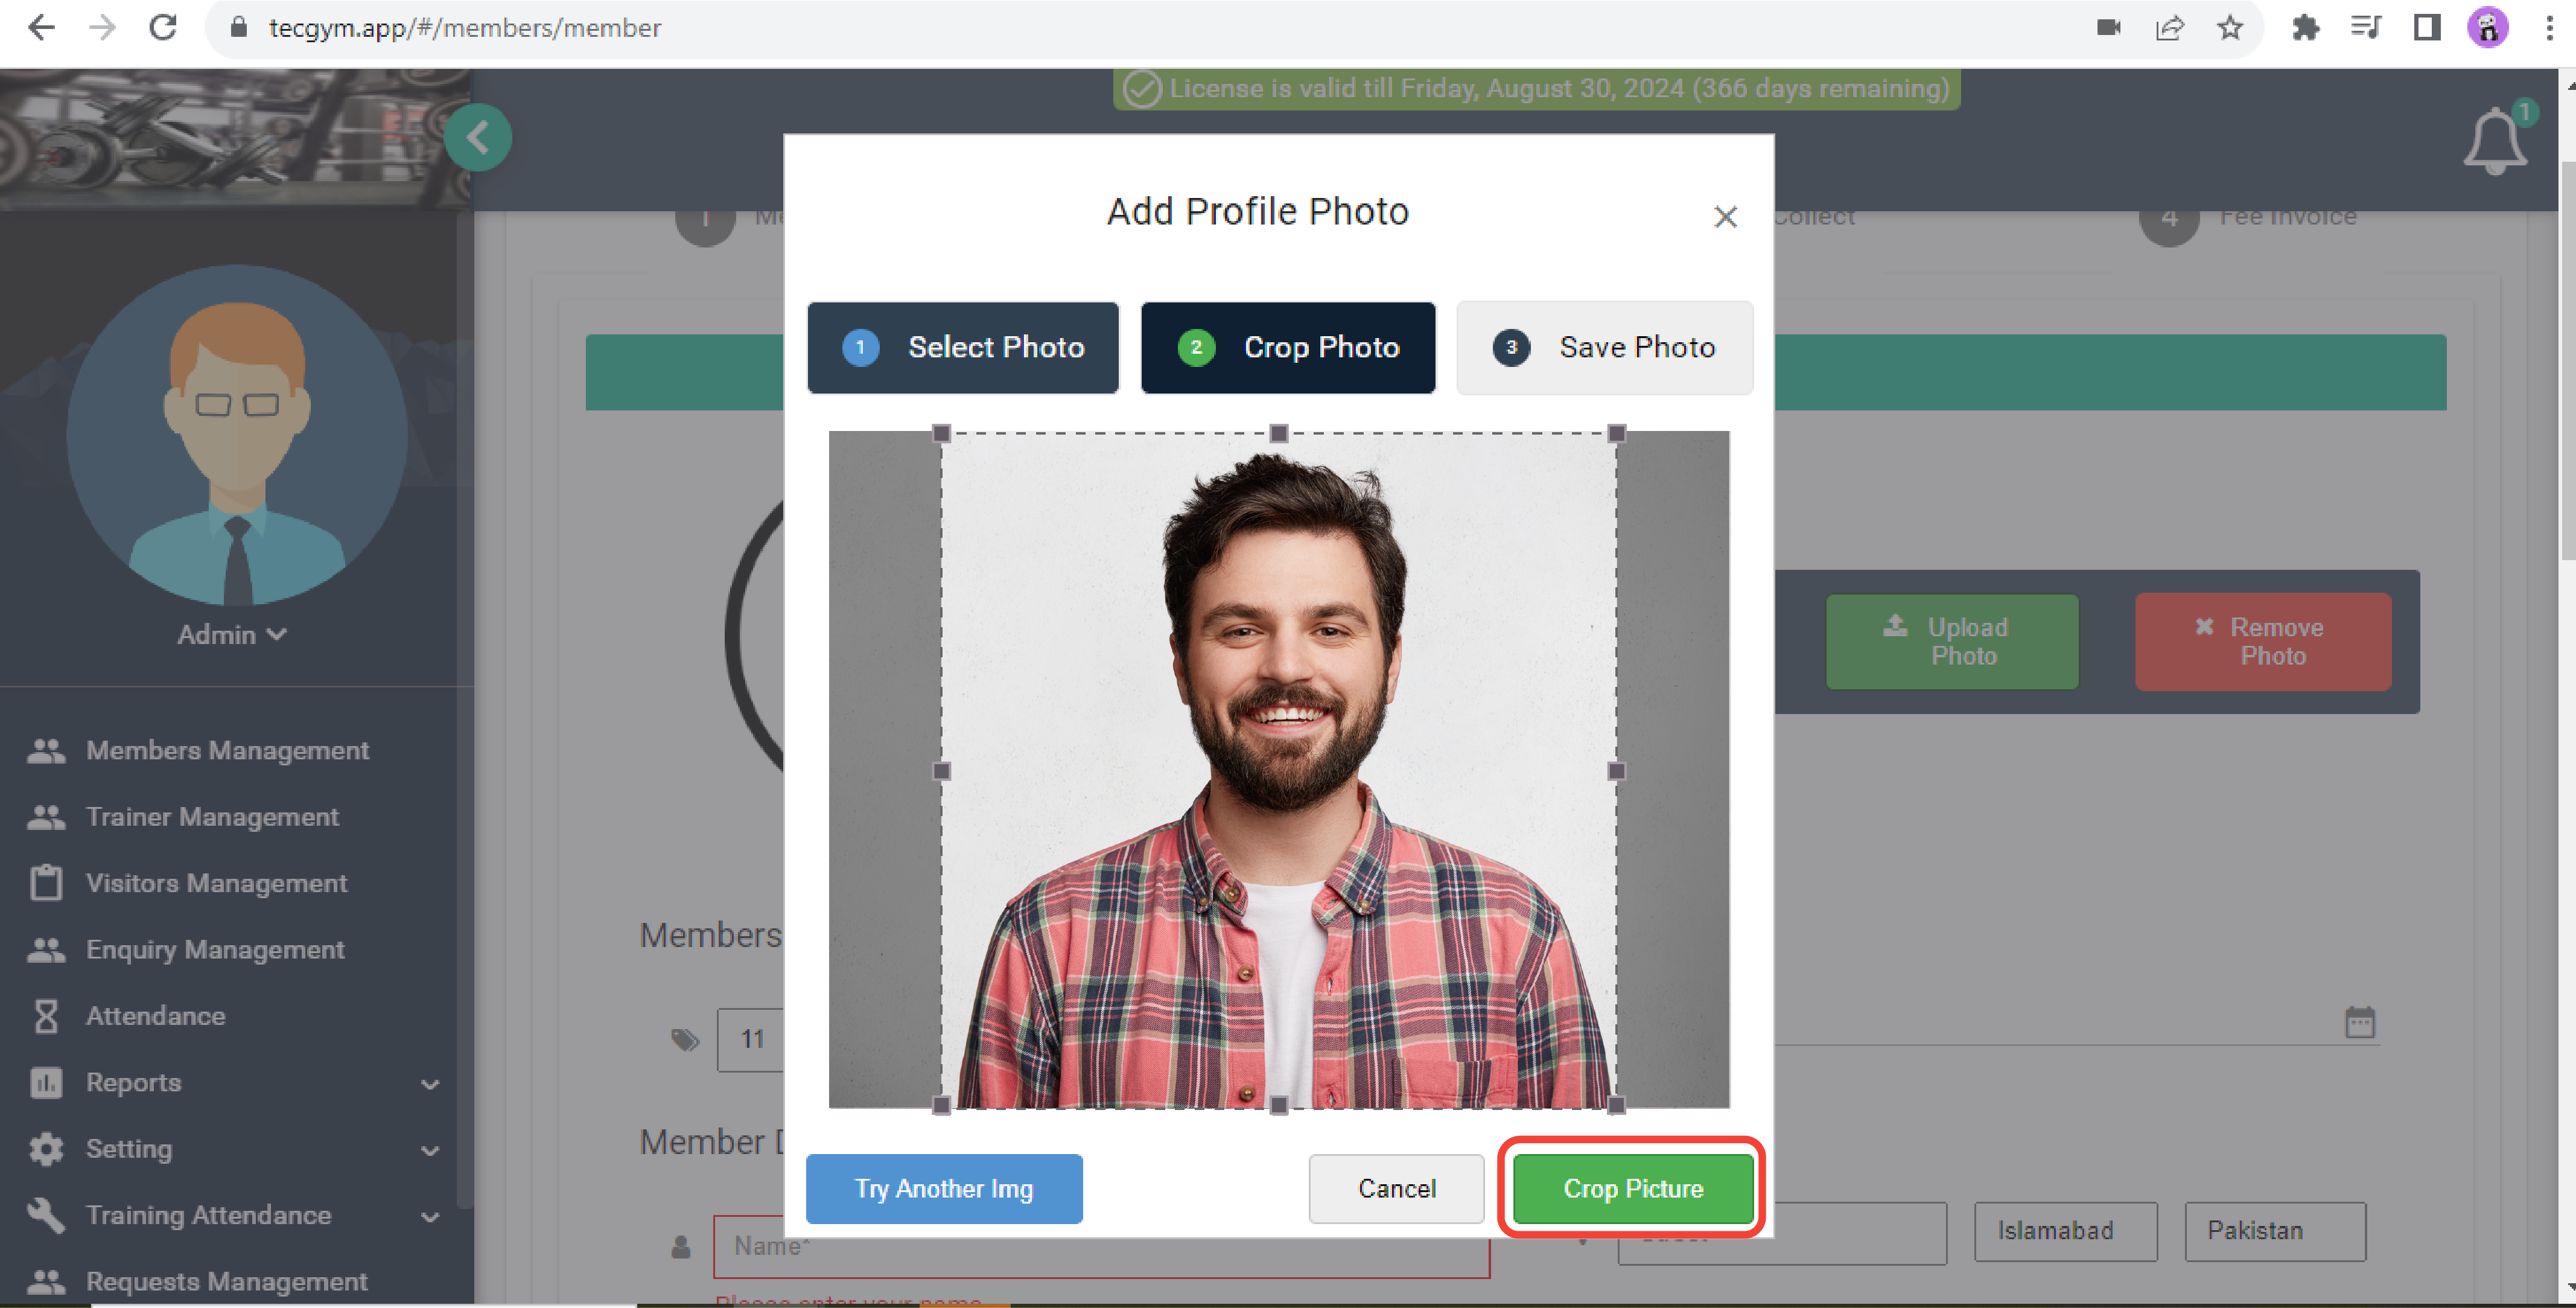
(d) Crop Picture
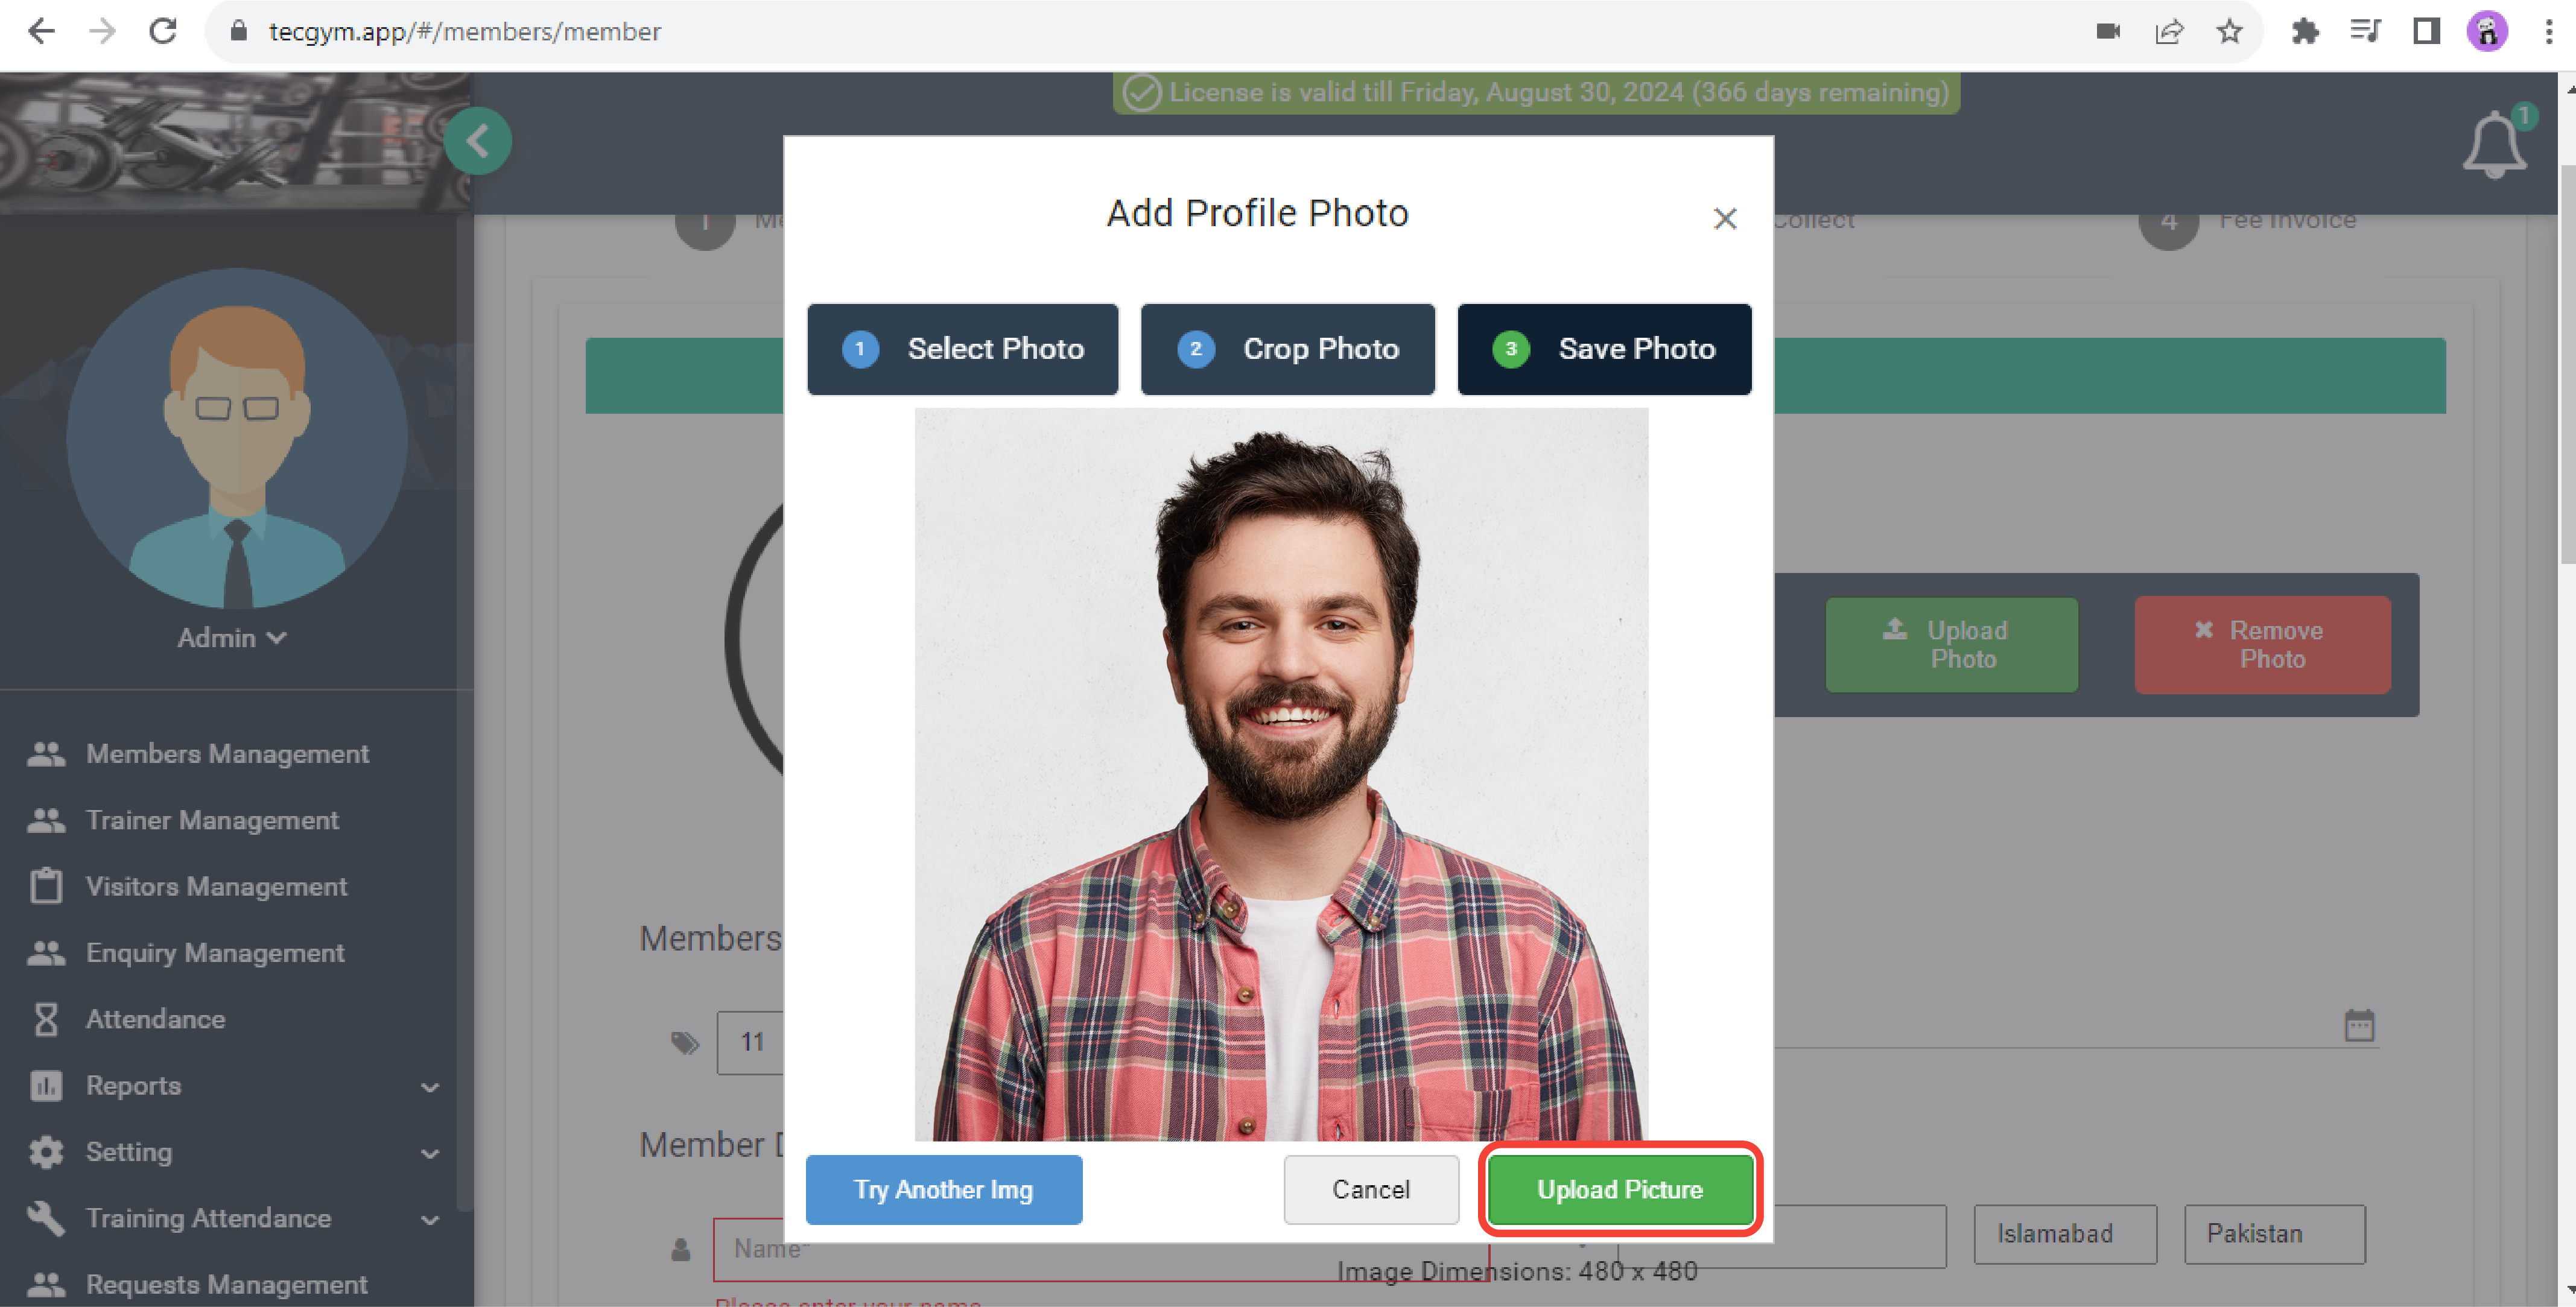
(e) Upload Picture
If you are facing any problem, please contact the support team for further assistance.
Click here to watch the video explanation.Please follow the steps outlined below:
- In the New Member wizard, select the Upload Photo option, as shown in screenshot (a)
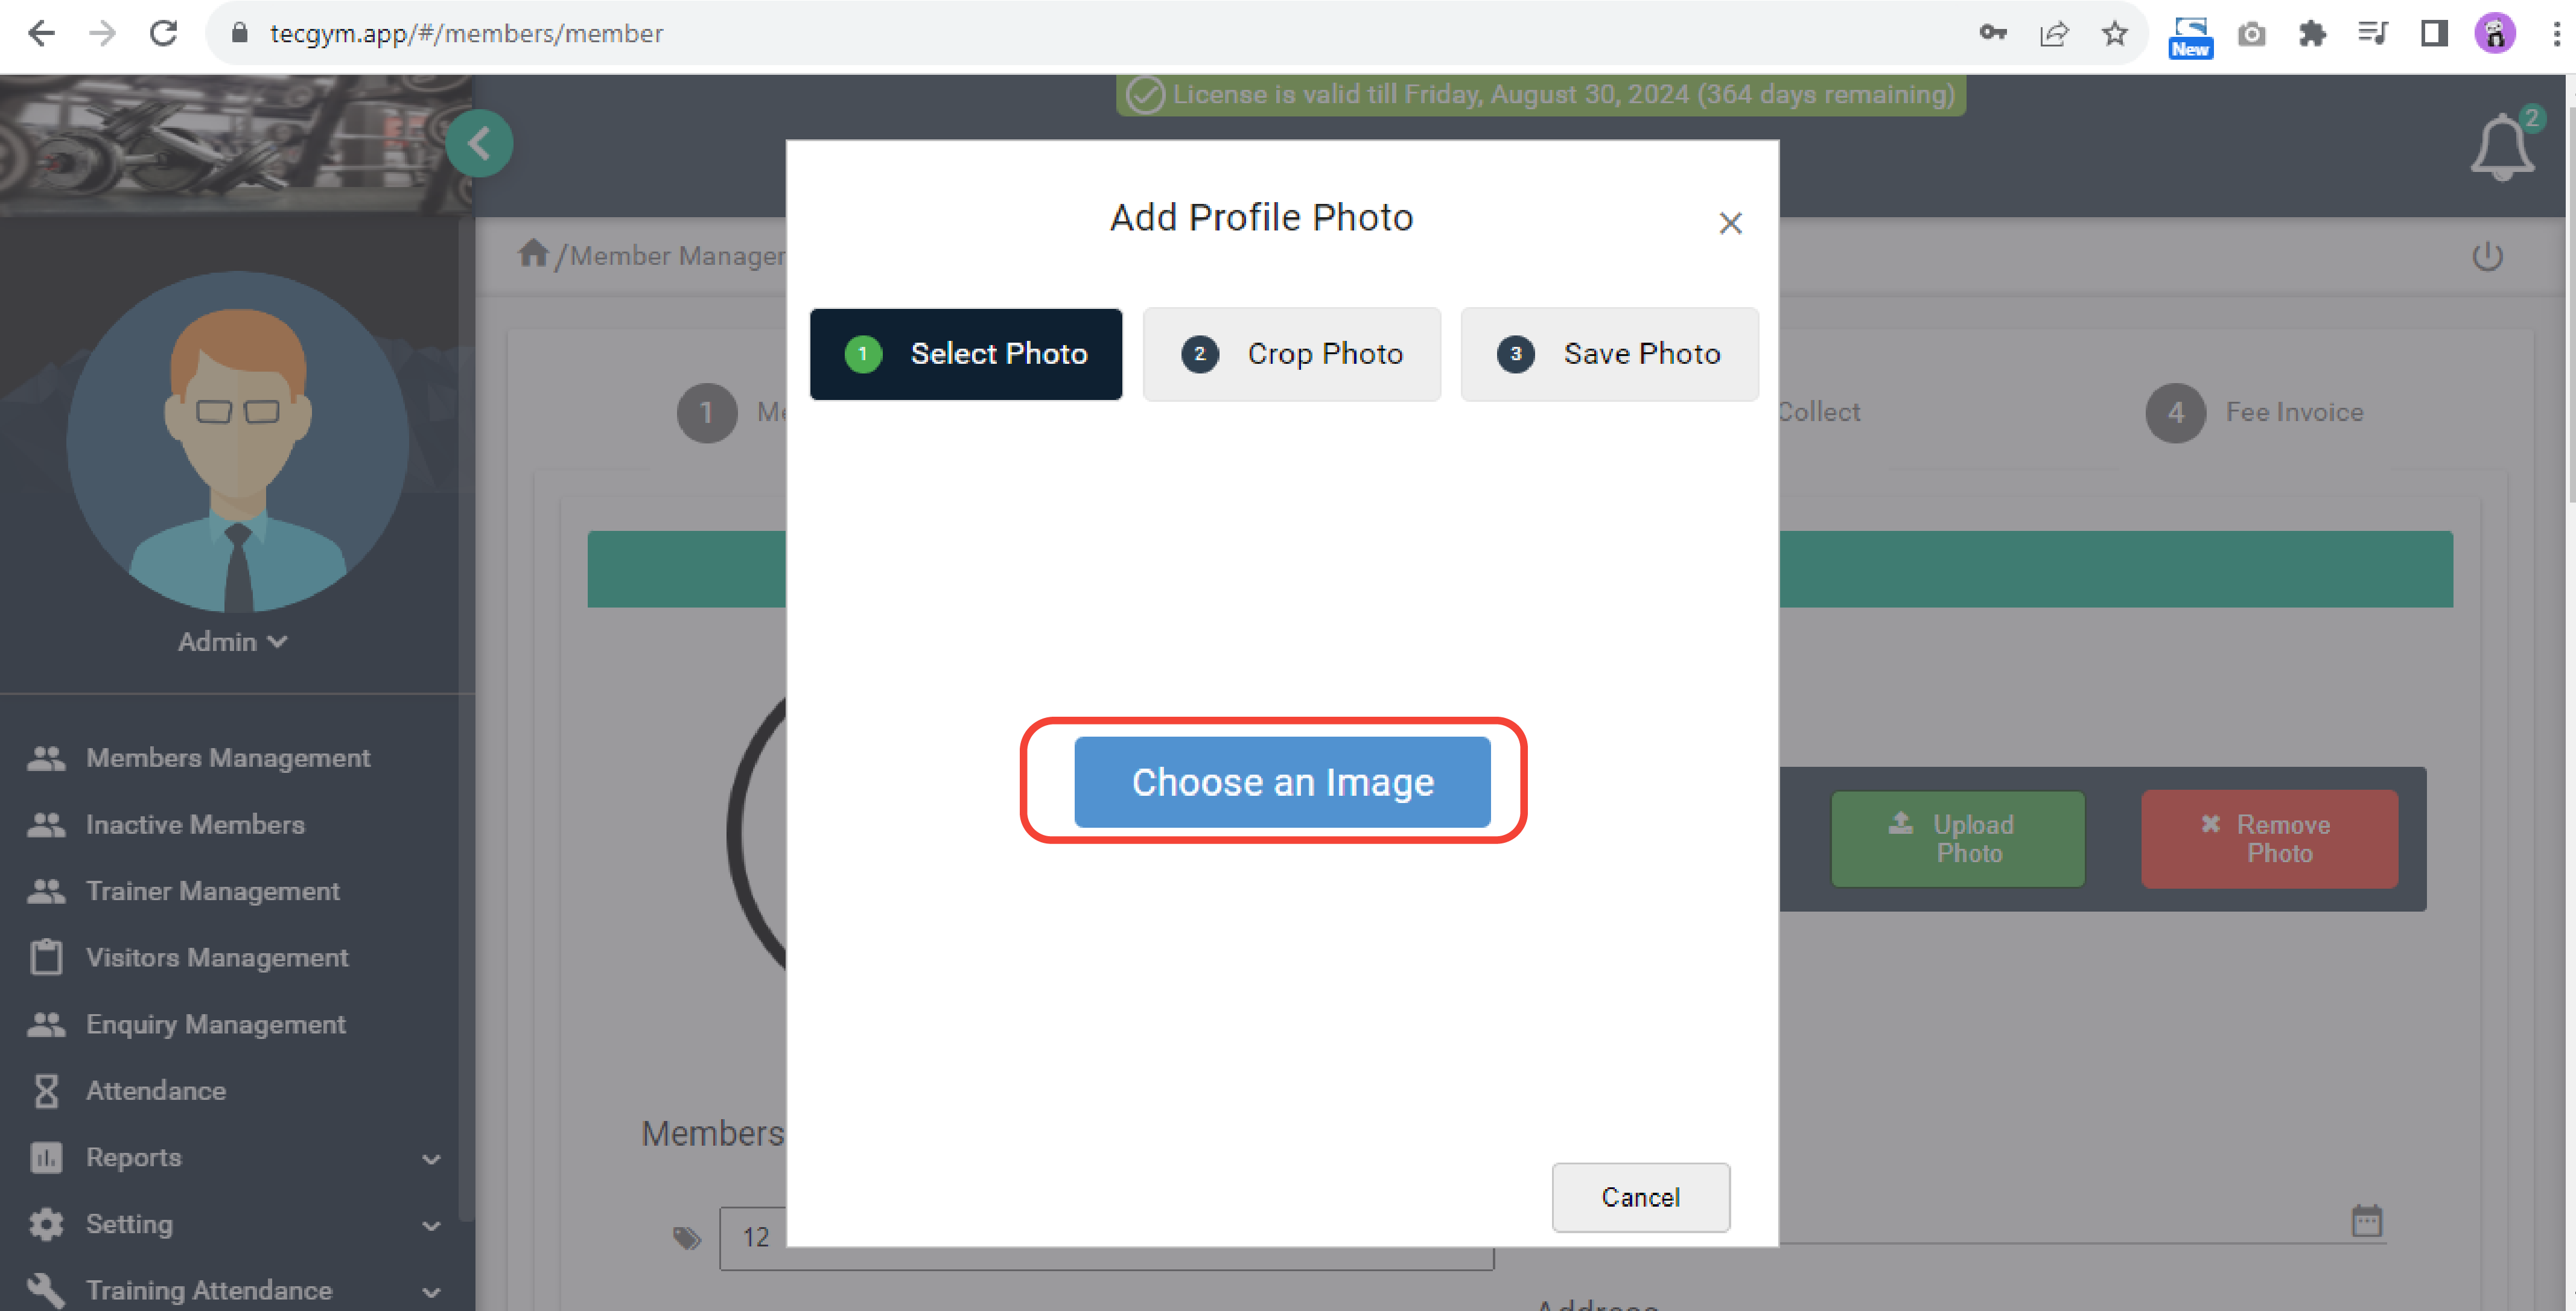
- Add Profile Photo popup will appear as shown in screenshot (b).
- Choose the desired member's image stored on your computer, just like shown in screenshot (c).
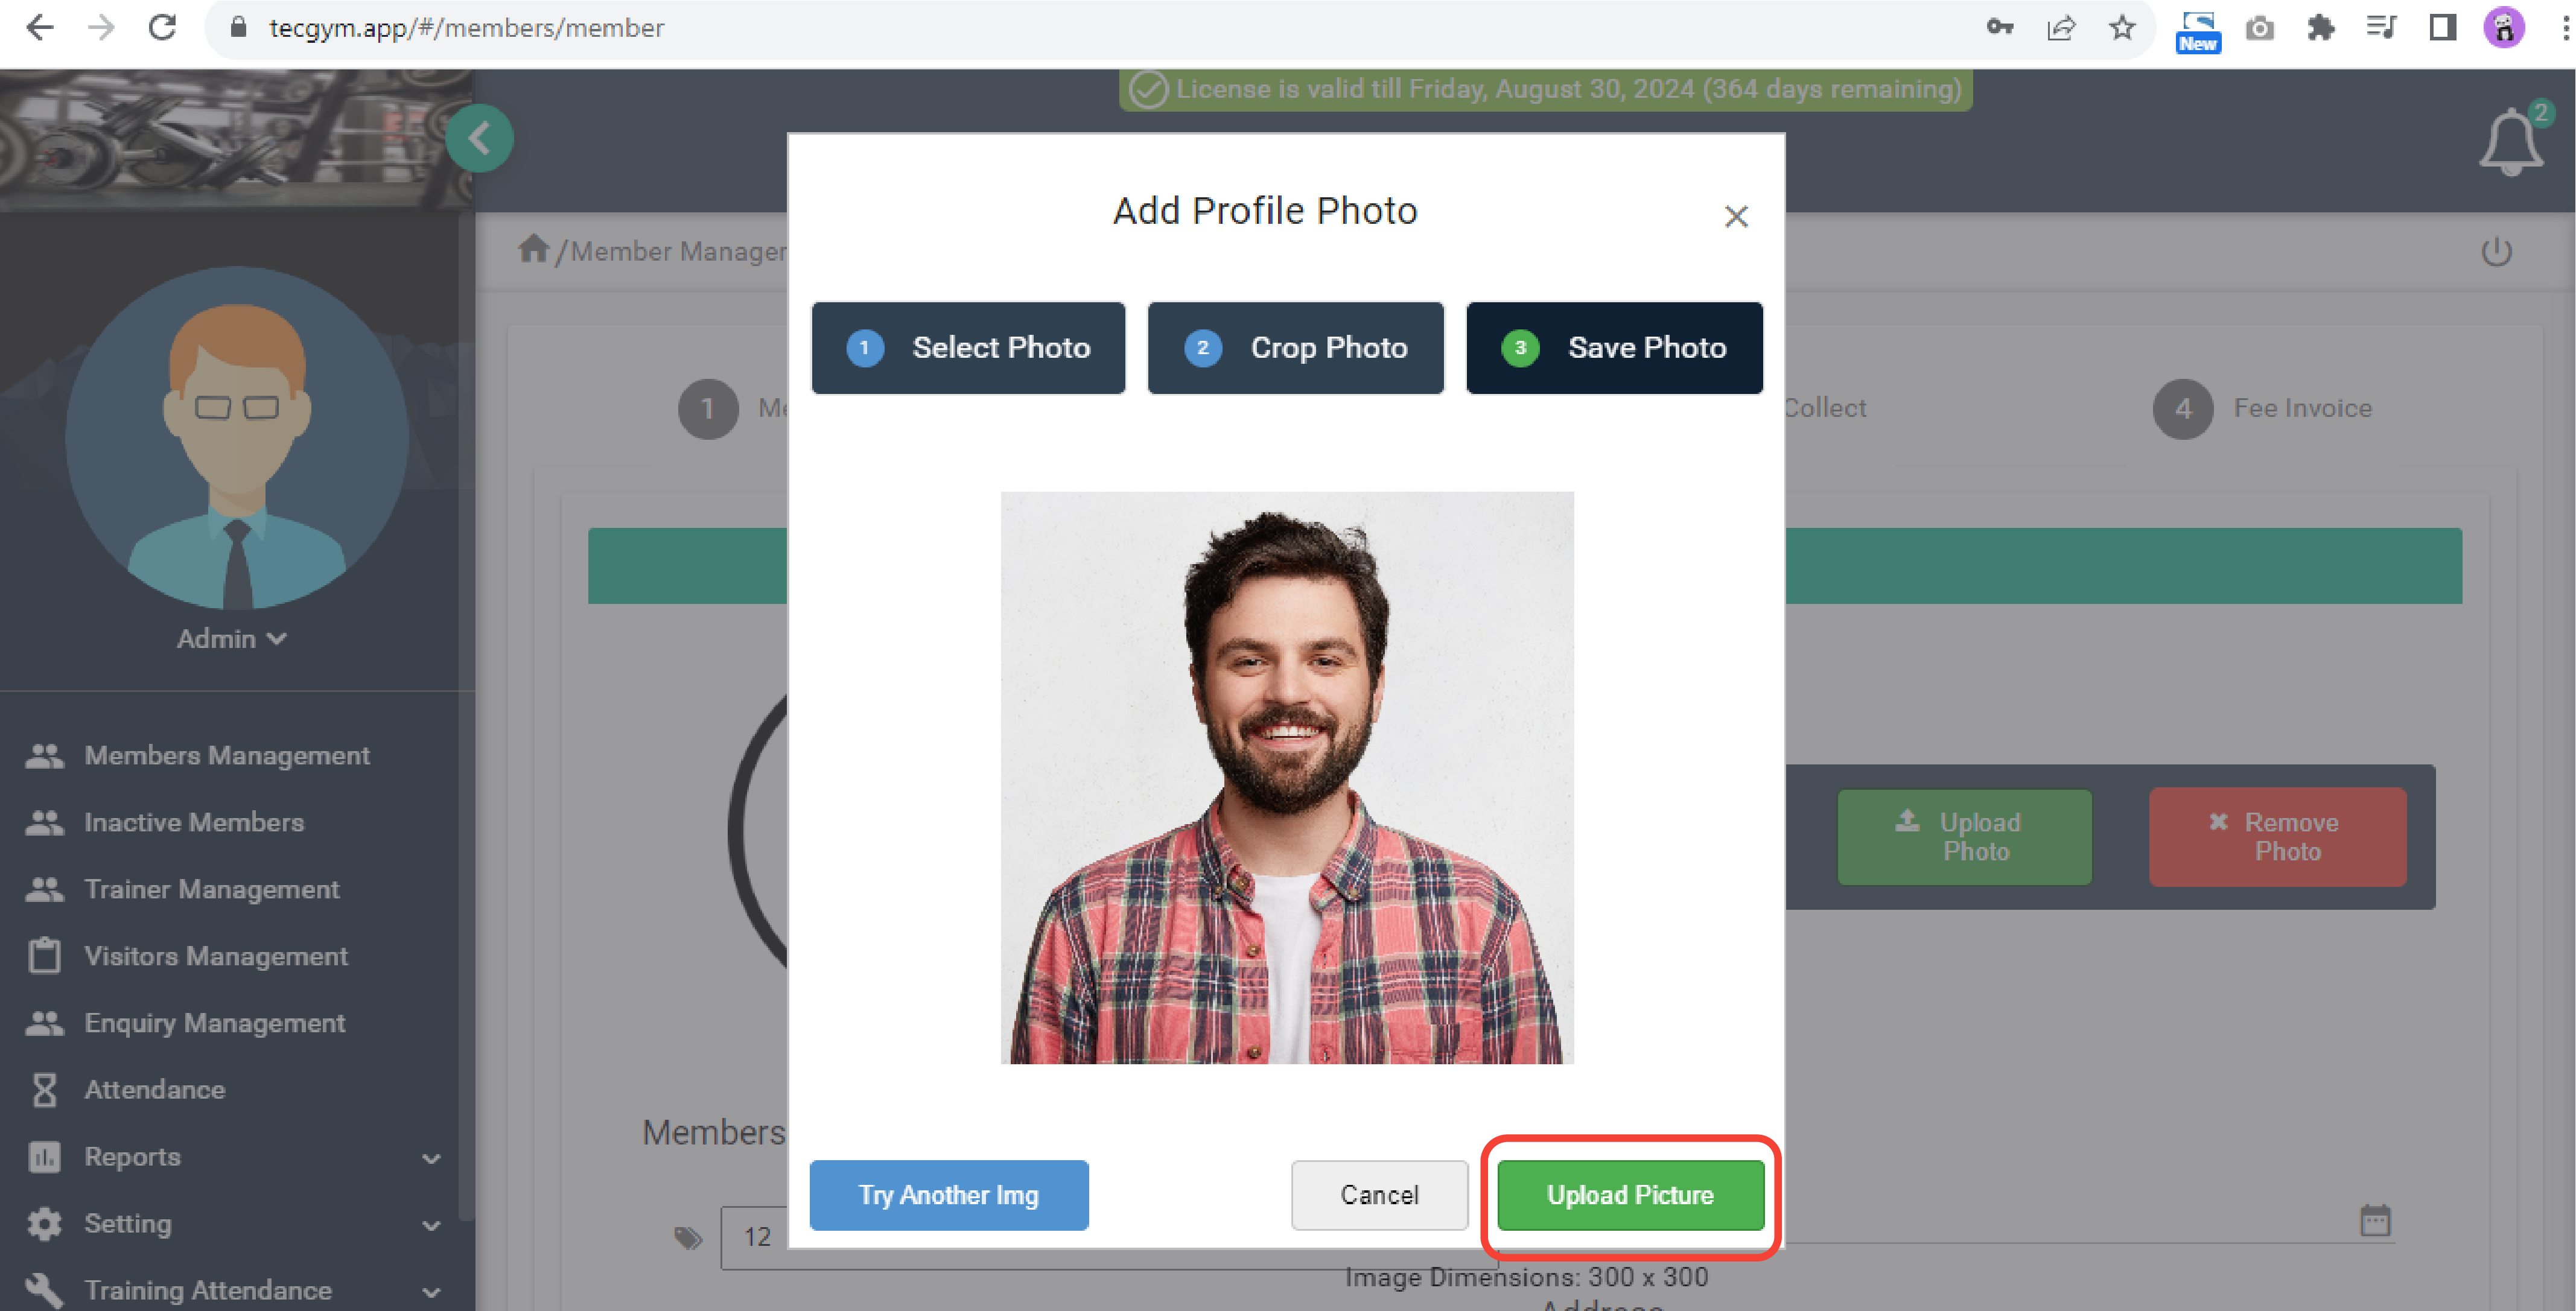
- Utilize your mouse to crop the image appropriately, then select the Crop Picture option, as highlighted in screenshot (d).
- Proceed by clicking on the Upload Picture option, as indicated in screenshot (e).
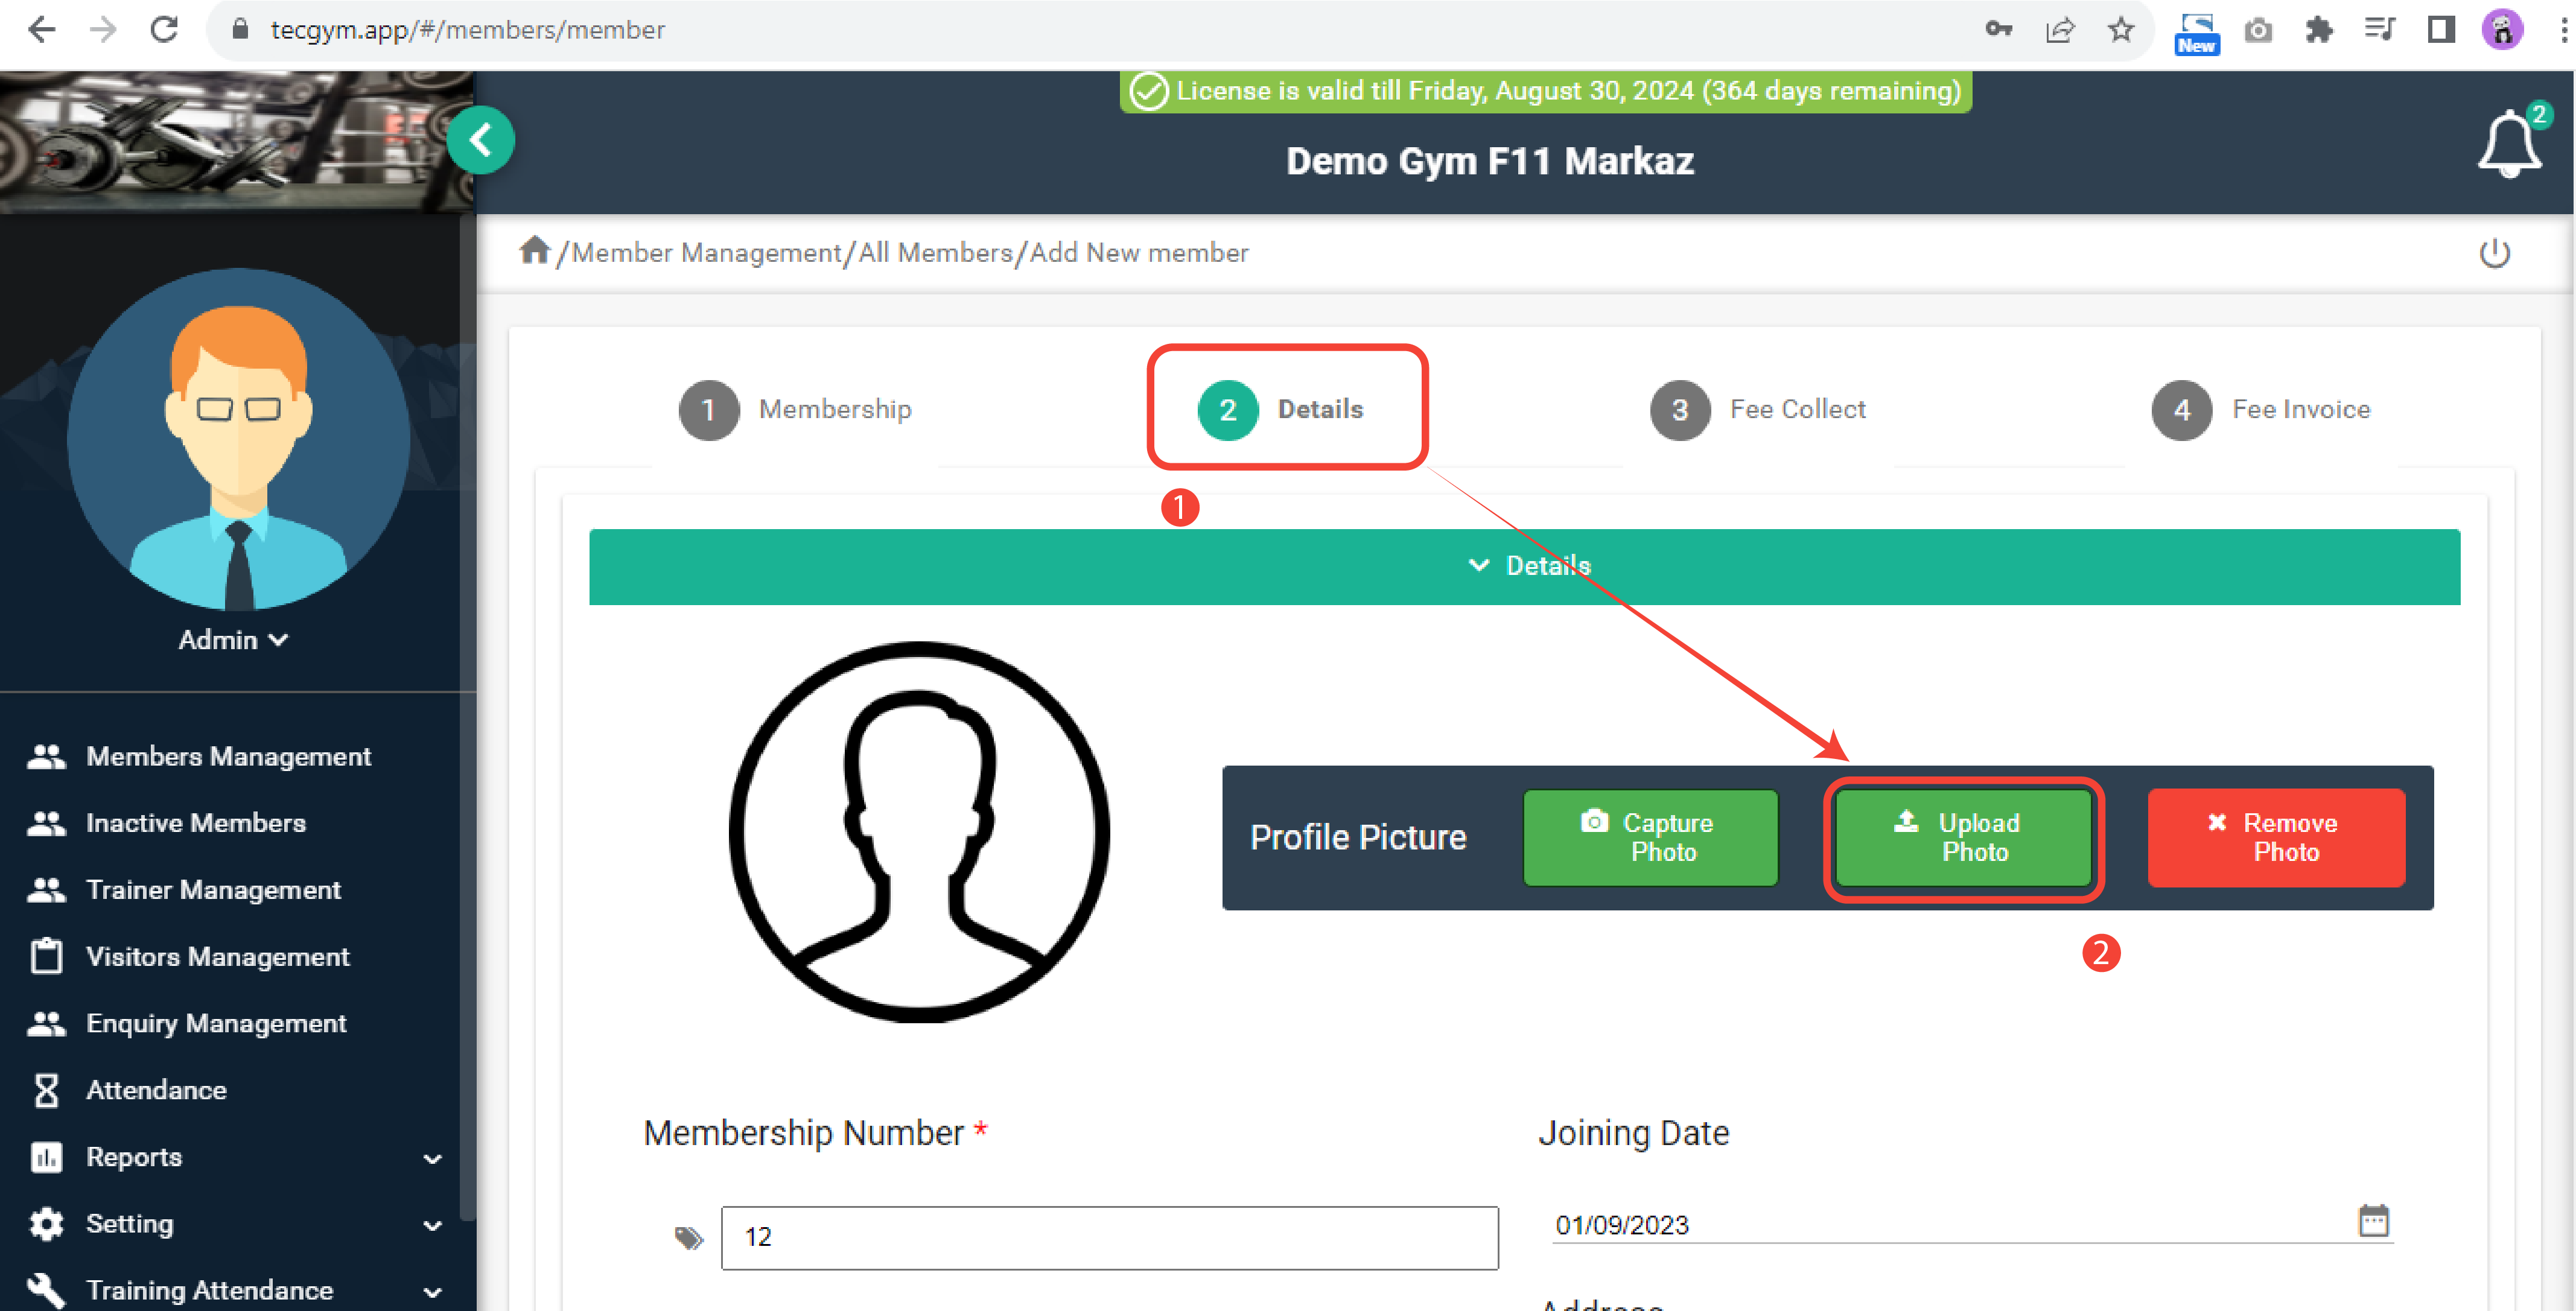
(a)Upload Photo
(b)Add Profile Photo

(c) Select Image
(d) Crop Picture
(e)Upload Picture
If you are facing any problem, please contact the support team for further assistance.
Click here to watch the video explanation.If you're facing issues with uploading a photo, here are a few steps you can take to troubleshoot:
- File Format and Size: Ensure that the photo you're trying to upload is in a supported format (such as JPEG, PNG) and that it doesn't exceed size limit of 10MB.
- Internet Connection: Ensure your internet connection is active. A slow or intermittent connection might hinder the upload process.
- Browser Compatibility: Try using a different web browser. Sometimes, certain browsers may have
compatibility issues with certain websites or platforms. It is recommended to use Google Chrome browser for
tecgym.app.
If you are facing any problem, please contact the support team for further assistance.
Click here to watch the video explanation.To update a member's package, please follow these steps:
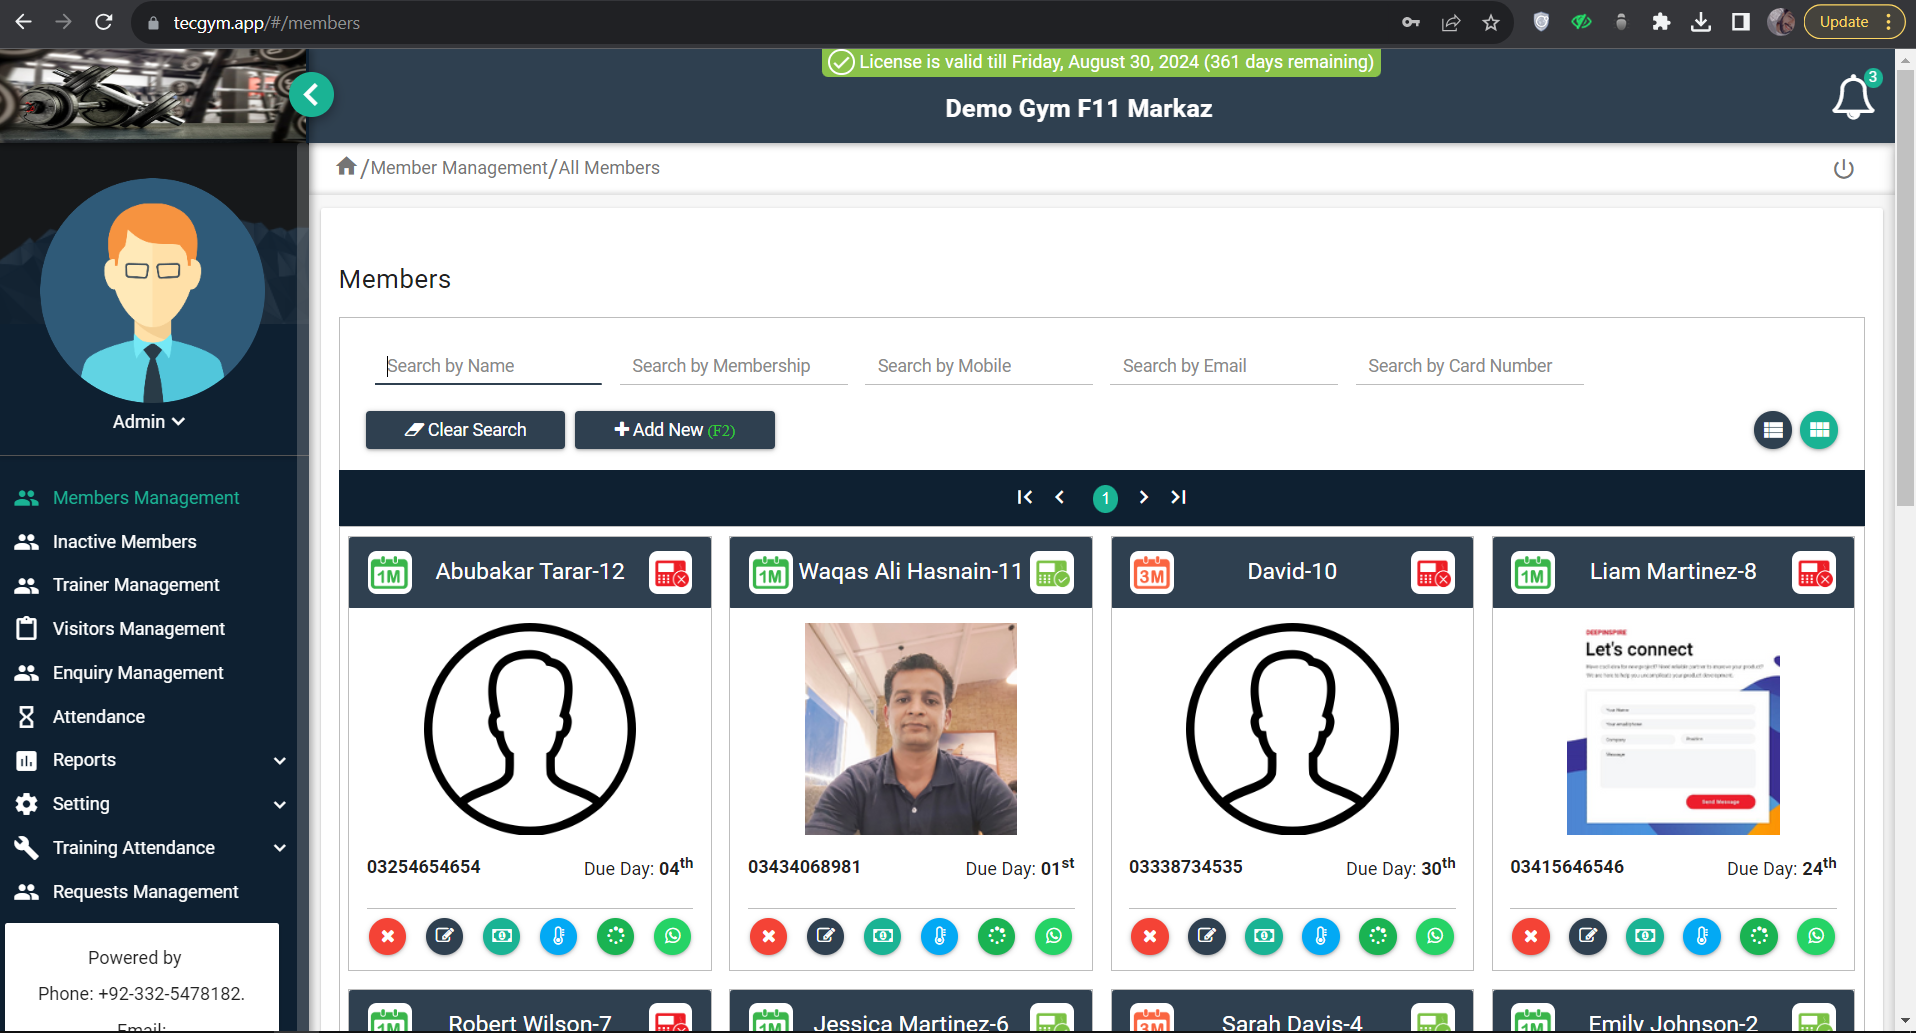
- Login to tecgym.app and from the left menu, select Members Management as shown in screenshot (a)
- This action will open the list of members.
- Click on the specific member from the list or use search functionality.
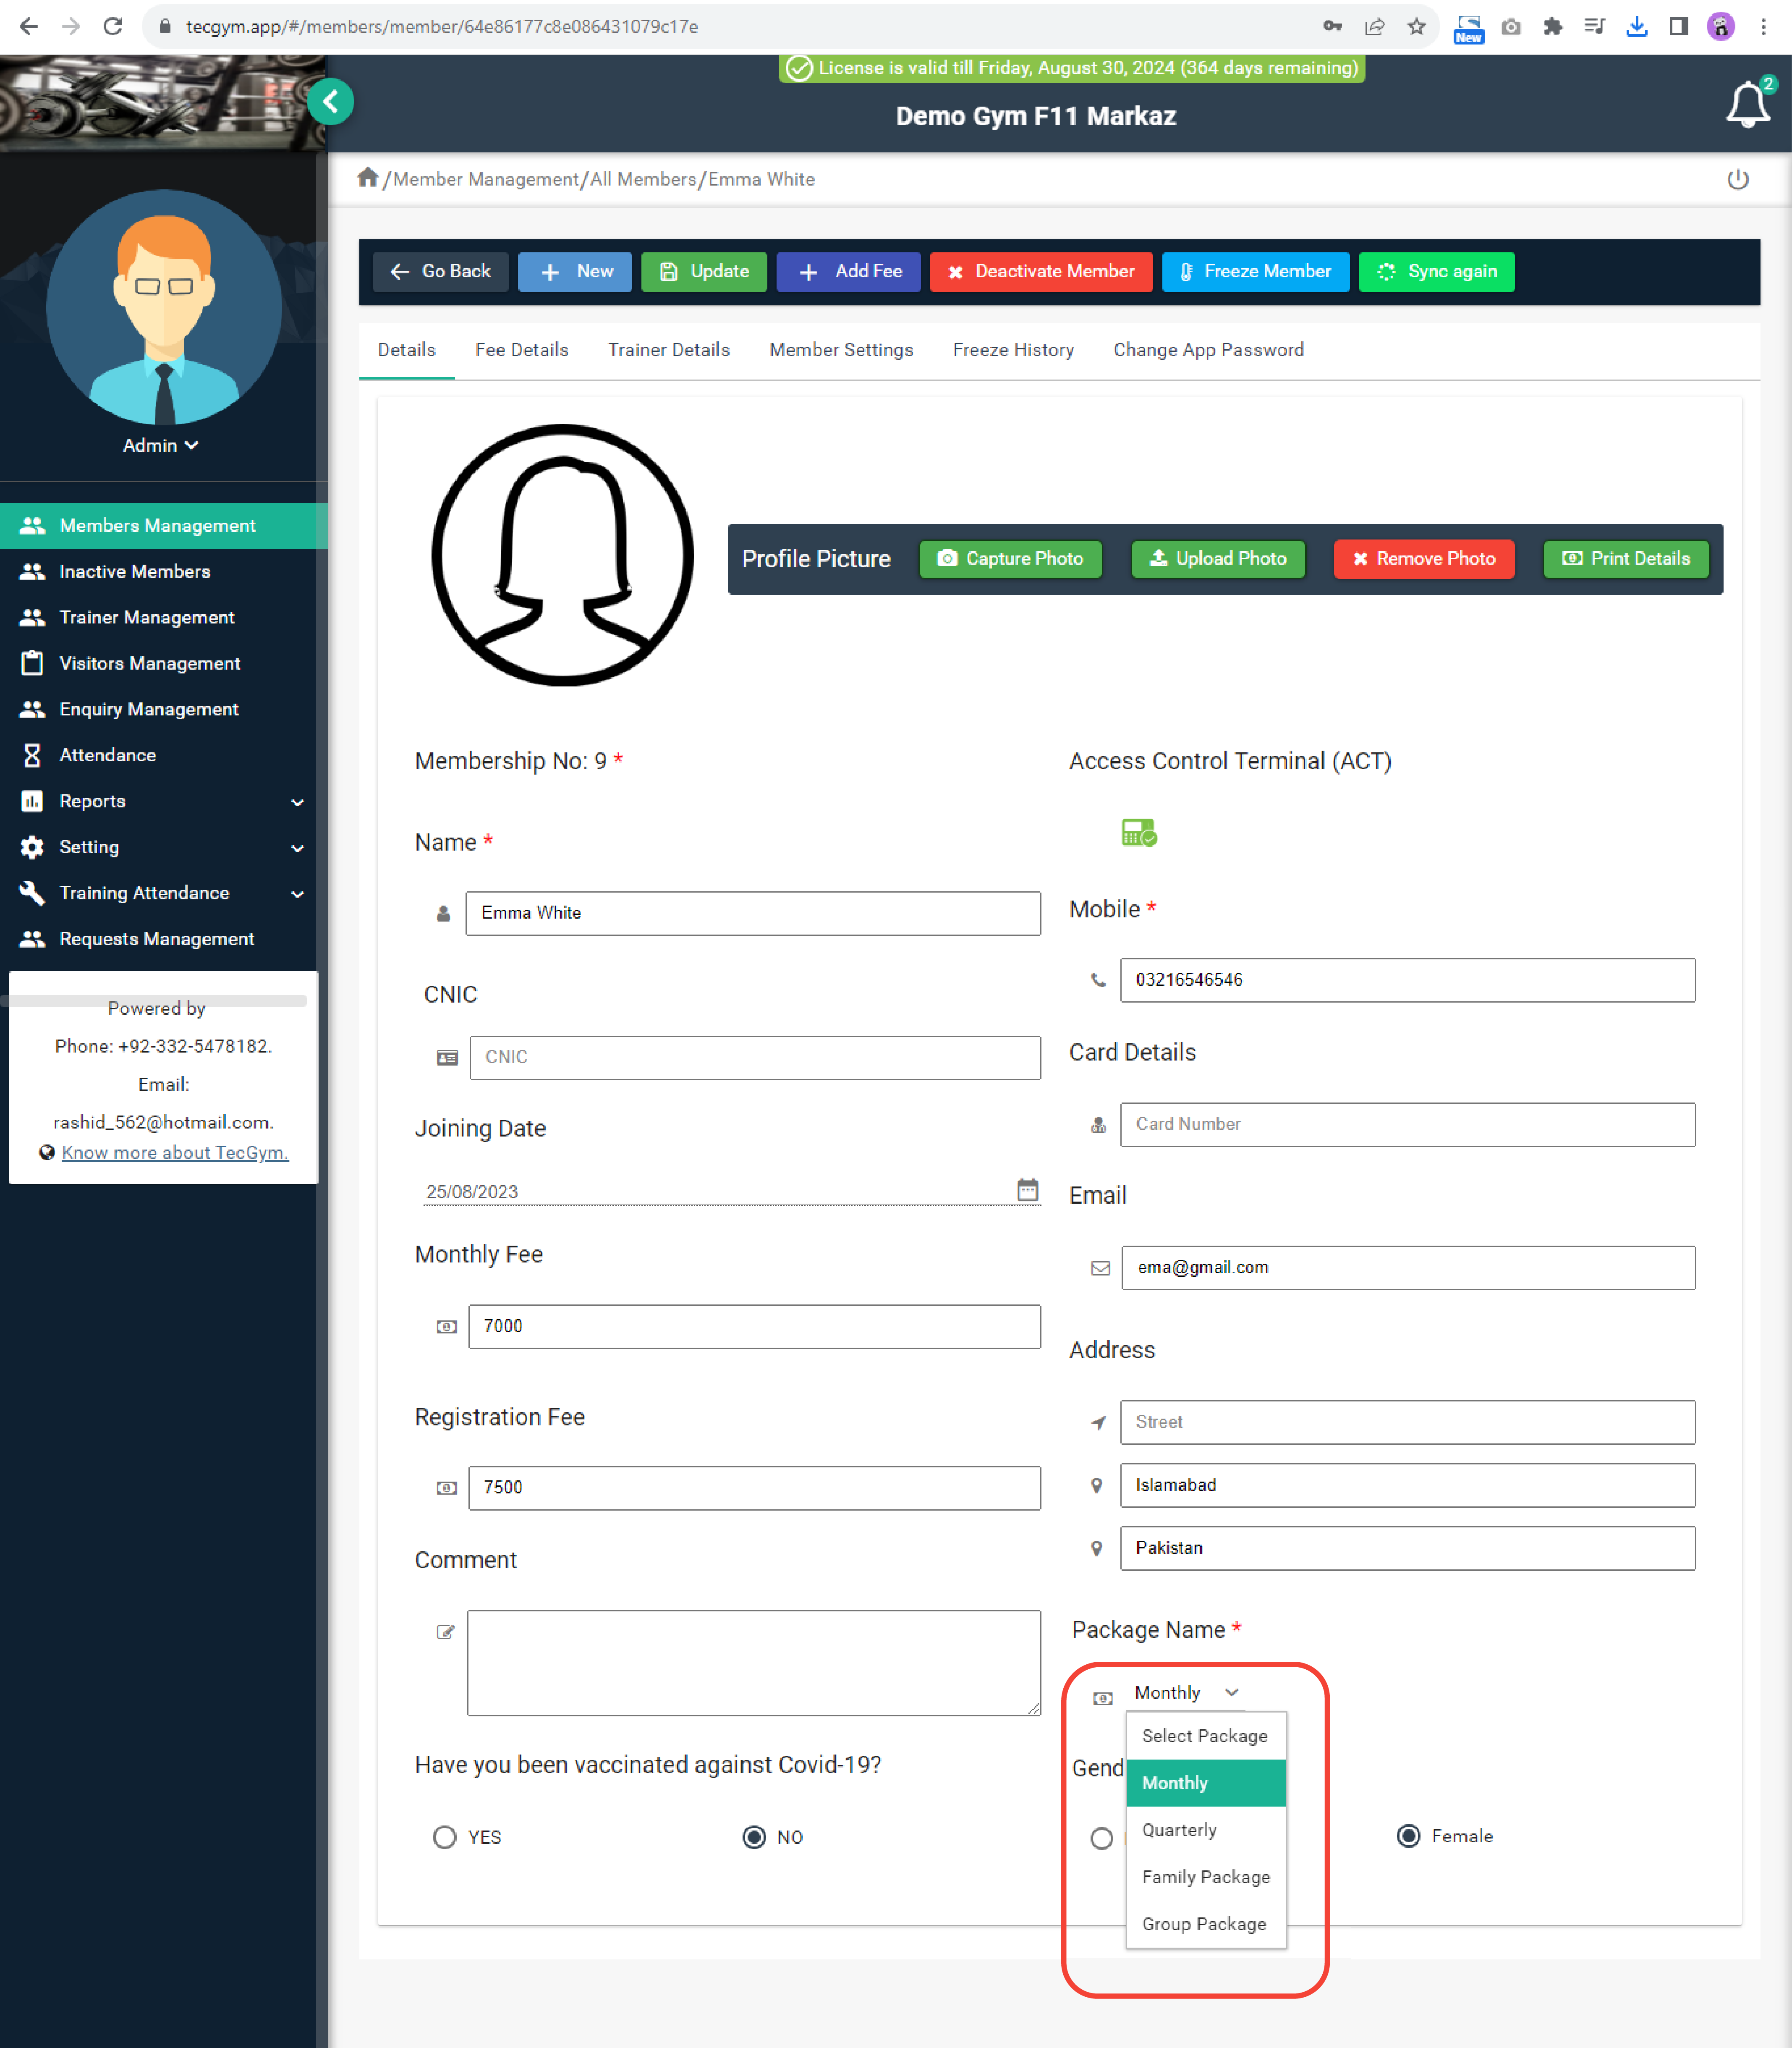
- On this member’s detail page, the current Package Name will be prominently displayed.
- Click on the dropdown menu adjacent to the current package name and proceed to select the desired new package, as shown in screenshot (b).
- A confirmation popup will appear; kindly click the Yes button to confirm.
- A success message will subsequently appear, as shown in the screenshot(c)
(a) Members Management
(b) screenshot
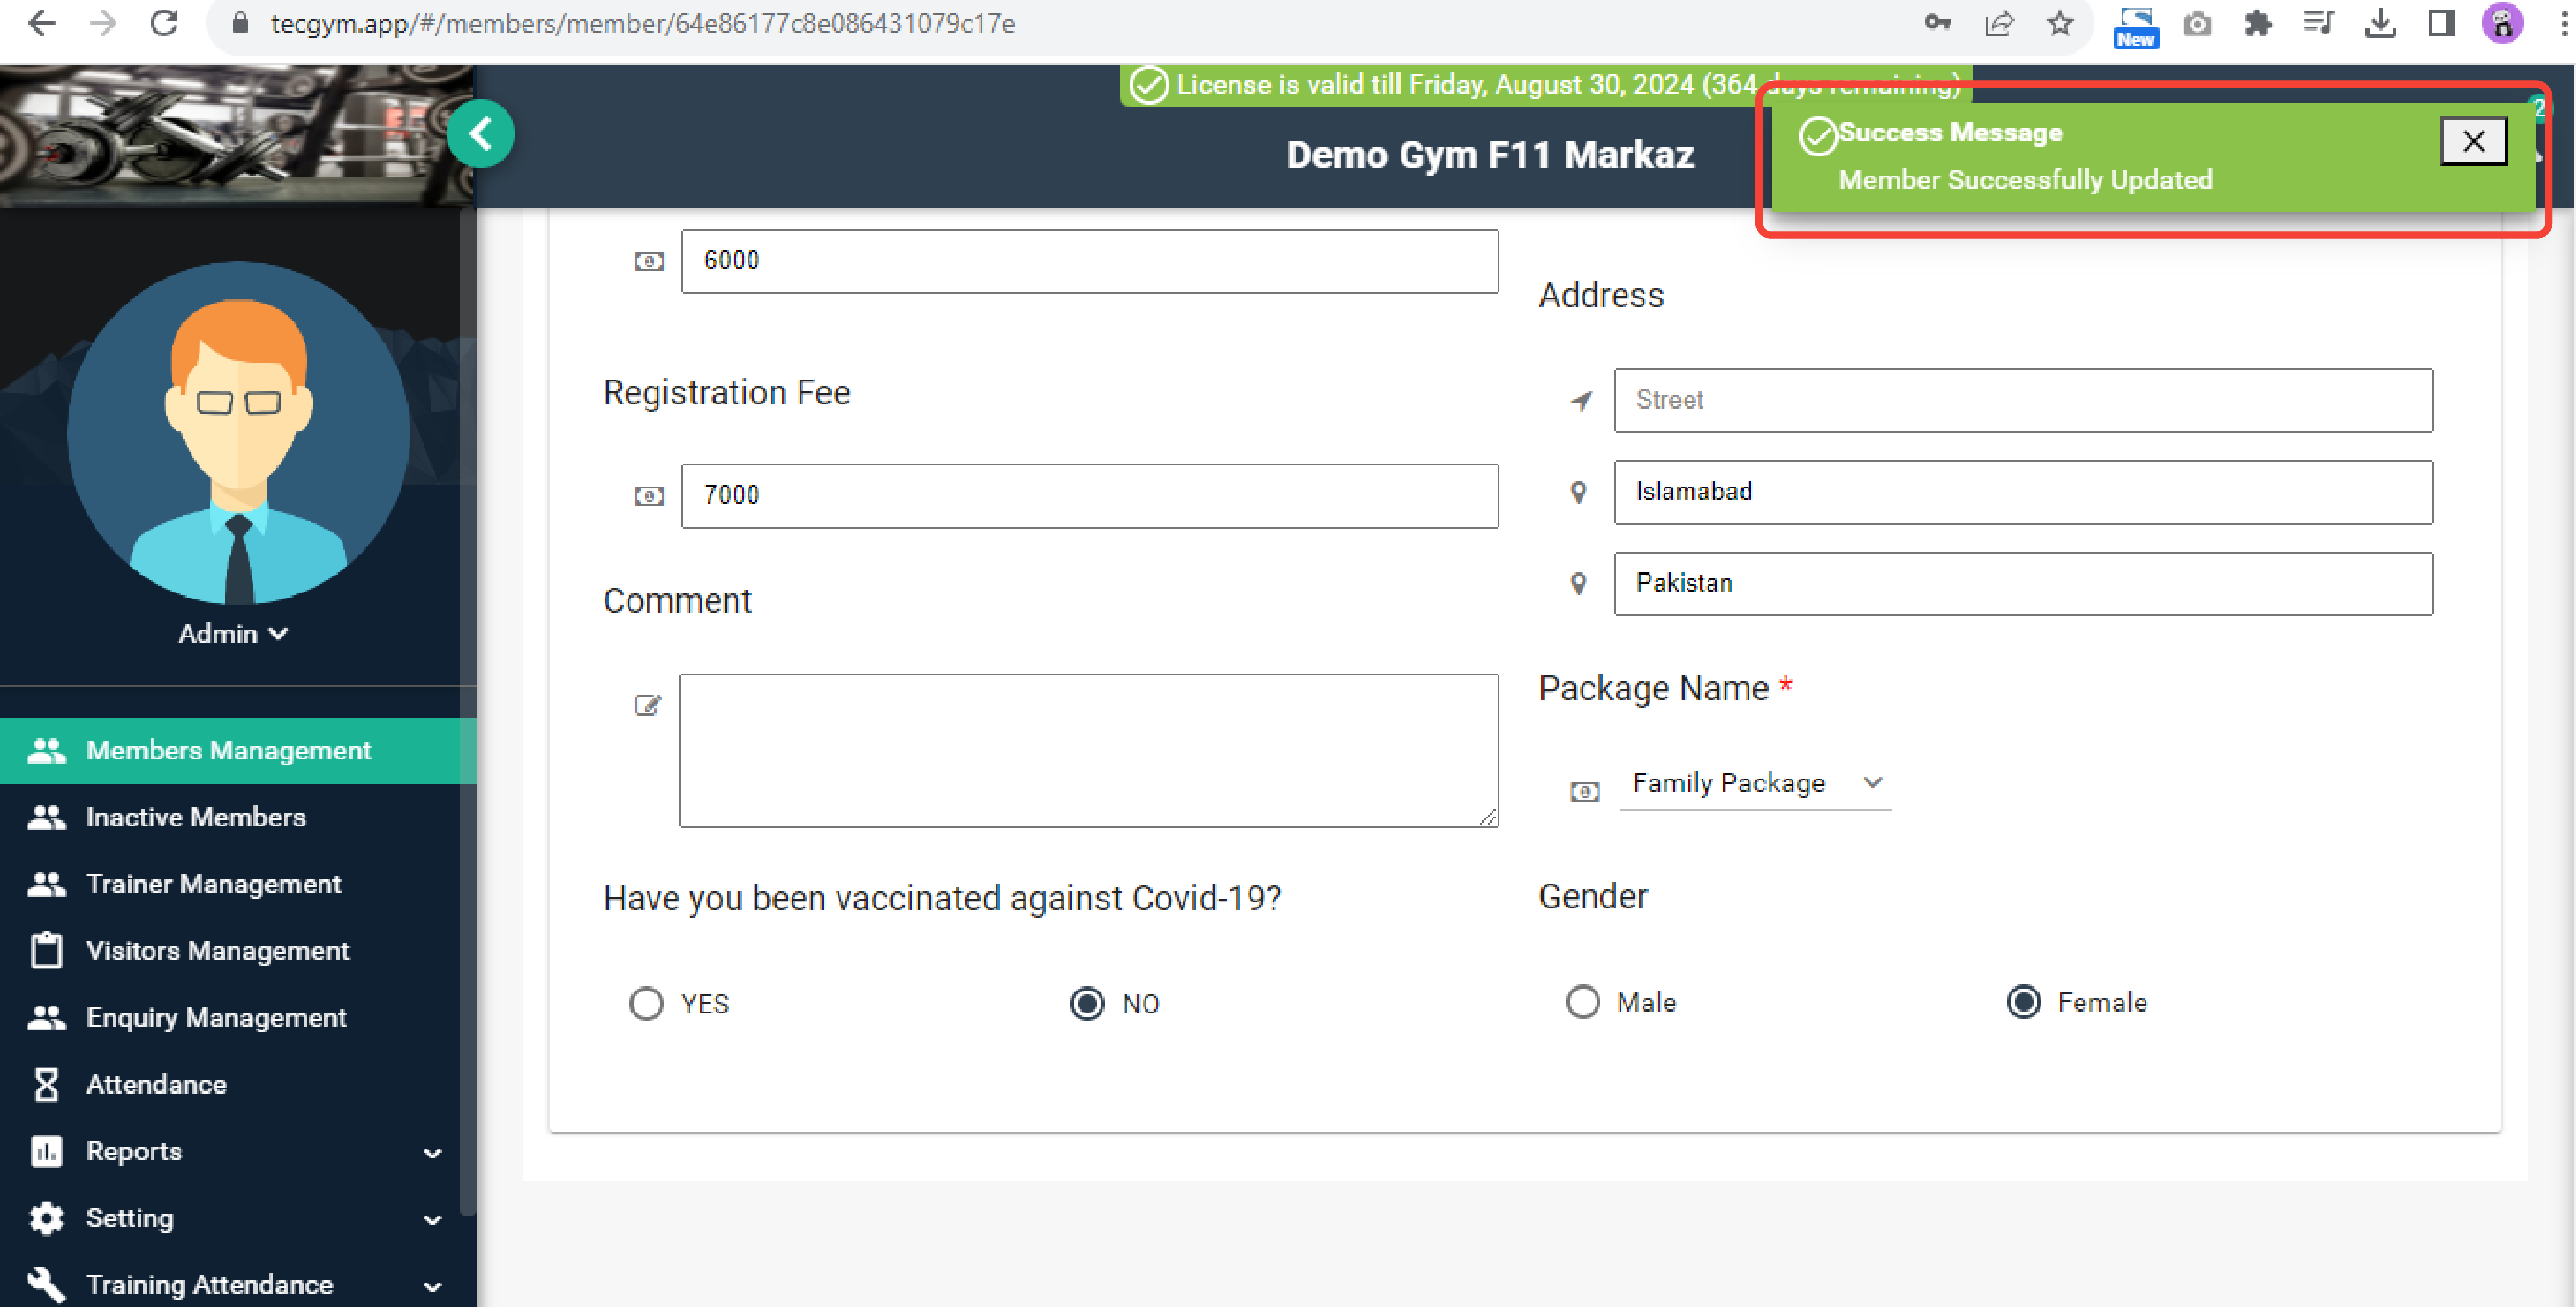
(c) screenshot
If you are facing any problem, please contact the support team for further assistance.
Click here to watch the video explanation.Follow the below steps to add fees:
- Open Member's Detail page for the member whose fees you want to add as shown in screenshot (a)
- Locate the Add Fee button as shown in screenshot (b).
- You will see a popup, as shown in screenshot (c).
- Verify the member's Package. You can also assign or update member's package form dropdown as shown in screenshot (d).
- Now, please select the month and year for the fees. Check the Next Due Date; after fee payment, the member will be valid until this date. You can also add a comment.
- Click on Save. If you receive a success message, you're all set. However, if you encounter an error message such as Fees already paid, it means that the fees for that particular month have already been paid.

(a) Member Management

(b) fee Details

(c) Fee Dialogue

(d) Package

(e) Fee Dialogue

(f) Fees Details
If you are facing any problem, please contact the support team for further assistance.
Follow the below steps for sending link to a member:
- Open Members Management and click on the WhatsApp icon for the specific member, as shown in screenshot (a).
- After clicking, you will see the screen as shown in screenshot (b). Press Continue to Chat. If you have WhatsApp for Windows, than it will automatically open and from there, you can send the online payment link to the member.

(a) Members Management

(b) WhatsApp Dialogue
If you are facing any problem, please contact the support team for further assistance.
Member can pay the fees online by following the steps below:
- Member will receive an online payment link from gym on his/her WhatsApp, as shown in screenshot (a).
- After clicking on the link, member will be directed to the online payment page of tecgym.app, as shown in screenshot (b).
- After verifying the Fee Detail, member will click on How to pay, the gym's bank details will appear, as shown in screenshot (c). Customers can copy the account number and make their fee payments online.
- After paying, click on Upload button and upload the fee invoice that was genrated at the time of online payment, as shown in screenshot (d).
- At last, press Submit.
- After submititng the invoice, customer can also send confirmation message to gym's owner by clicking on whatsapp icon as shown in screenshot (f).

(a) WhatsApp

(b) Online Payment

(c) How to pay

(d) Upload Invoice

(e) Submit Invoice

(f) WhatsApp
If you are facing any problem, please contact the support team for further assistance.
Click here to watch the video explanation.Follow the below steps:
- Open Requests Management and click on the Deatil icon of a specific fee submission request you want to accept, as shown in screenshot (a).
- Fee reqeust detail will open. Review member and fee details and click on Approve button, as shown in screenshot (b).

(a) Requests Management

(b) Request Detail
If you are facing any problem, please contact the support team for further assistance.
Click here to watch the video explanation.It is recommended to open tecgym.app on your mobile or install WhatsApp for Windows on your computer and follow the below steps:
- Navigate to the Defaulter Report and click on the WhatsApp icon corresponding to a specific member as shown in screenshot (a).
- The WhatsApp application will launch on your mobile device. Proceed to tap the send button, as illustrated in screenshot (b).

(a) Defaulter Report

(b) Launch WhatsApp
It is recommended to open tecgym.app on your mobile or install WhatsApp for Windows on your computer and follow the below steps:
- Submit the fees of a member.
- From the Fee Details tab of member, click on the WhatsApp icon corresponding to a specific fees as shown in screenshot (a).
- The WhatsApp application will launch on your mobile device. Proceed to tap the send button, as illustrated in screenshot (b).

(a) Fee Details
(b) Launch WhatsApp
You should follow the below steps:
- Navigate to the member's Fee Details tab and select the Print icon, as depicted in screenshot (a).
- A fees invoice popup will appear as shown in the screenshot (b).
- Press Ctrl + P to open the print dialogue as shown in screenshot (c).
- Provide a suitable name and save the file as shown in screenshot (d).
- You can then manually use your WhatsApp application to send the file to the desired member.

(a) Fee Details

(b) Fees Invoice

(c) Print Dialogue

(d) Save File
If the fee invoice pop-up is not appearing, it's likely that the browser's pop-up blocker is causing it to be blocked from displaying. To enable pop-ups in your browser, you should follow the instructions provided in this link .
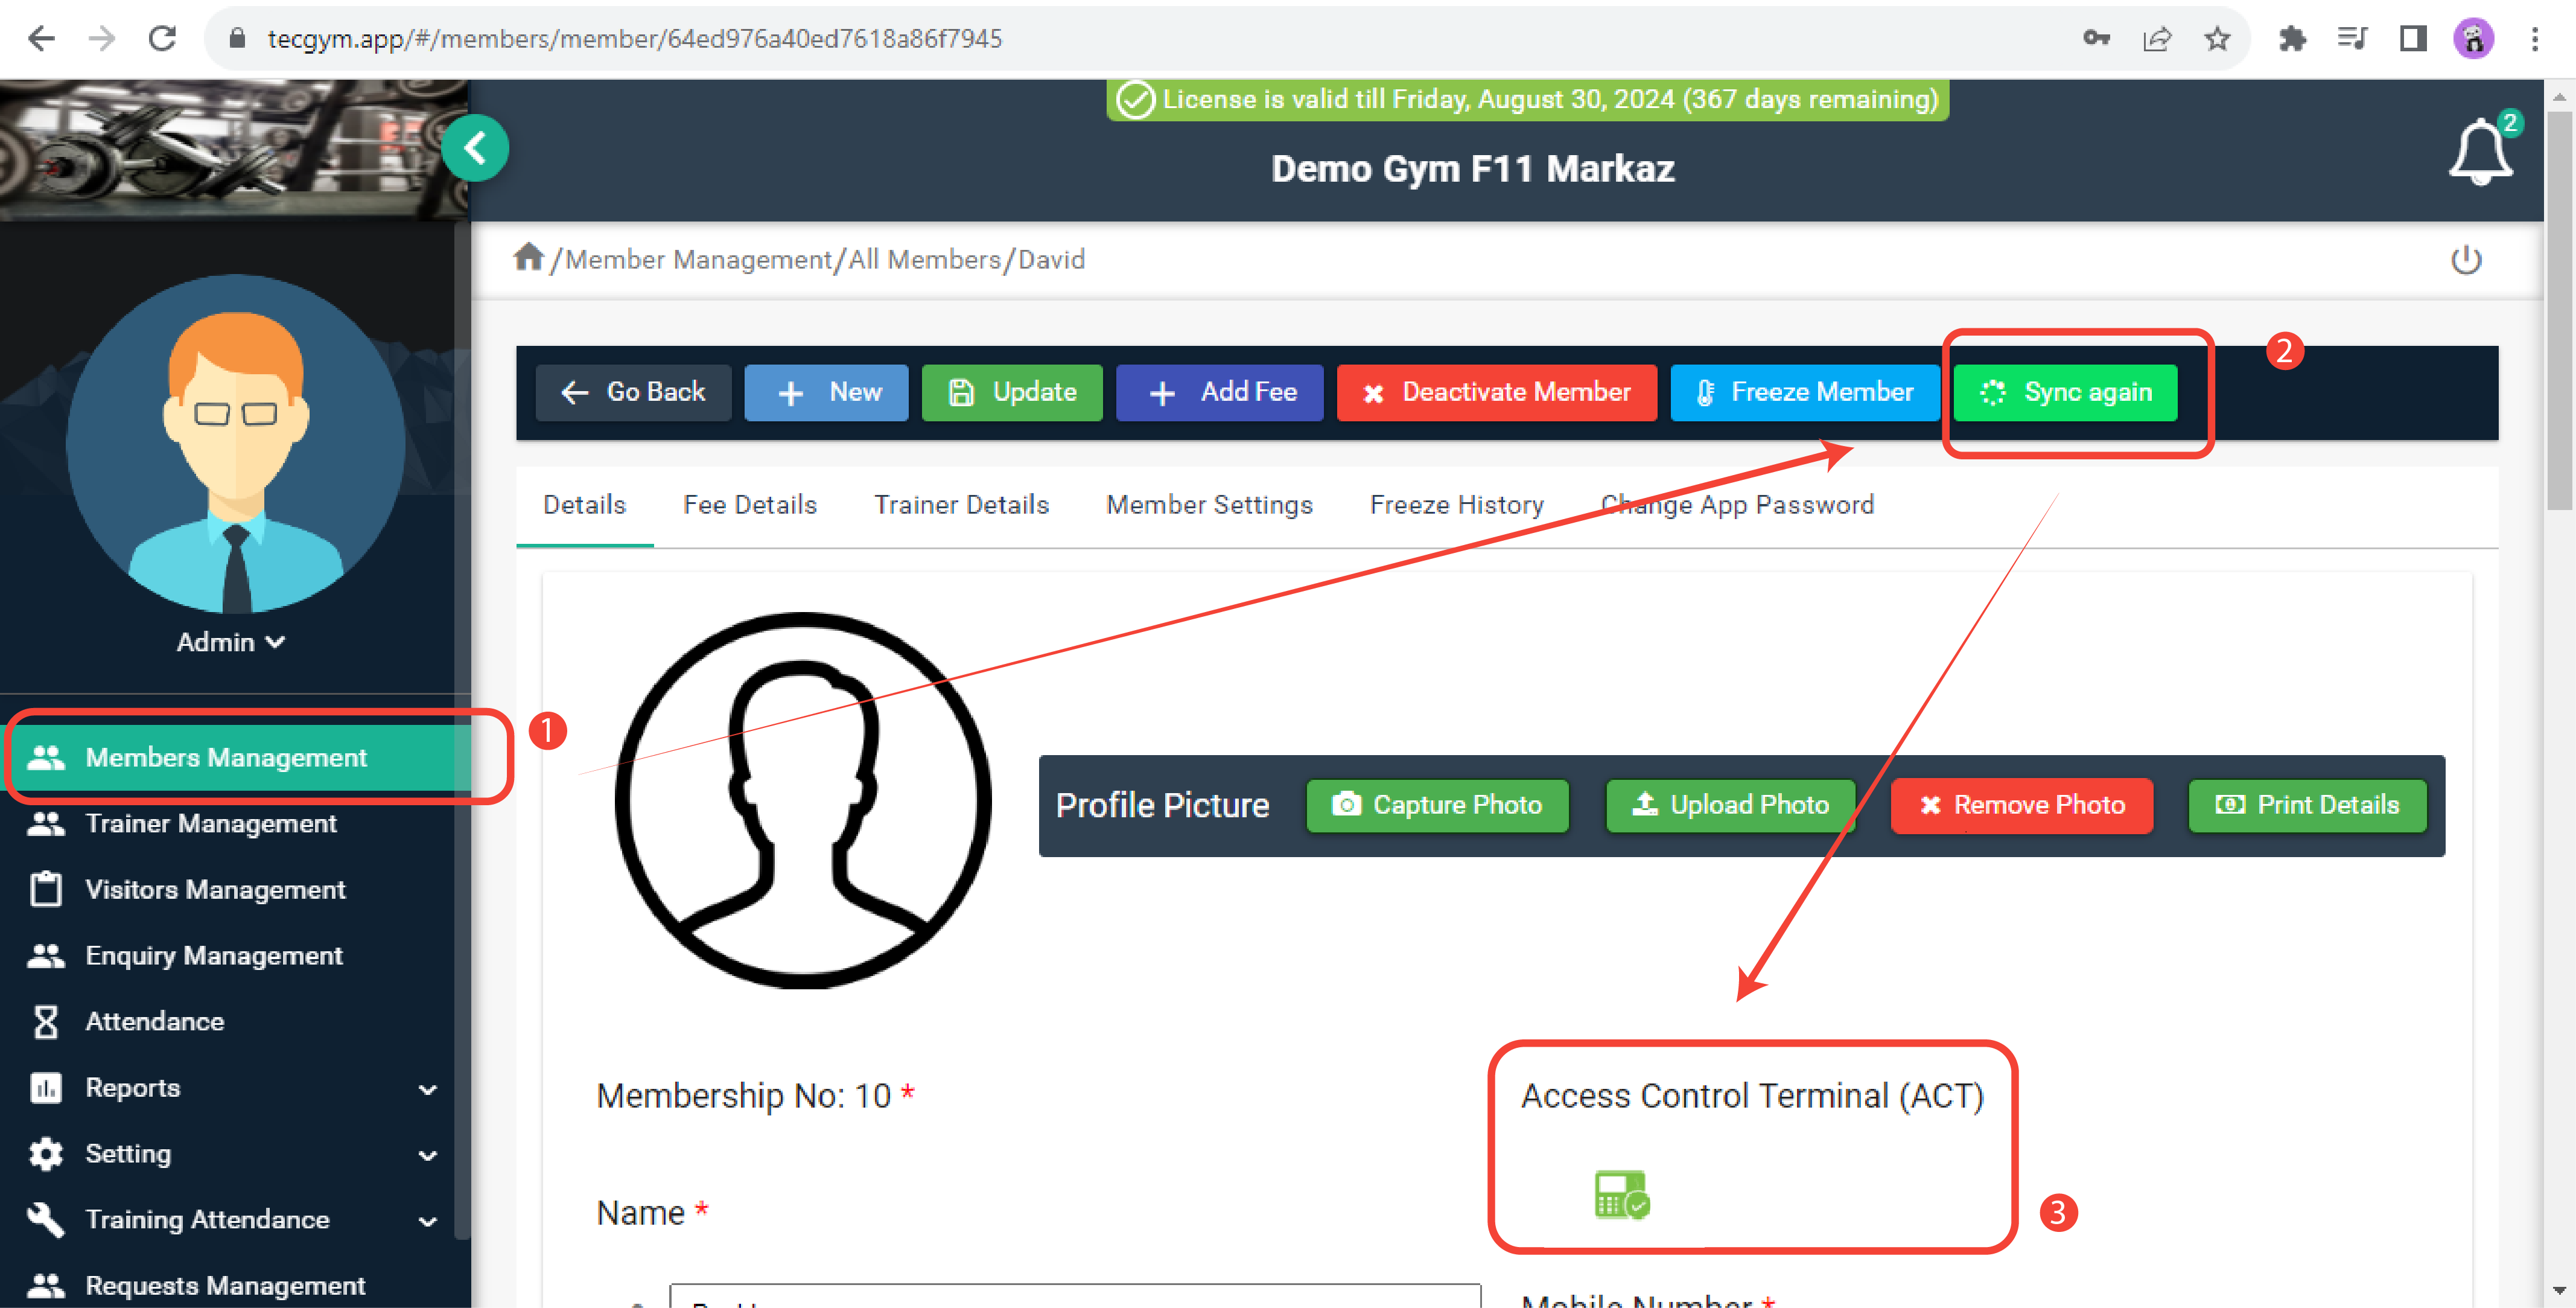
You should check the following things:
- First you should check, member is not in the defaulter list as shown in screenshot (a).
- Navigate to the Member Settings and ensure that the Next Due Date is set to a future date as shown in screenshot (b).
- Ensure the Tecgym Console App on the desktop is up and running.

- Confirm that the Tecgym Console App is displaying a green connectivity message. as shown in screenshot (c).
- Ensure your internet connection is active.
- Go to the Member's Detail page and click on the Sync Again button in the tecgym.app as shown in the screenshot (d) and within few seconds Access Control Terminal (ACT) icon will change to Green.

(a) Defaulter List

(b) Member Settings

(c) Tecgym Console App

(d) Sync again
If you are facing any problem, please contact the support team for further assistance.
Click here to watch the video explanation.Inactive members are not displayed by default because this data is archived, which may result in slow performance. To view all inactive members, click on the Search button, as depicted in screenshot (a).
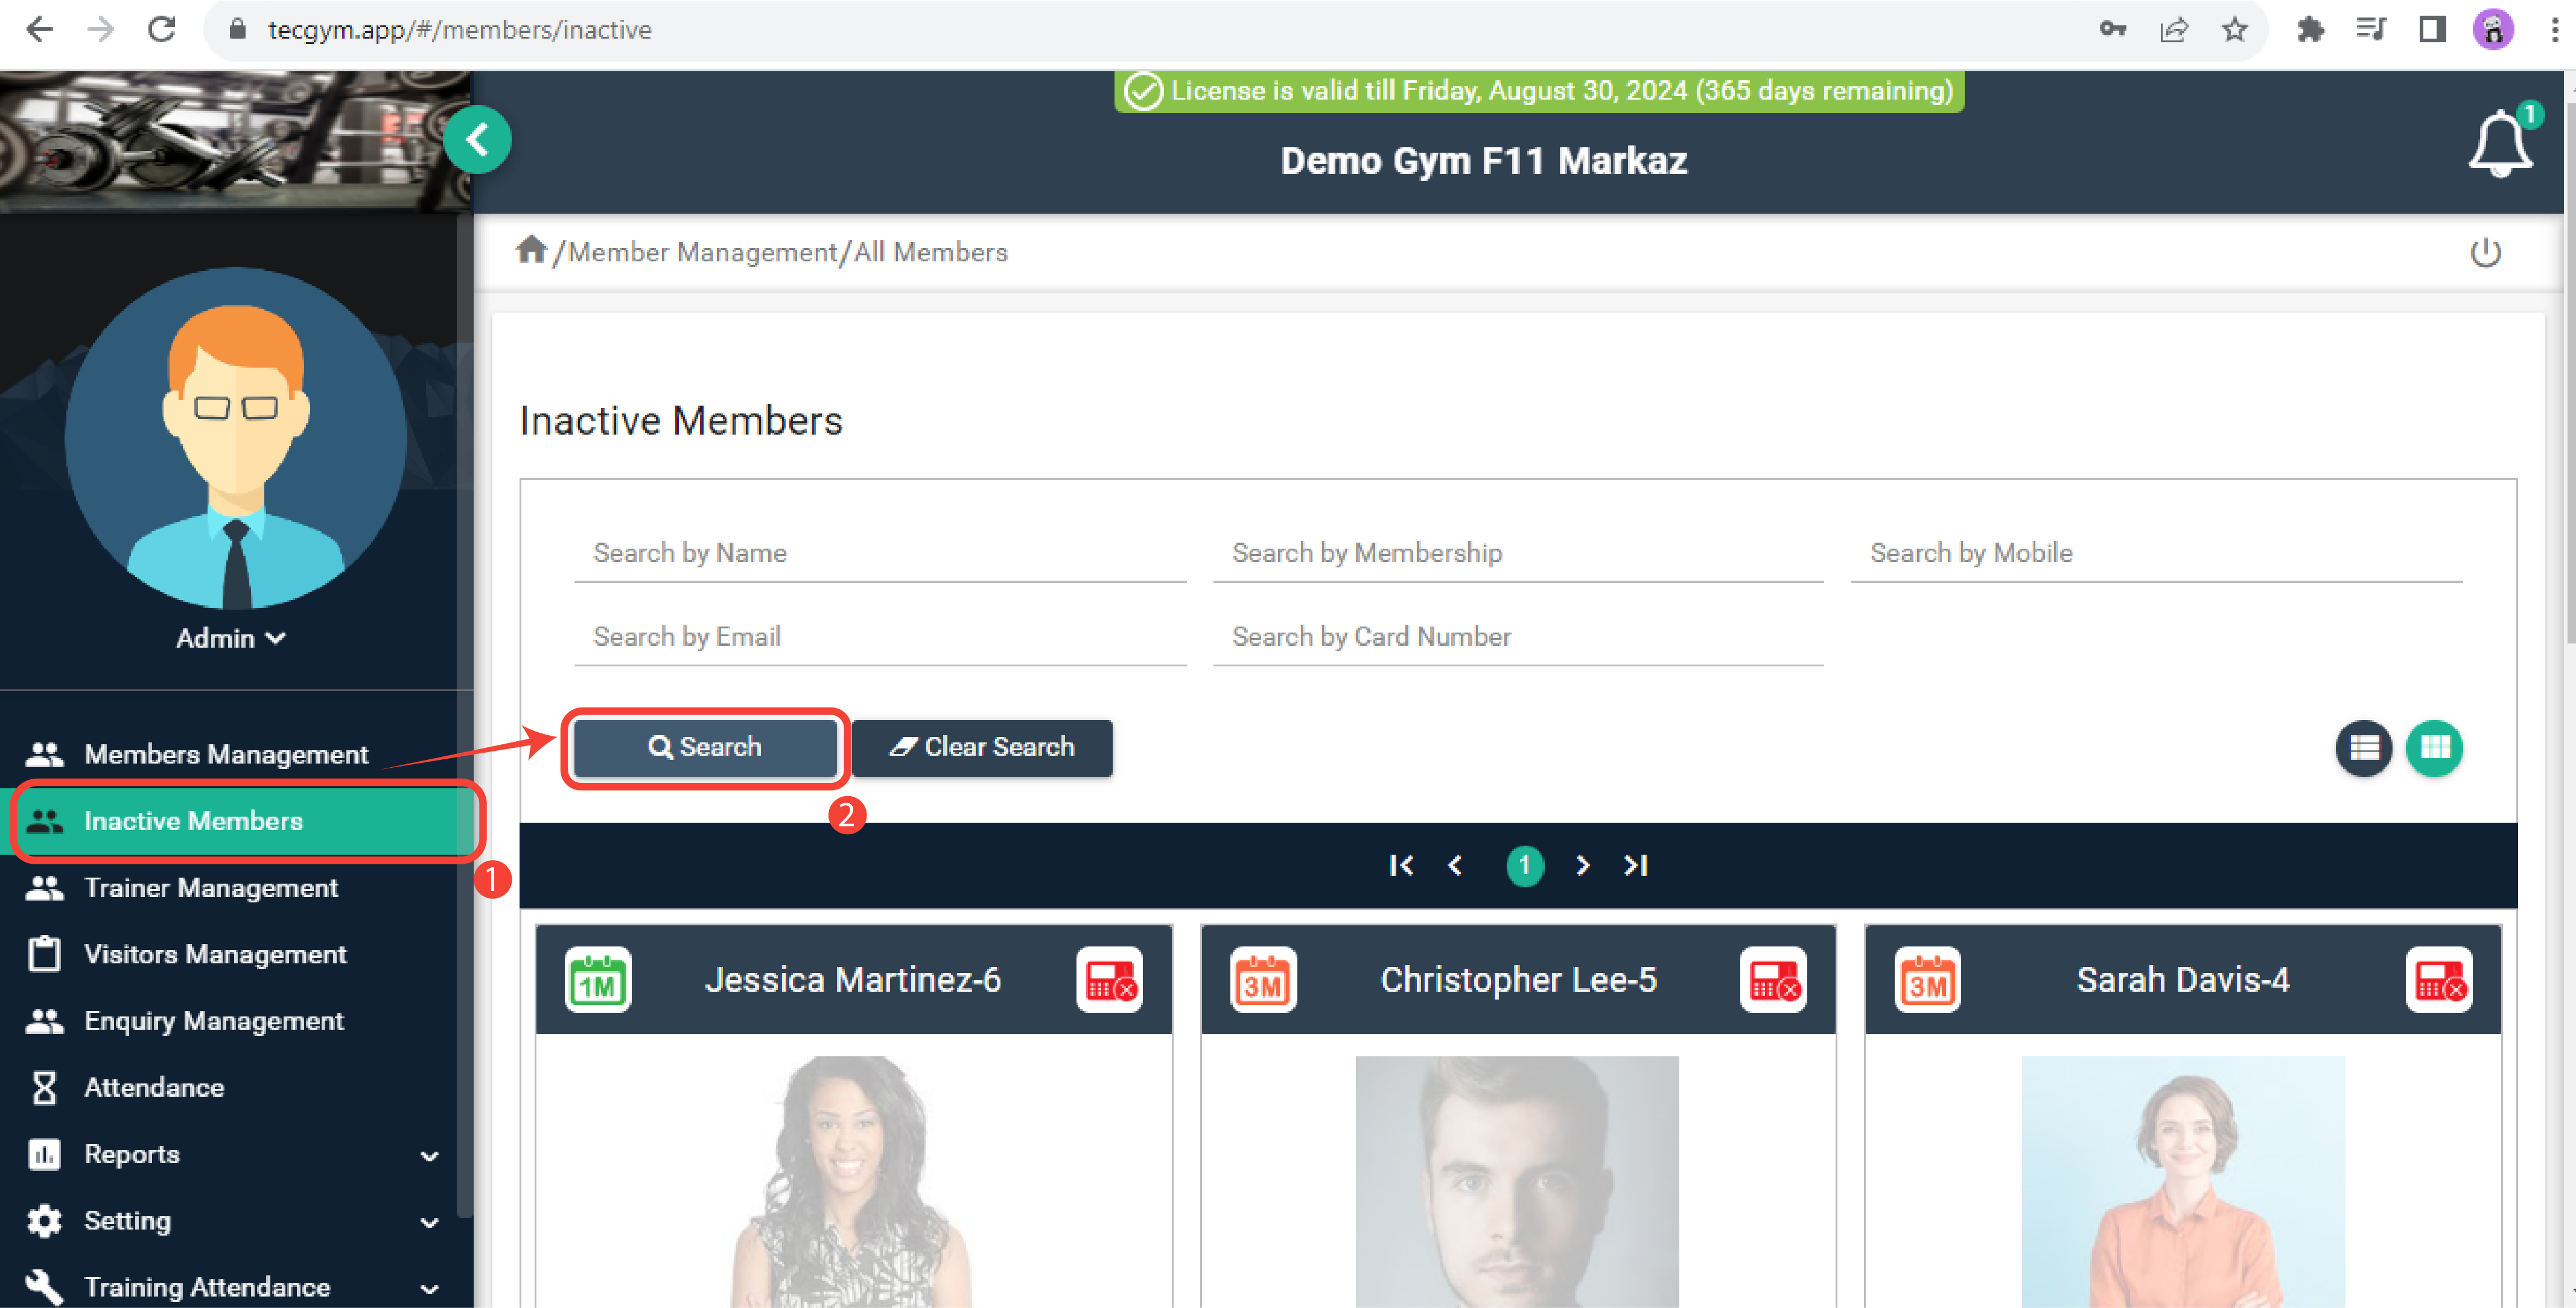
(a) Inactive Member
If you wish to find a particular member, enter information in the Name, Membership, Mobile, Email, or Card Number fields, and then click the Search button, as demonstrated in screenshot (b).
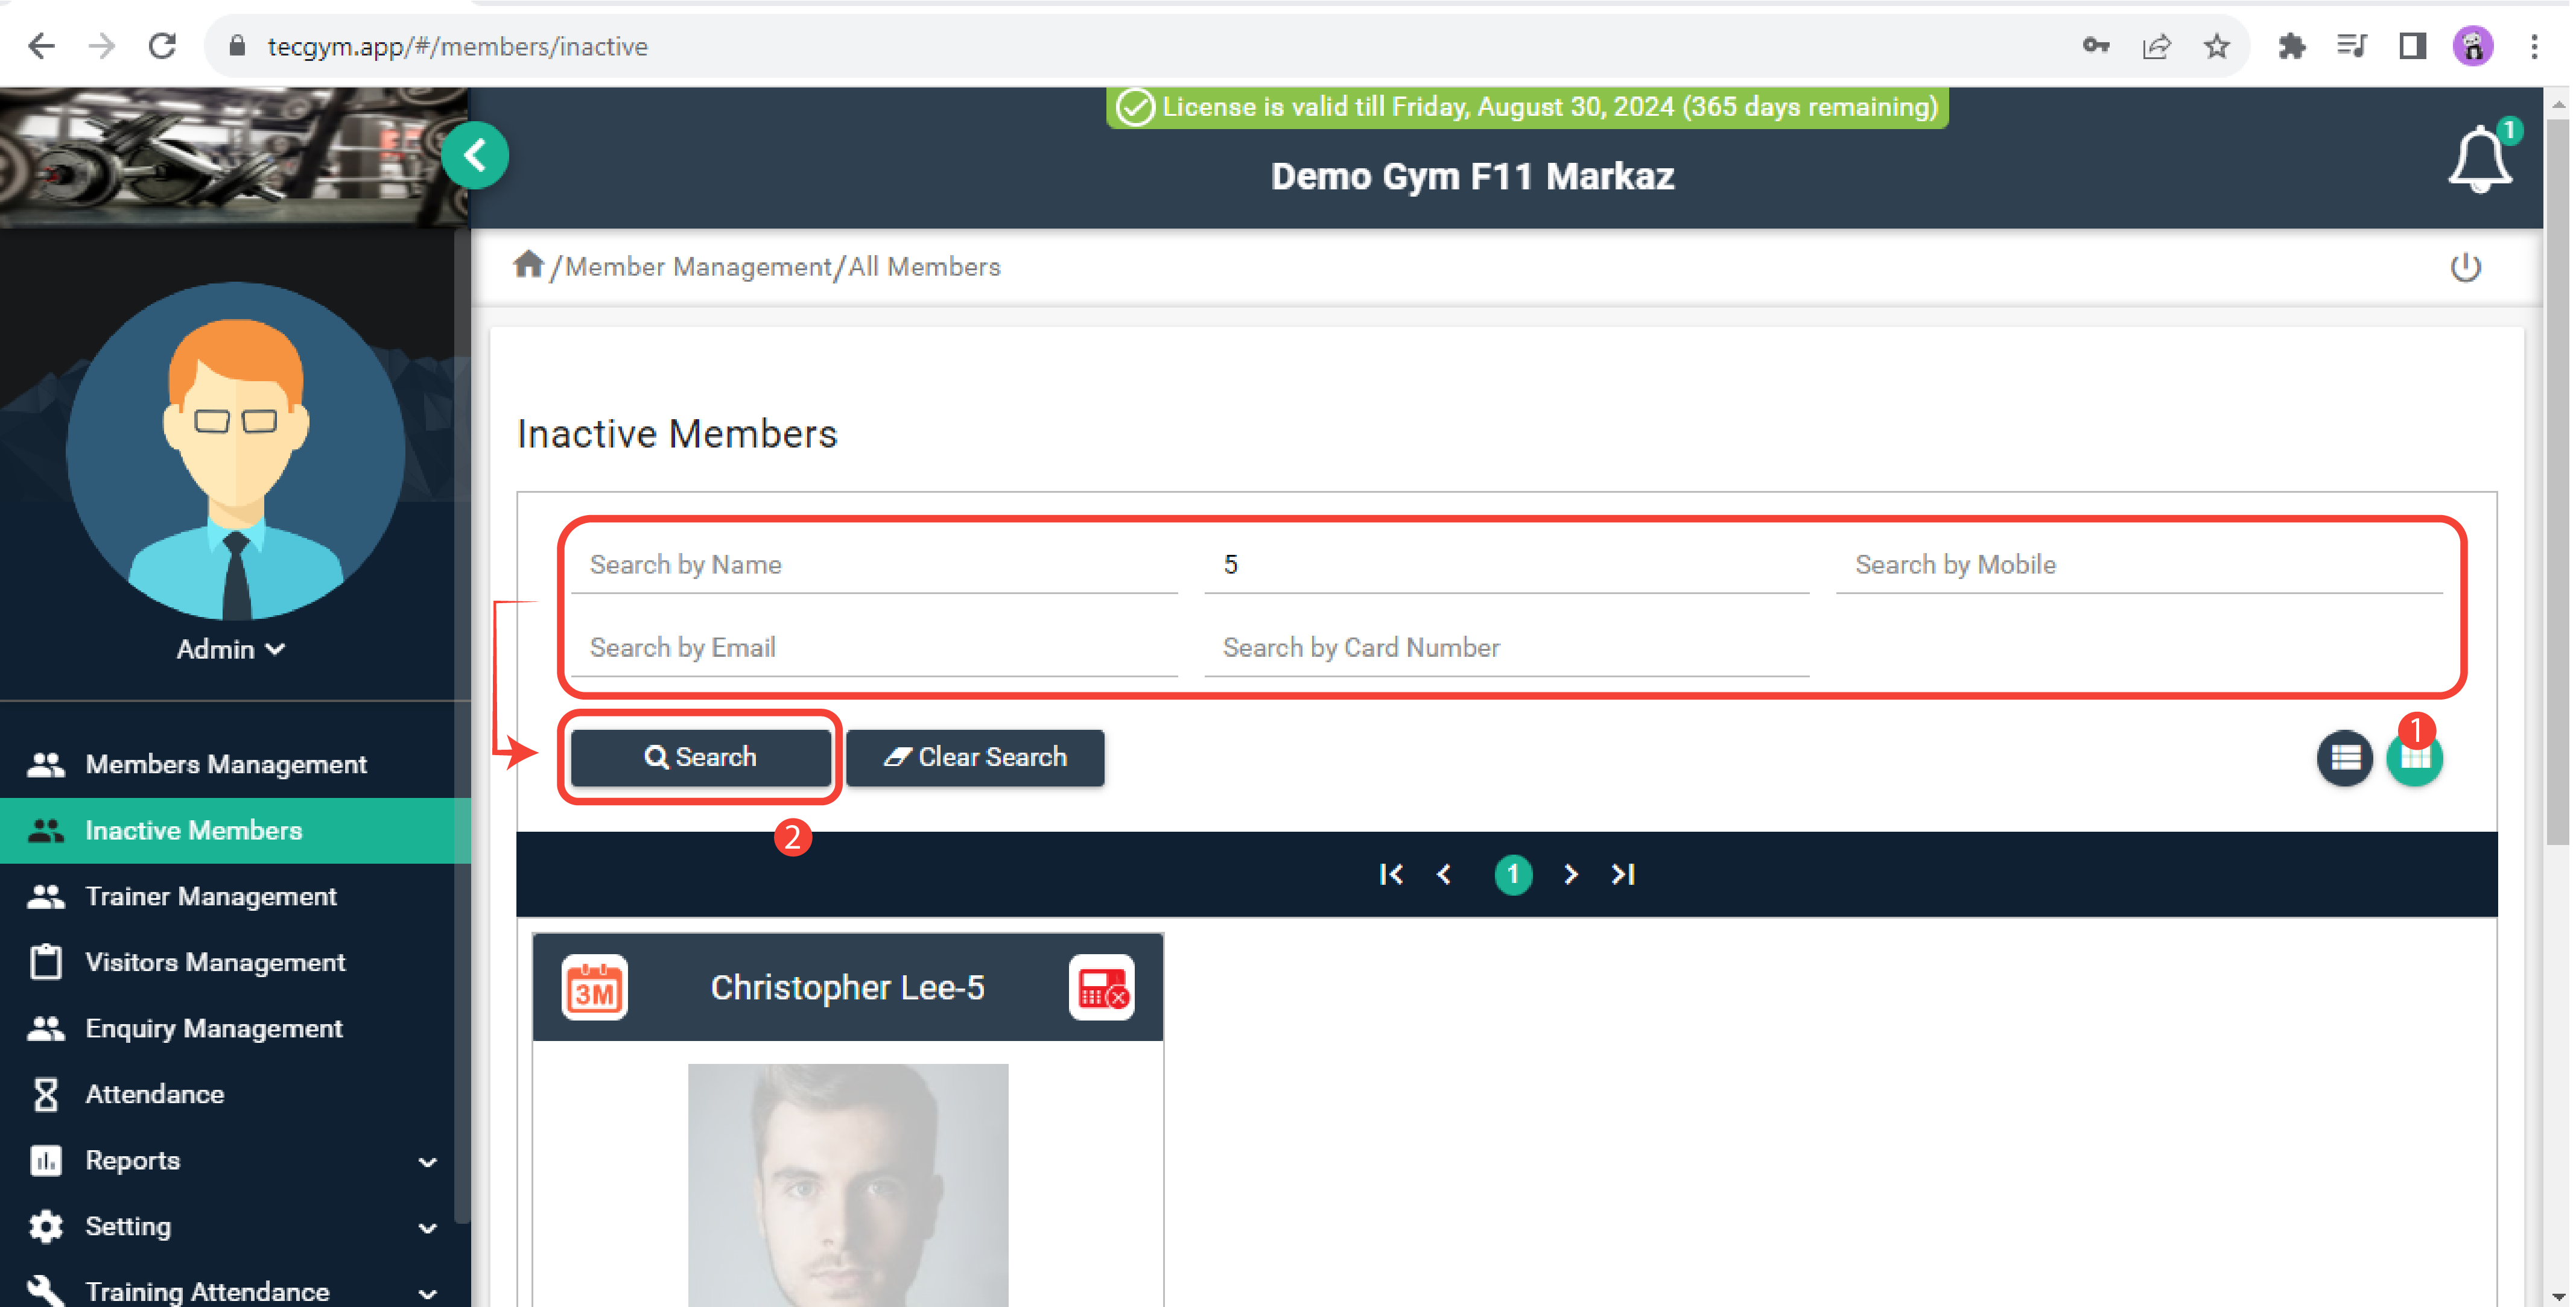
(b) Search
Ans. There are three possible reasons, why a member might be unable to enter:
- Member is In-active.
- Member is Freezed.
- Member is Defaulter.
If the above conditions are not applicable, please review the following points:
- Ensure the Tecgym Console App on the desktop is up and running.
- Confirm that the Tecgym Console App is displaying a green connectivity message as shown in screenshot(a)
- Navigate to the member’s detail page and press the Sync Again button if the Access Control Terminal icon
 .
is still red as shown in screenshot (b).
.
is still red as shown in screenshot (b).
(a) Tecgym Console App
(b) Sync Again
If you are facing any problem, please contact the support team for further assistance.
Click here to watch the video explanation.To address this issue, please review the following points:
- Login to tecgym.app and go to branch details as shown in screenshot (a). Make sure the lock indicates Yes. If its No, defaulters will be able to enter into the gym.
- If it is Yes than from the left menu, select Members Management as shown in screenshot (b)
- This action will display the list of members.
- Click on the specific member from the list or use the search functionality.
- On this member’s detail page, check the Access Control Terminal (ACT) icon. If it's displayed in green, contact the support team. If it's red, proceed with the following checks.
- Ensure the Tecgym Console App on the desktop is up and running.
- Confirm that the Tecgym Console App is displaying a green connectivity message as shown in screenshot (d).
(d) Tecgym Console App
- Ensure your internet connection is active.
- From the Member's Detail page, click the Sync Again button, as illustrated in screenshot (E). After a few seconds, the member's entry will be removed from the Access Control Terminal (ACT), and the member won't be able to enter the gym if the gym settings dictate locking the ACT for defaulters.
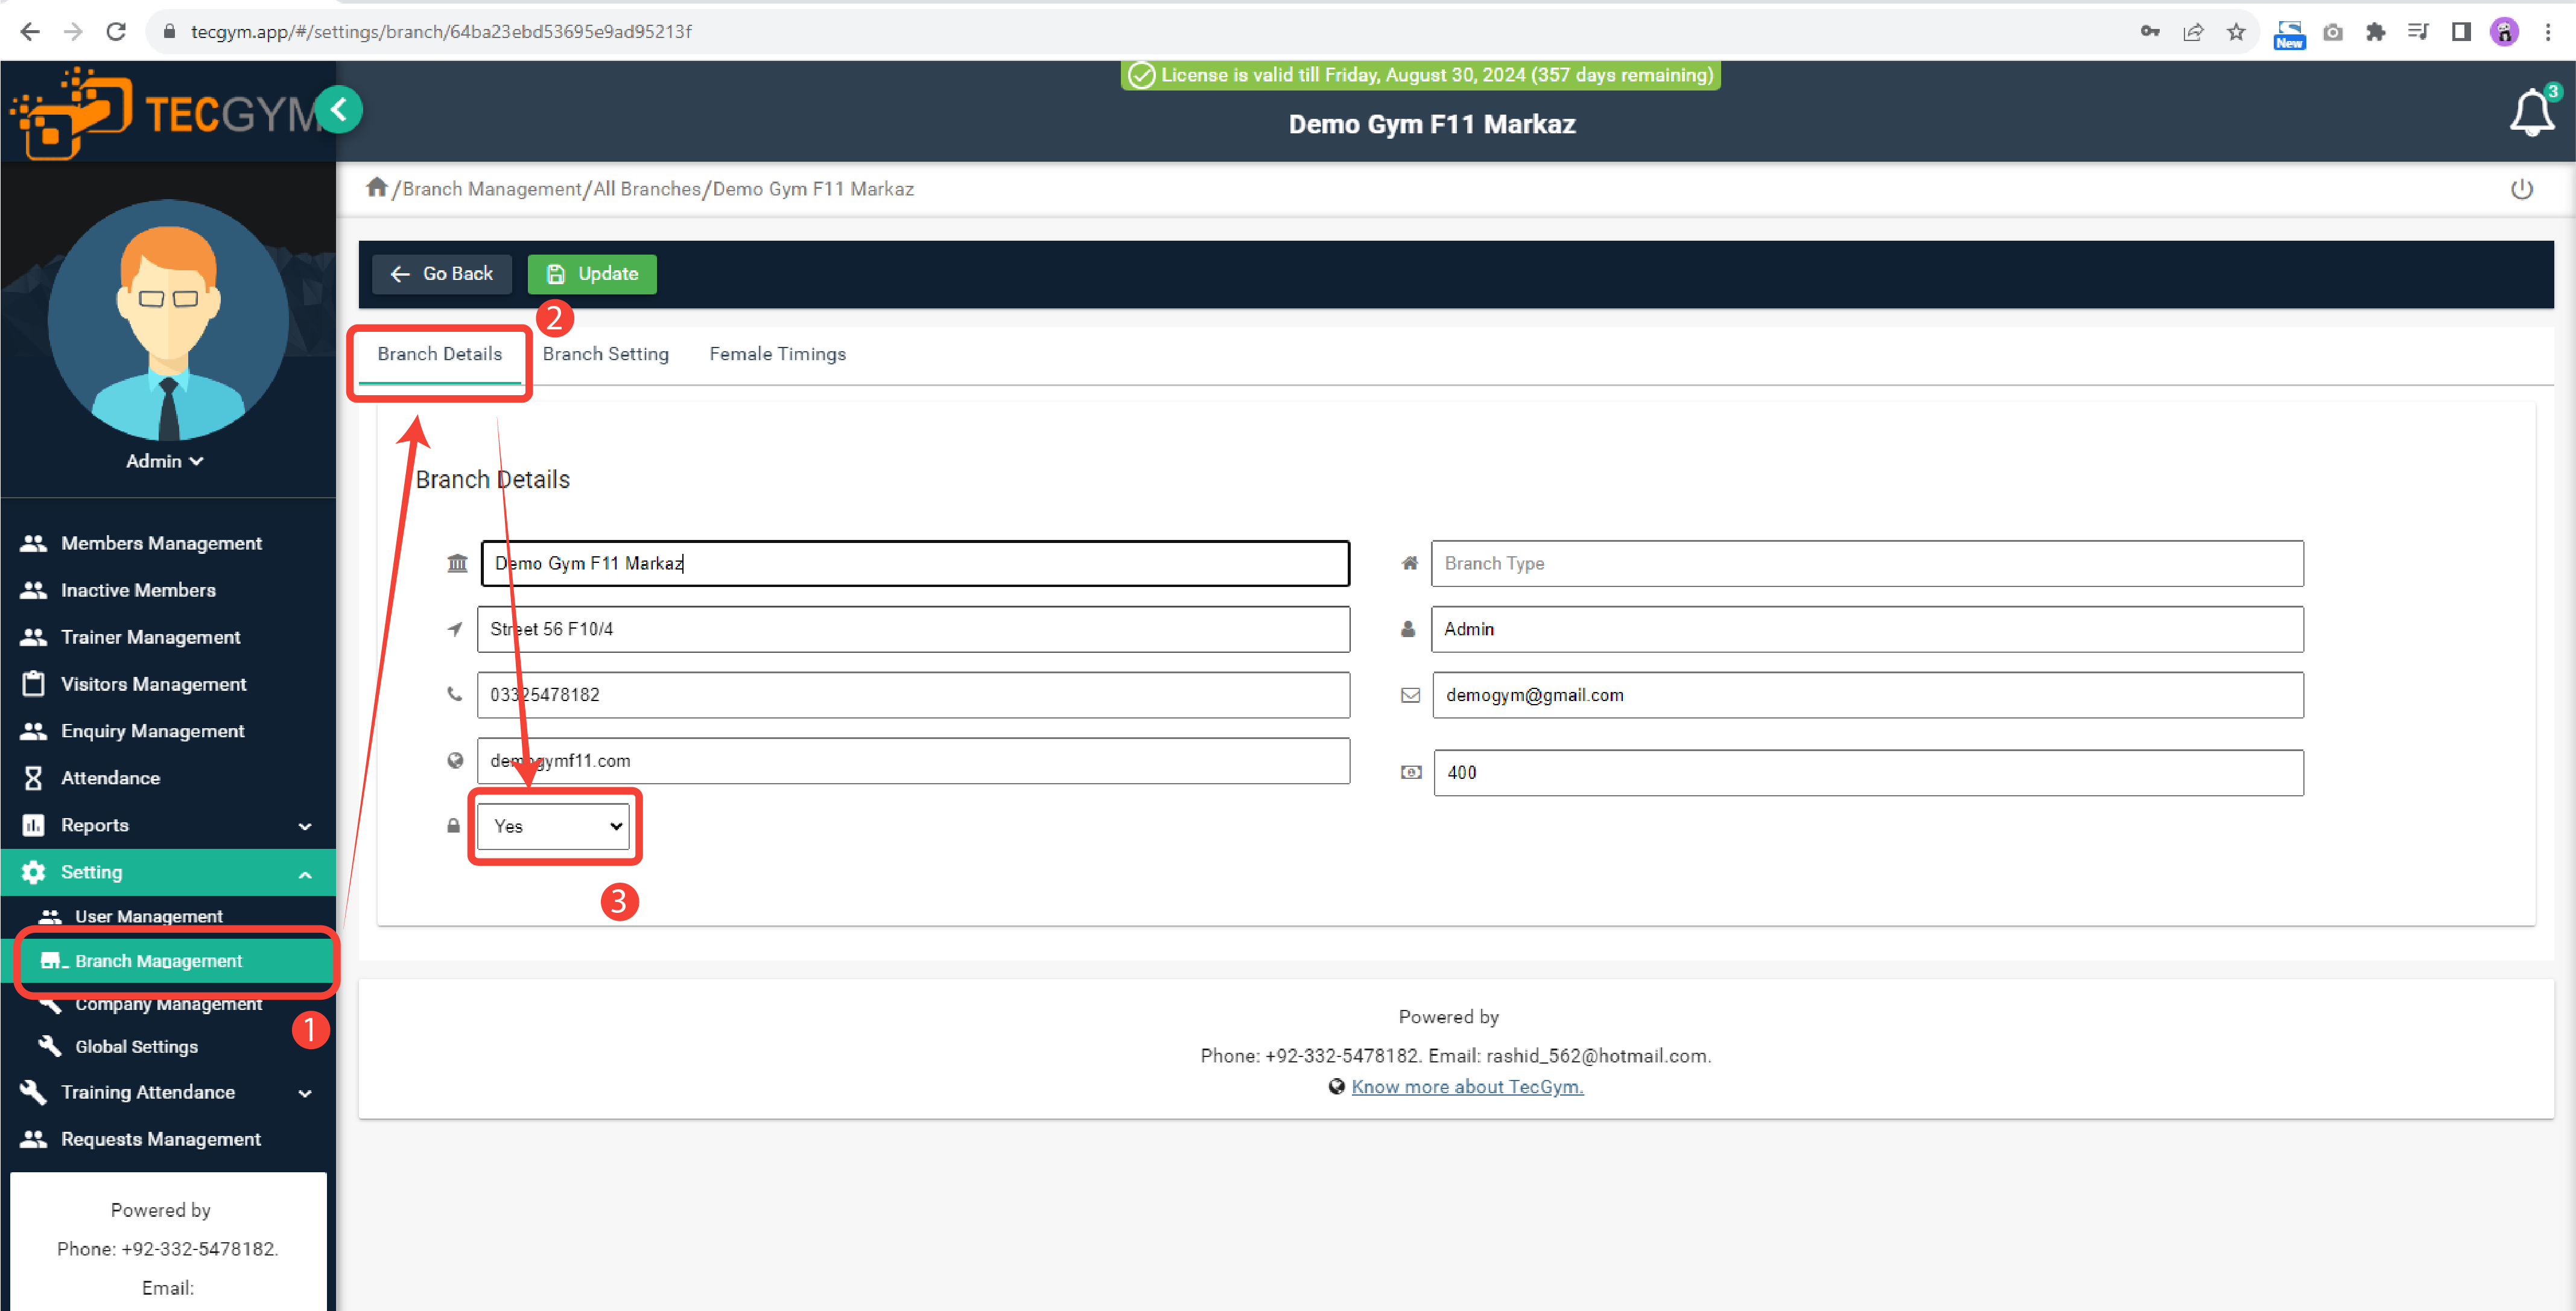
(a) Branch Details
(b) Member Management
(c) screenshot
(E) Sync Again
If you are facing any problem, please contact the support team for further assistance.
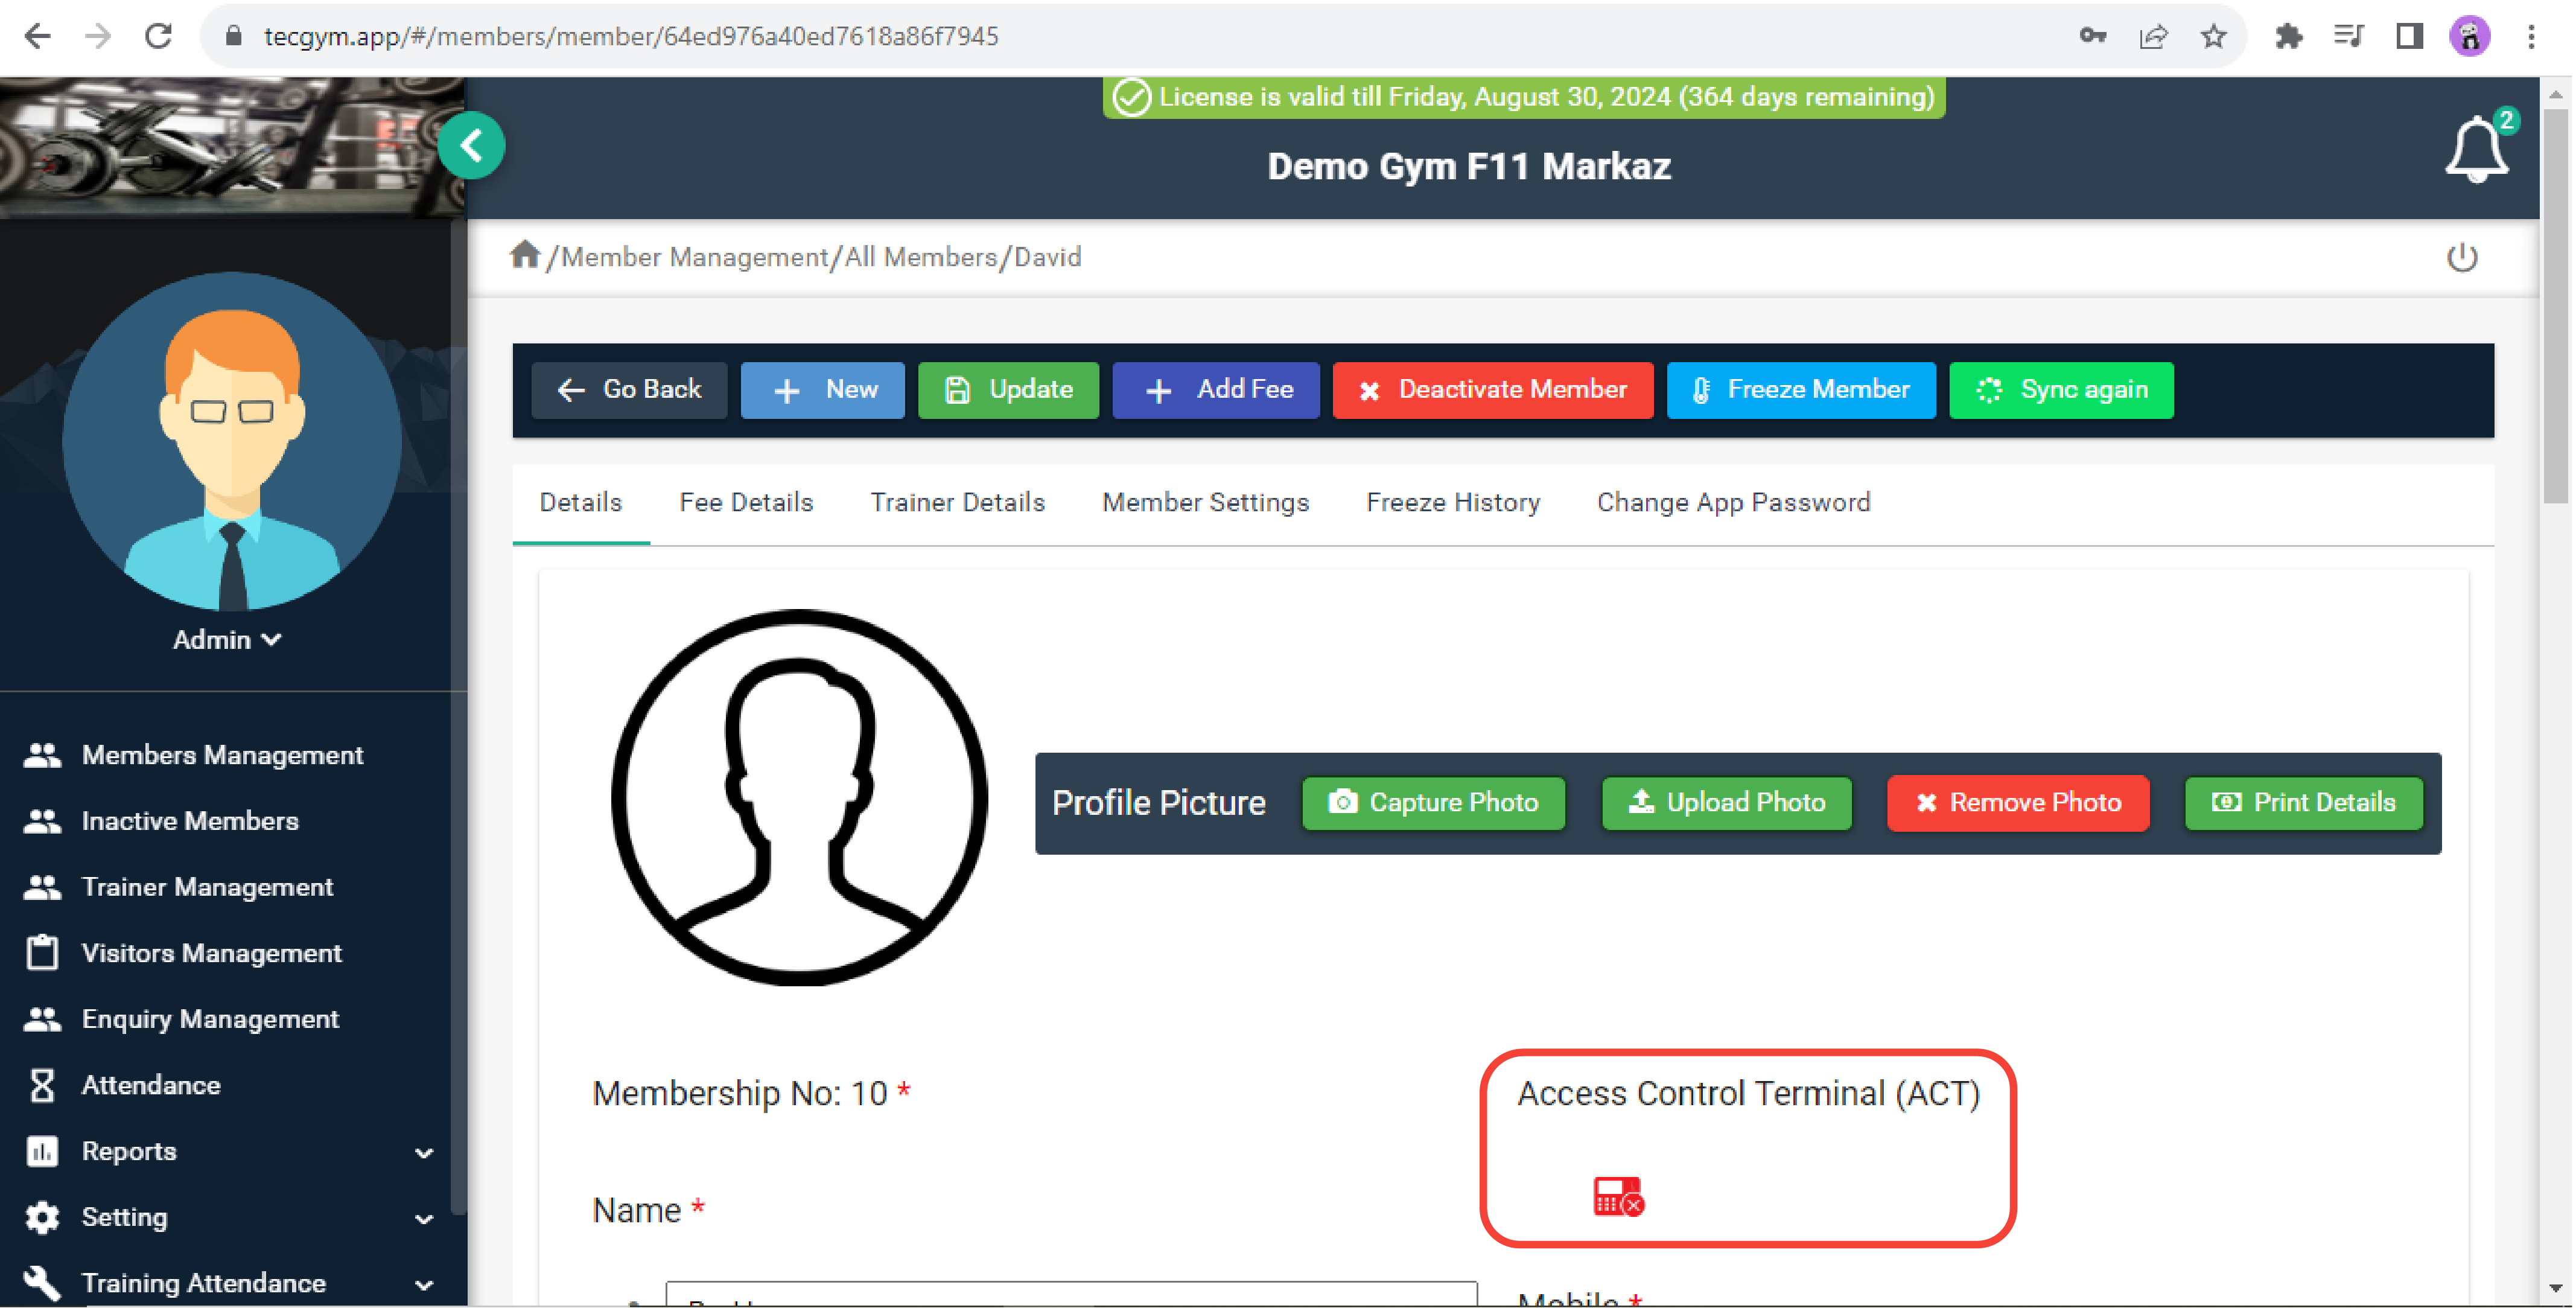
Click here to watch the video explanation.To deactivate a member, navigate to Members Management and select the specific member you want to deactivate. On this page, you will find a Deactivate button, as shown in the screenshot (a).
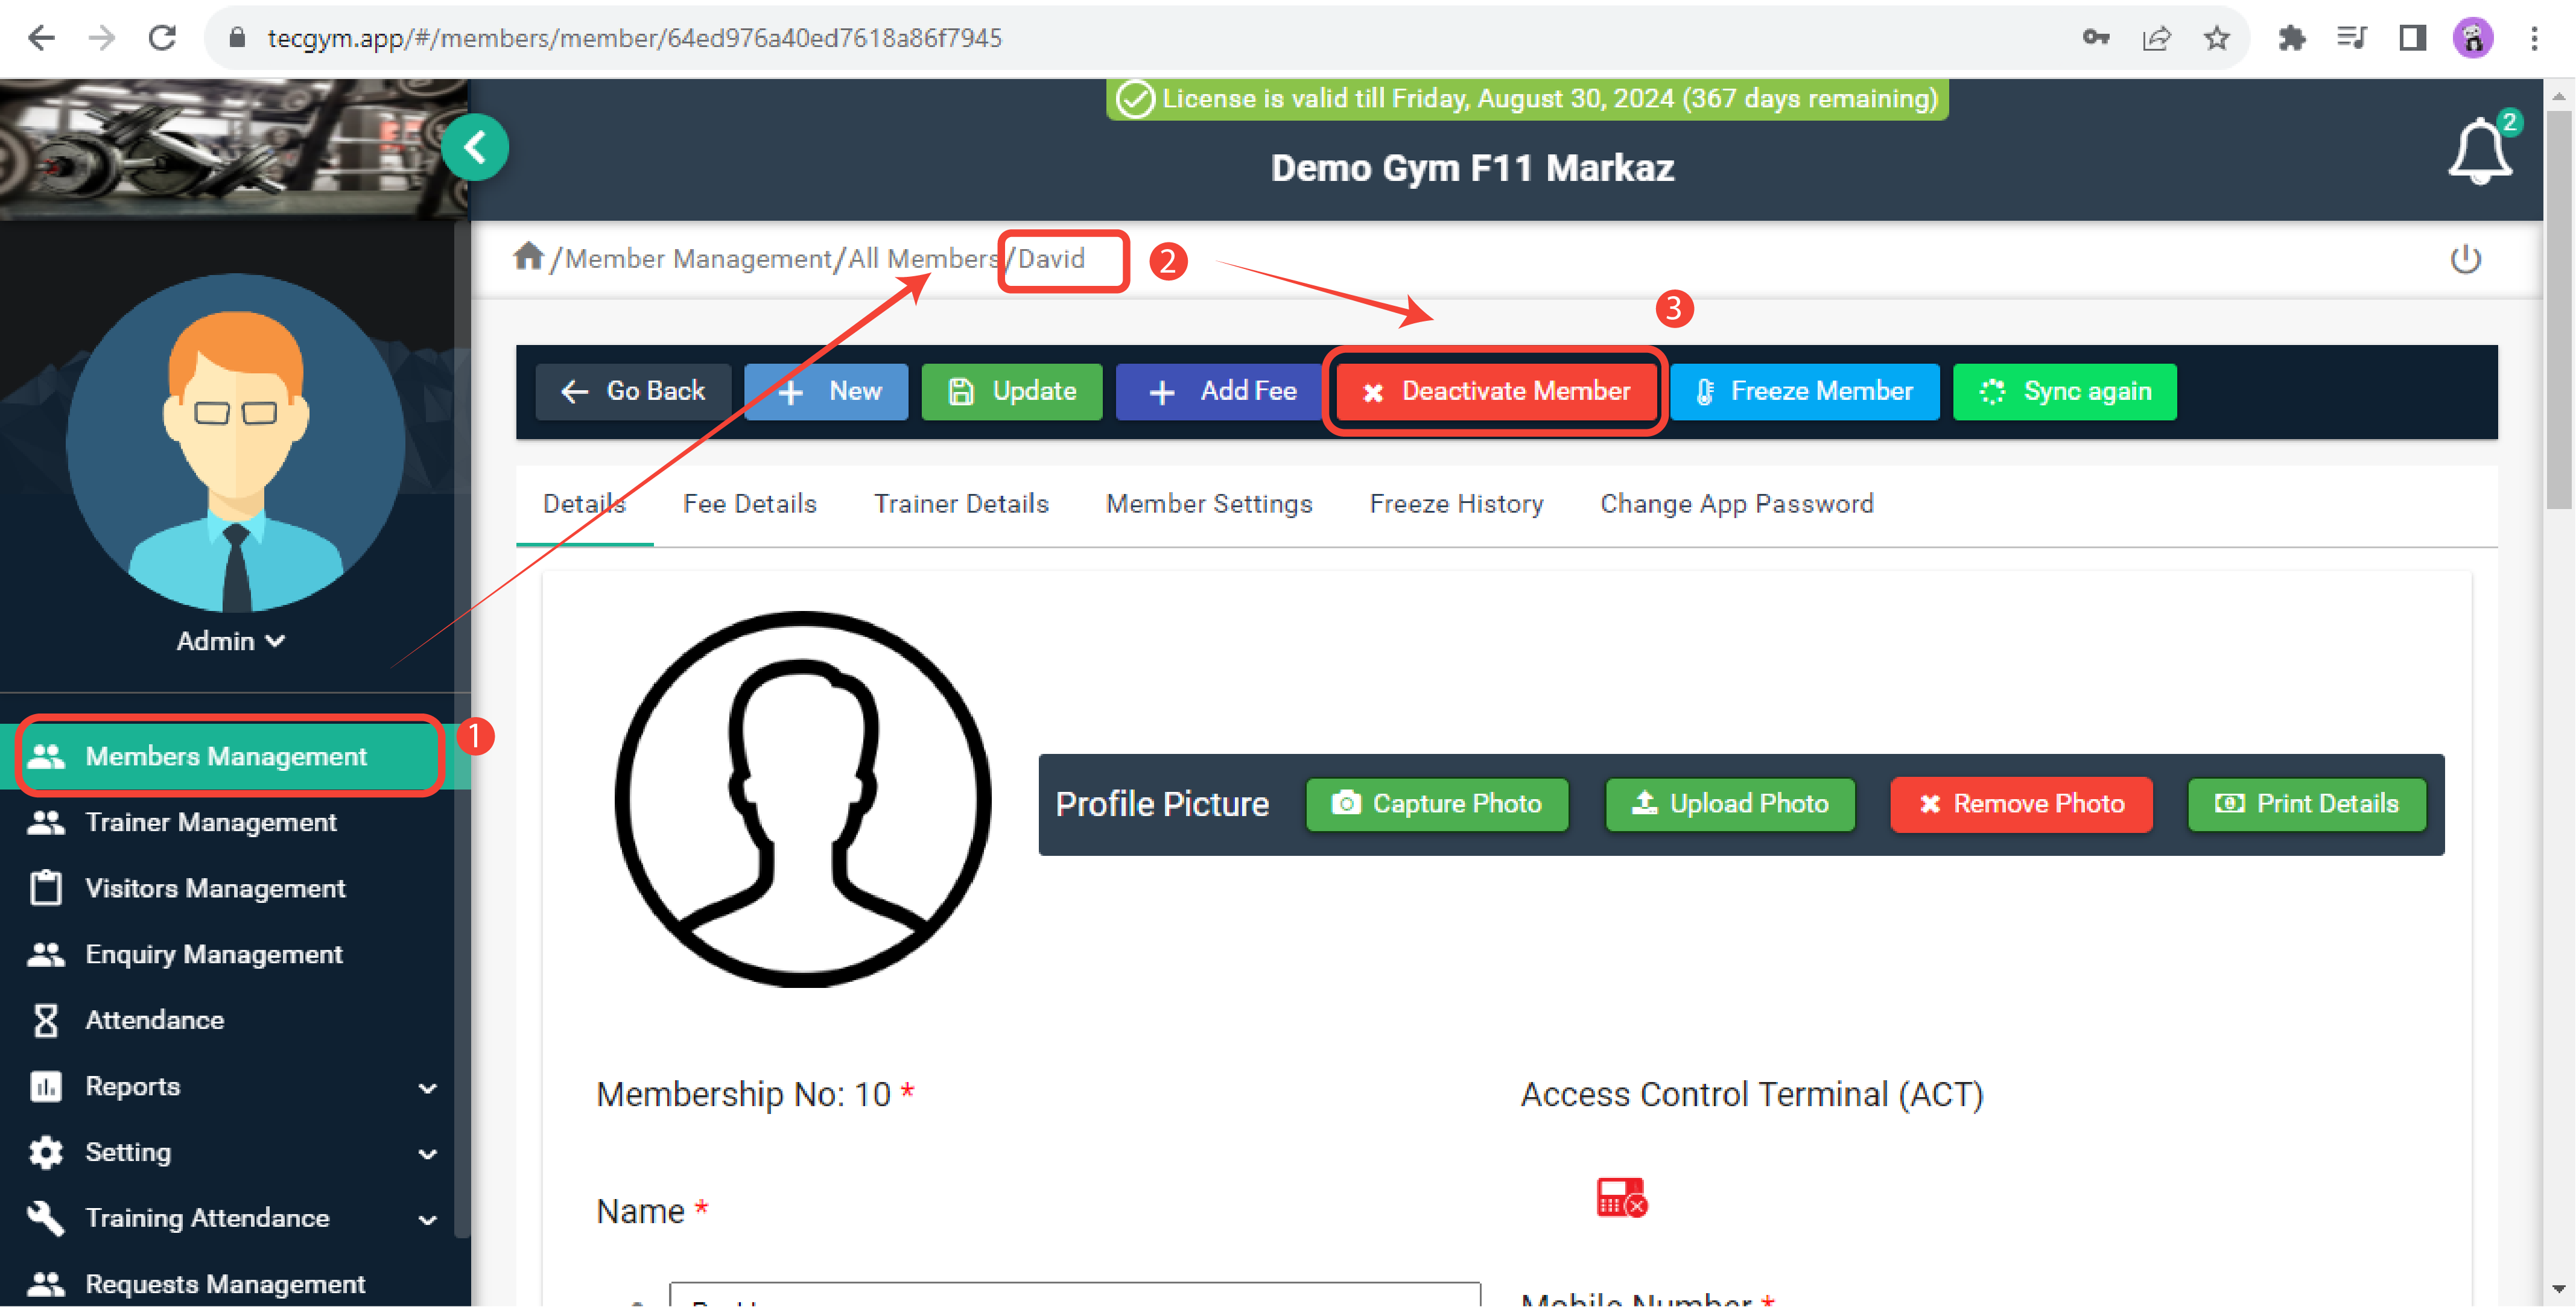
(a) screenshot
To activate a member, navigate to Inactive Members and select the specific member you want to activate. On this page, you will find a Activate button, as shown in the screenshot (a).
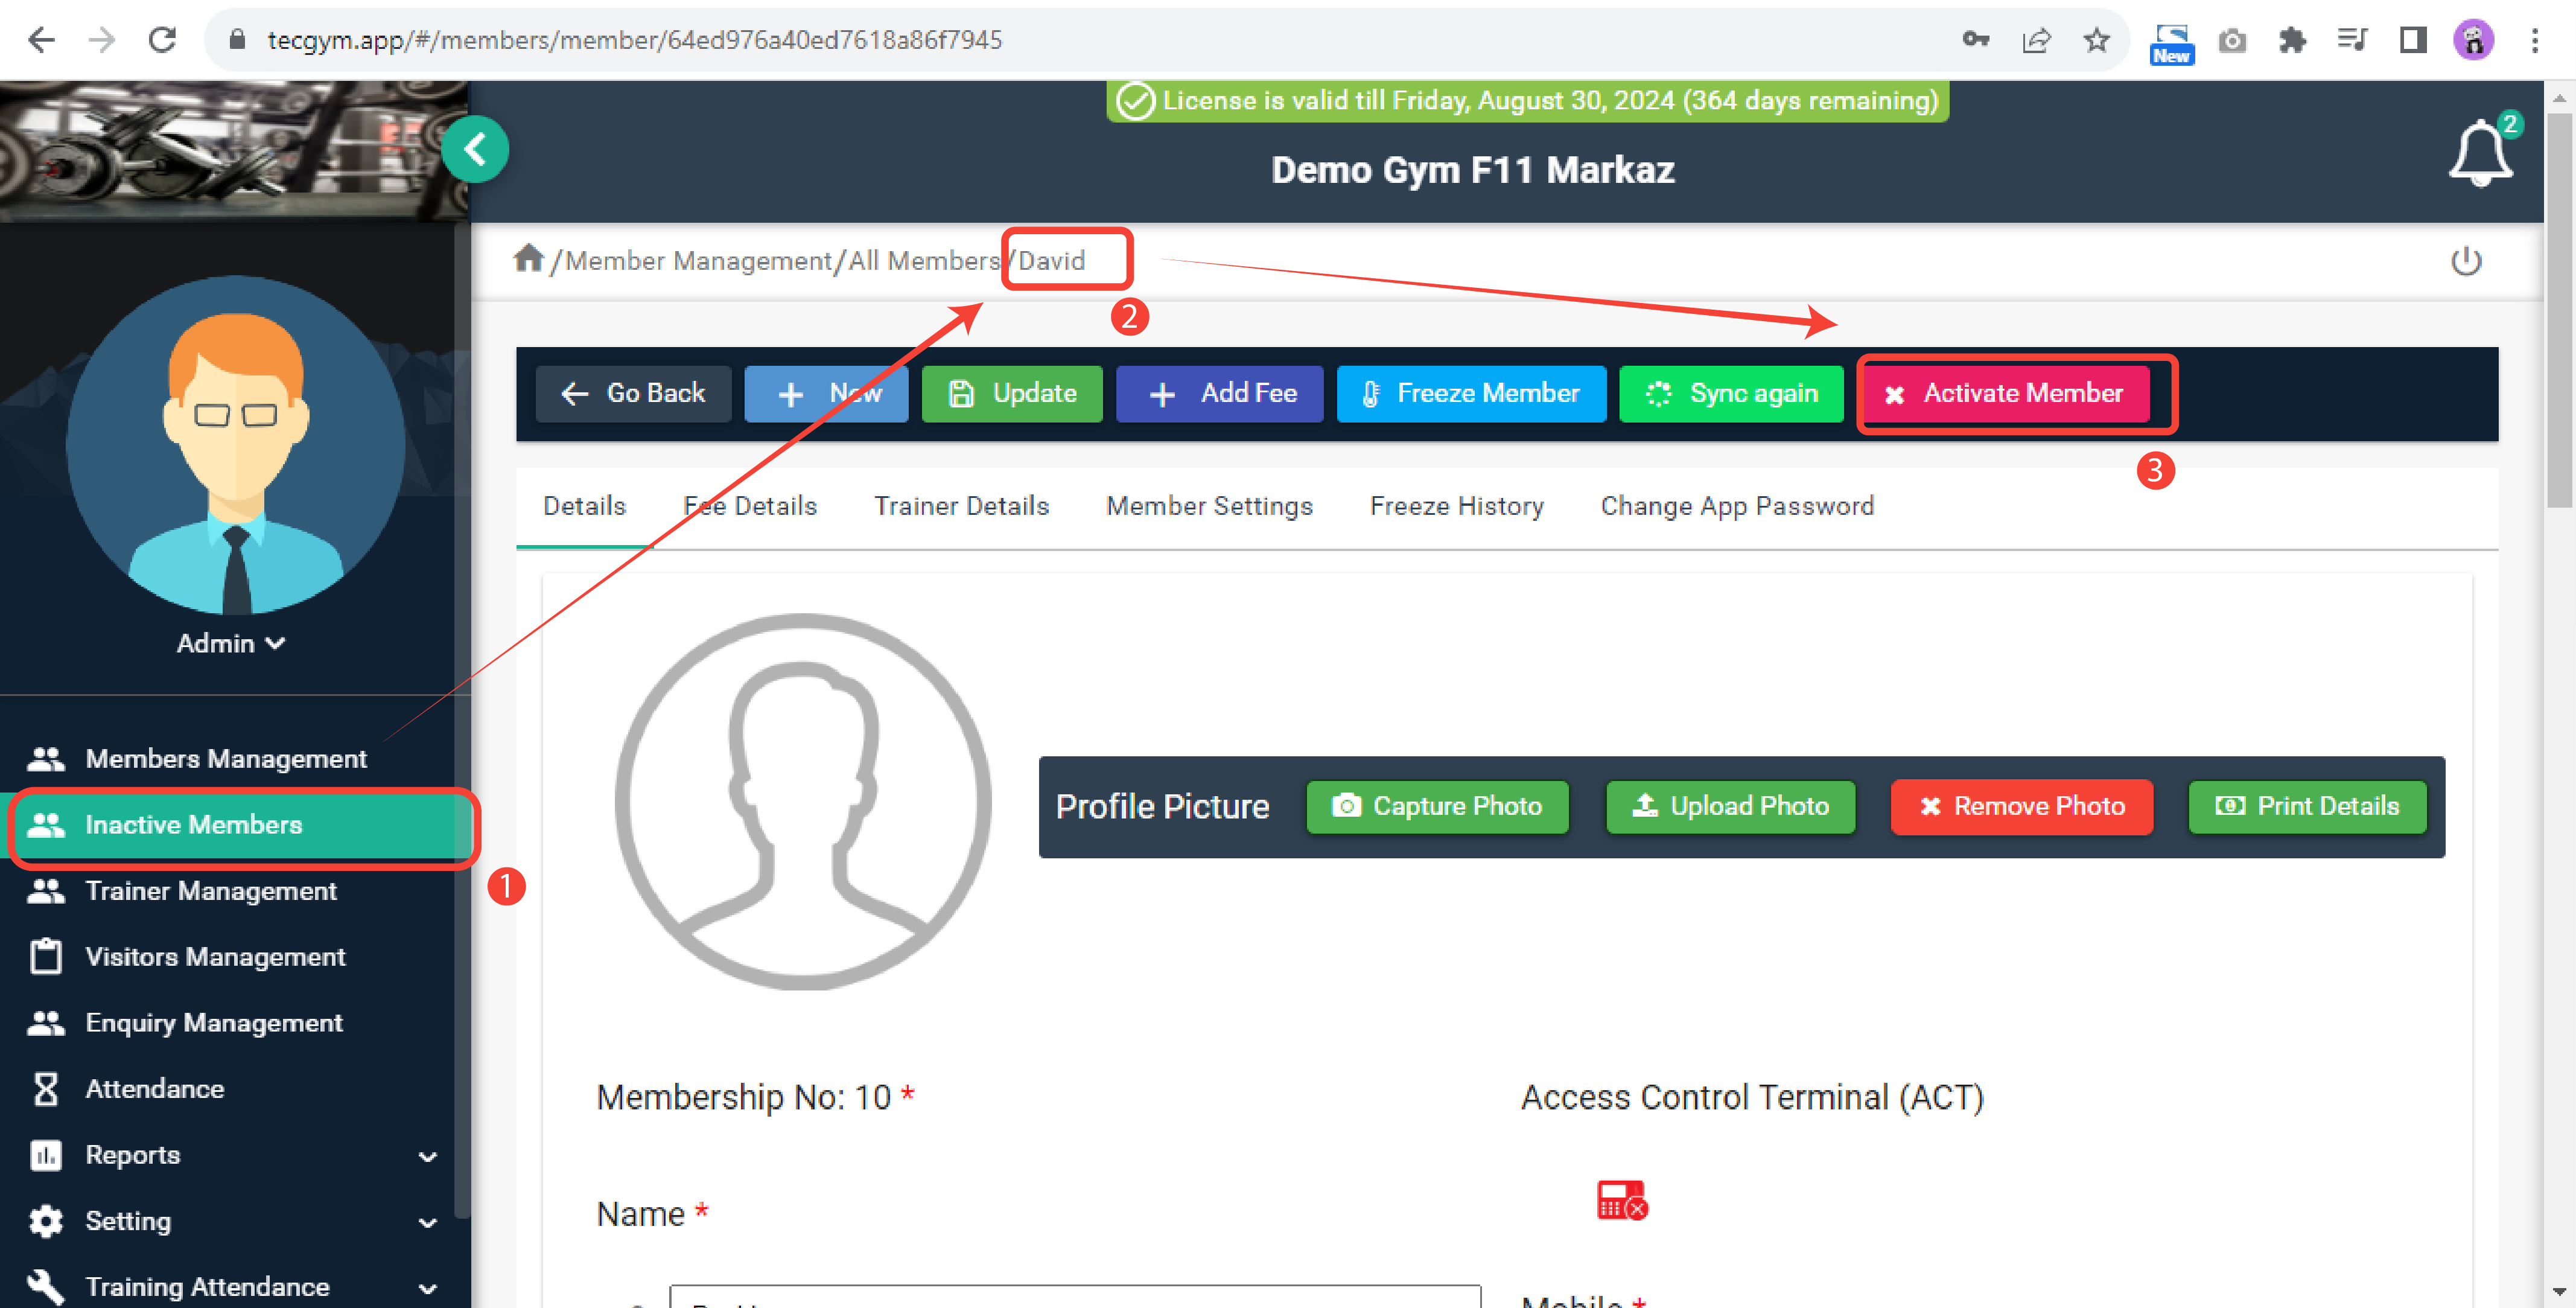
(a) screenshot
Click on Activate button and a confirmation prompt will appear. To proceed with activation, click Yes and the member's account will be activated, as shown in the screenshot (b).
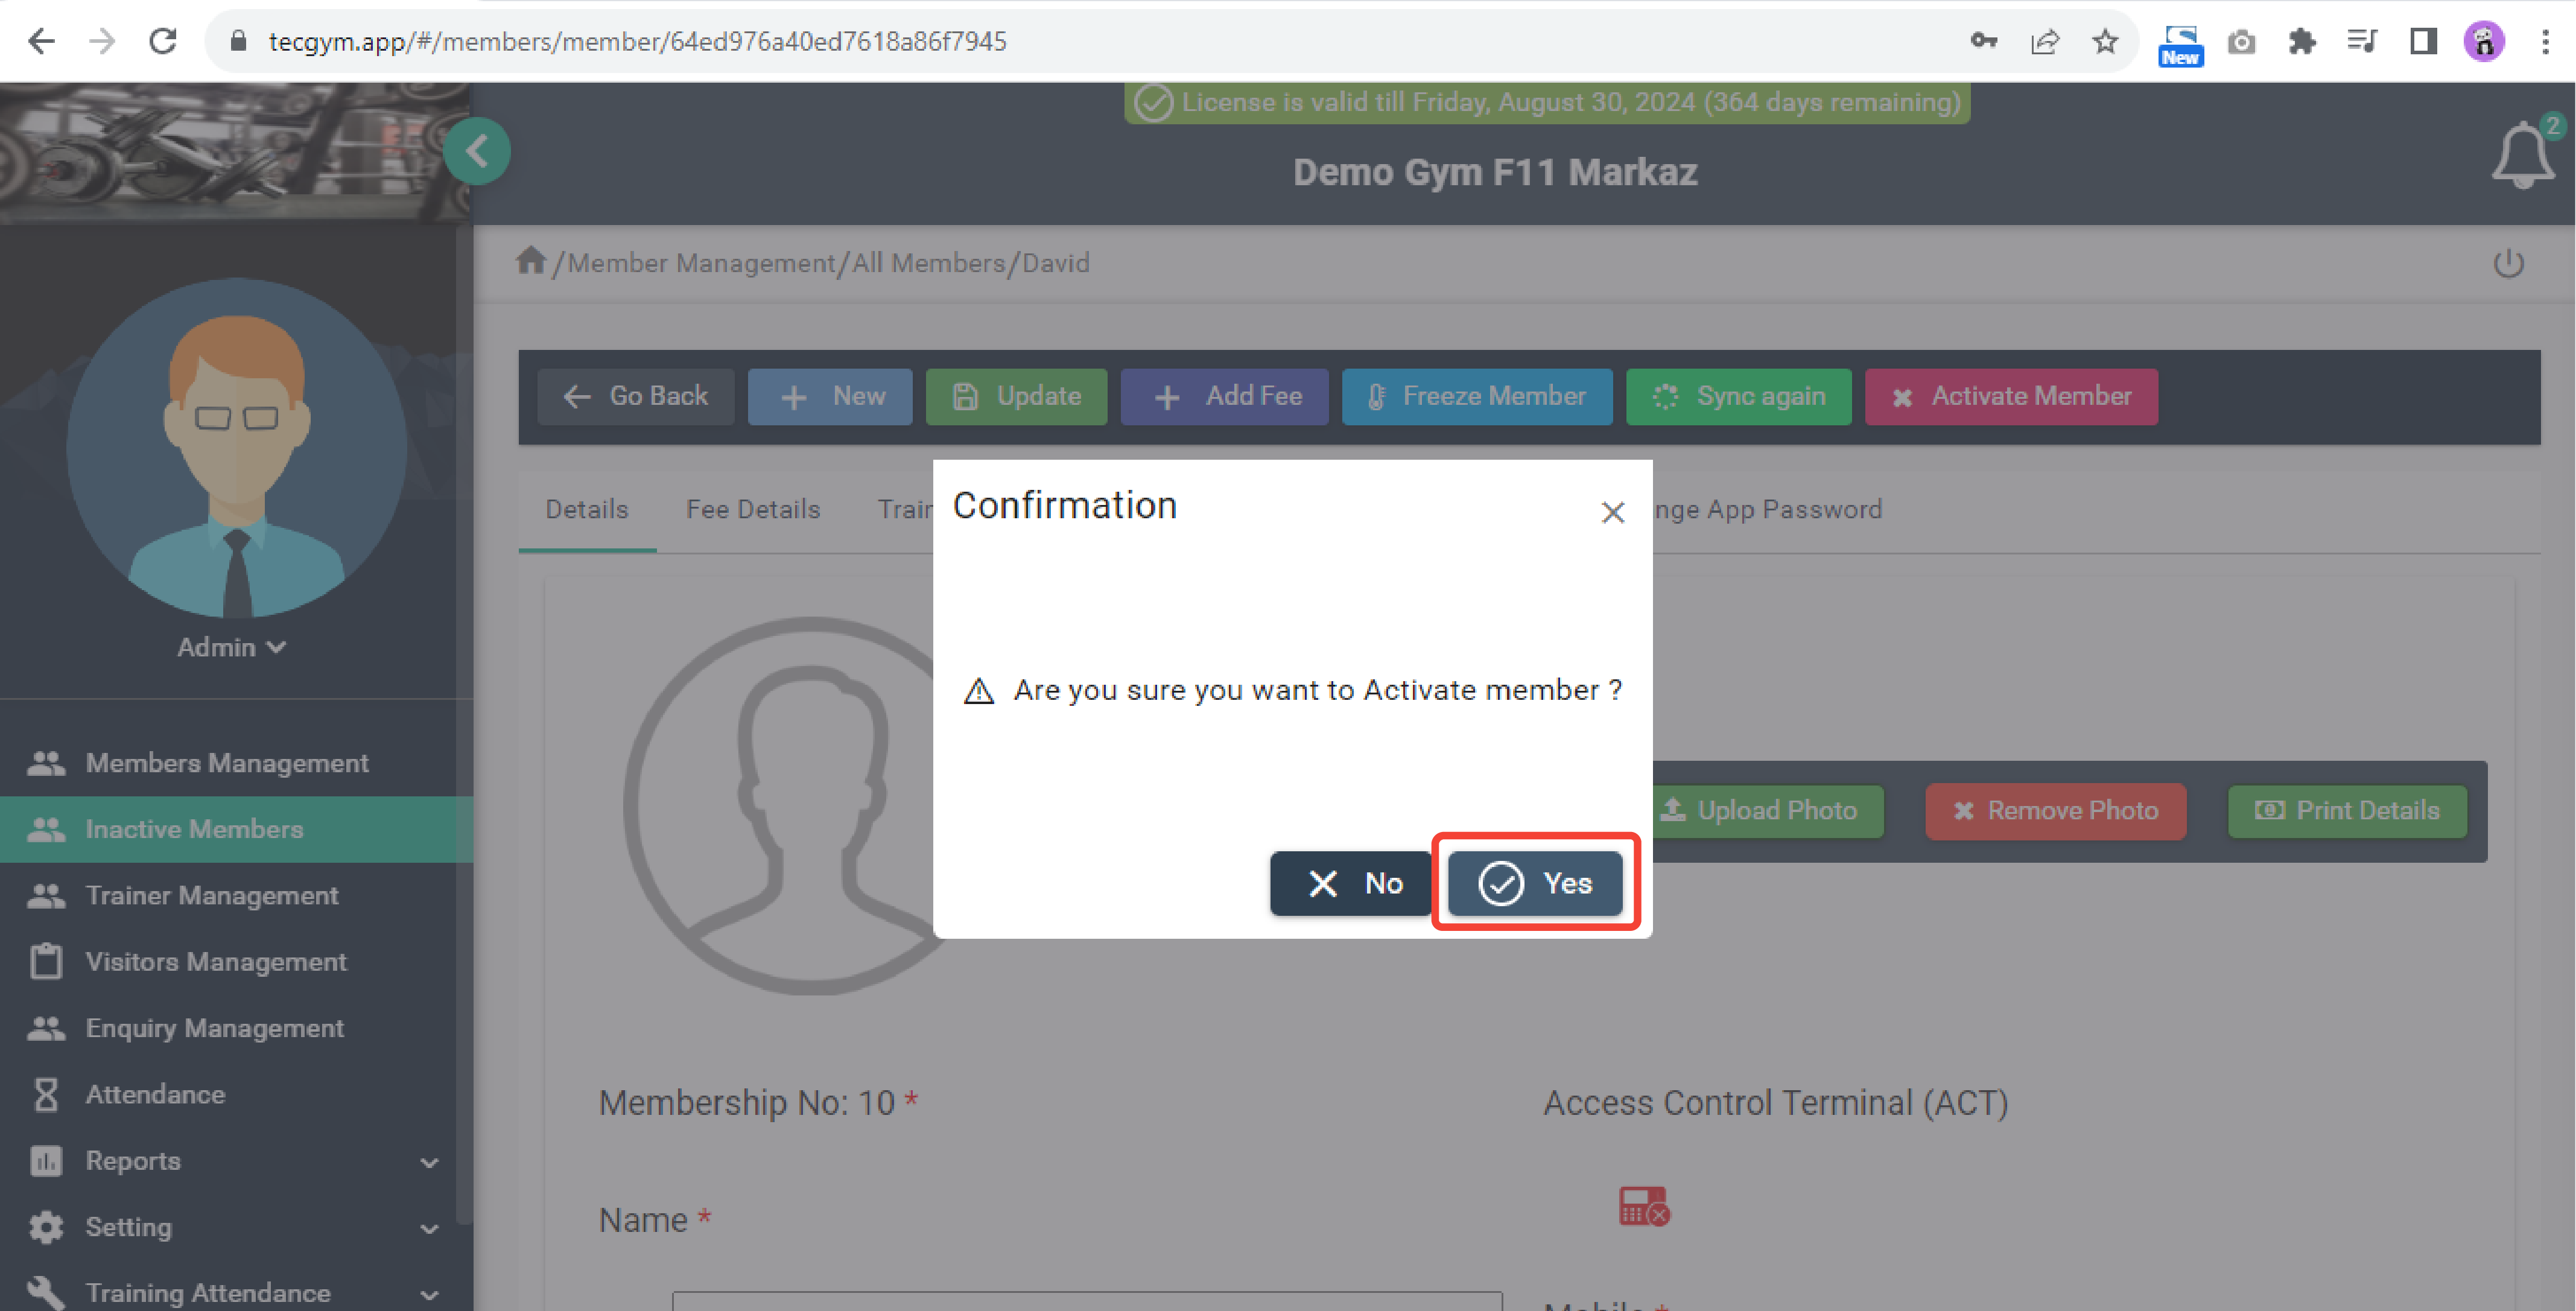
(b) screenshot
To change the Next Due Date of a member, open member's detail and go to Member Settings as shown in screenshot (a)
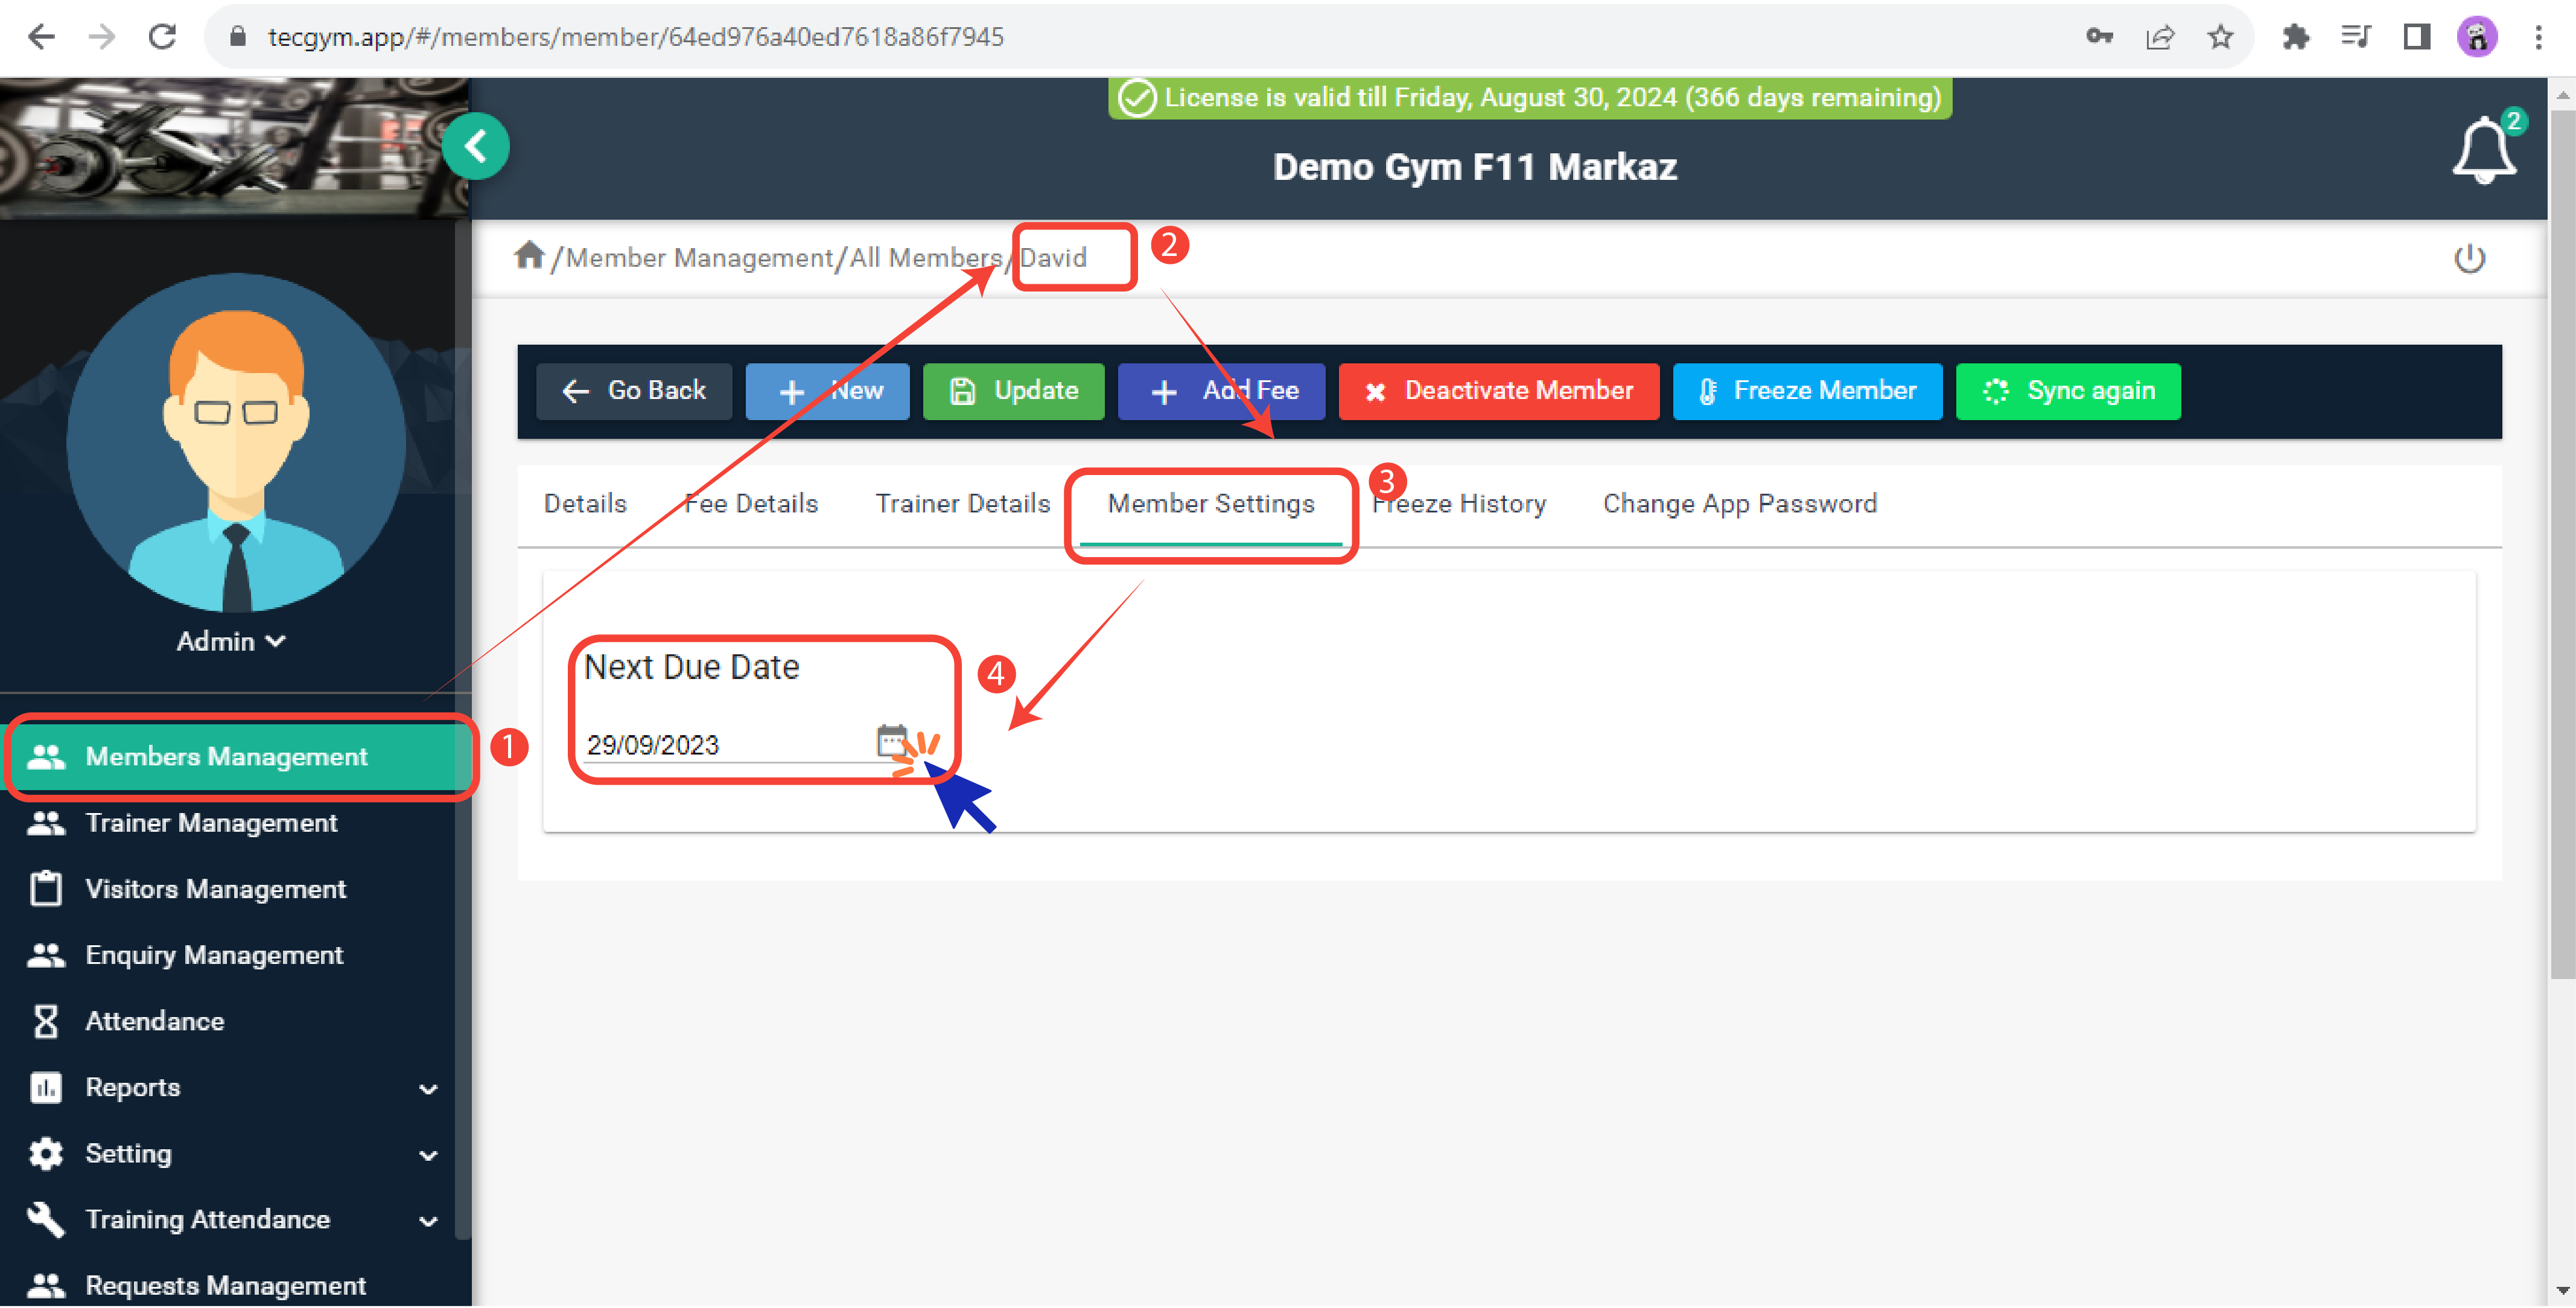
(a) screenshot
There, you will see the Next Due Date section. From the calendar, you can change the next due date, but don't forget to press the Update button; otherwise it will not be changed.
Using LAN is the recommended method of connecting your desktop computer and Access Control Terminal (ACT) . Additionally, ensure that both your desktop computer and Access Control Terminal (ACT) are on the same network. Forexample, if the Ip Address of your computer is 127.16.240.203, than first three groups i.e 127.16.240 should be same on both of your computer and Access Control Terminal (ACT).
After completing the Add New Member process on tecgym.app, if the Tecgym Console App on the desktop is up and running, the registered member will be automatically included in the Access Control Terminal (ACT) and will subsequently appear within the ZKTimes.net application. To register a fingerprint using a small scanner device, follow these steps:
- Launch the ZKTimes.net application. You will see this screen as shown in screenshot (a).
- Navigate to the Personal tab located in the top menu as shown in screenshot (b).
- Enter the membership number in search to get the desired member.
- In the Member details section, there is a Biometric icon as shown in screenshot (c).
- Clicking on this icon will open a new window, presenting two options at the top.
- Choose Sensor option and then proceed to select the specific finger for registration as shown in screenshot (d).
- Place the finger you want to register onto the sensor surface.
- You need to scan your specific fingers 3 times.
- Upon successful completion, a success message Biometric is registered will appear.
- Additionally, the registered fingerprint will be added into the Access Control Terminal (ACT) system.
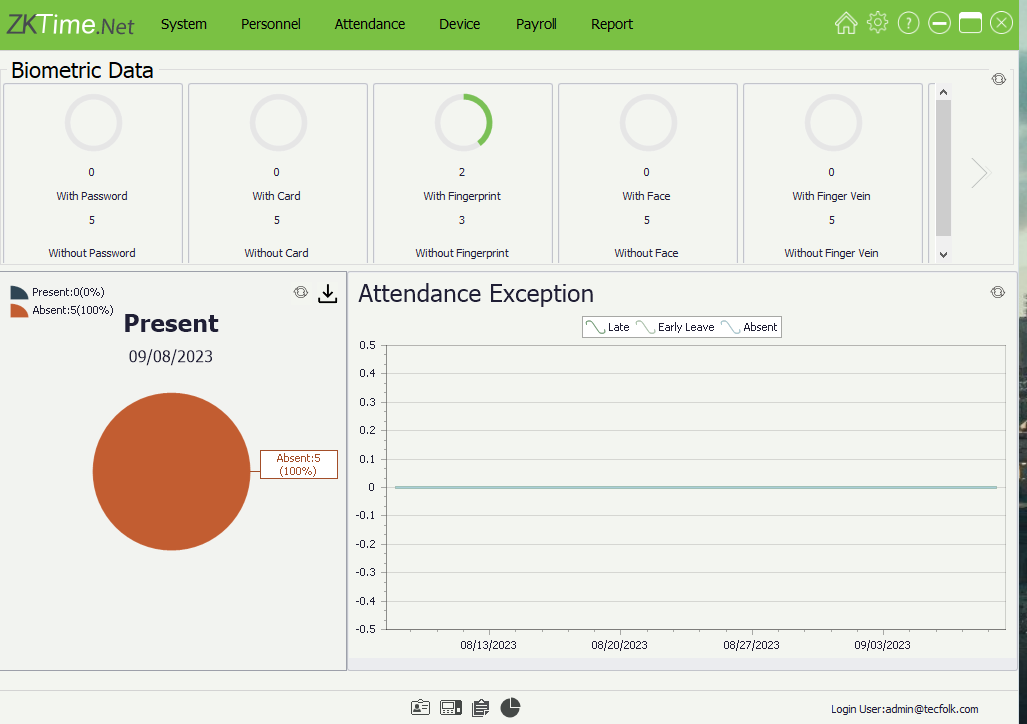
(a) ZKTimes Application
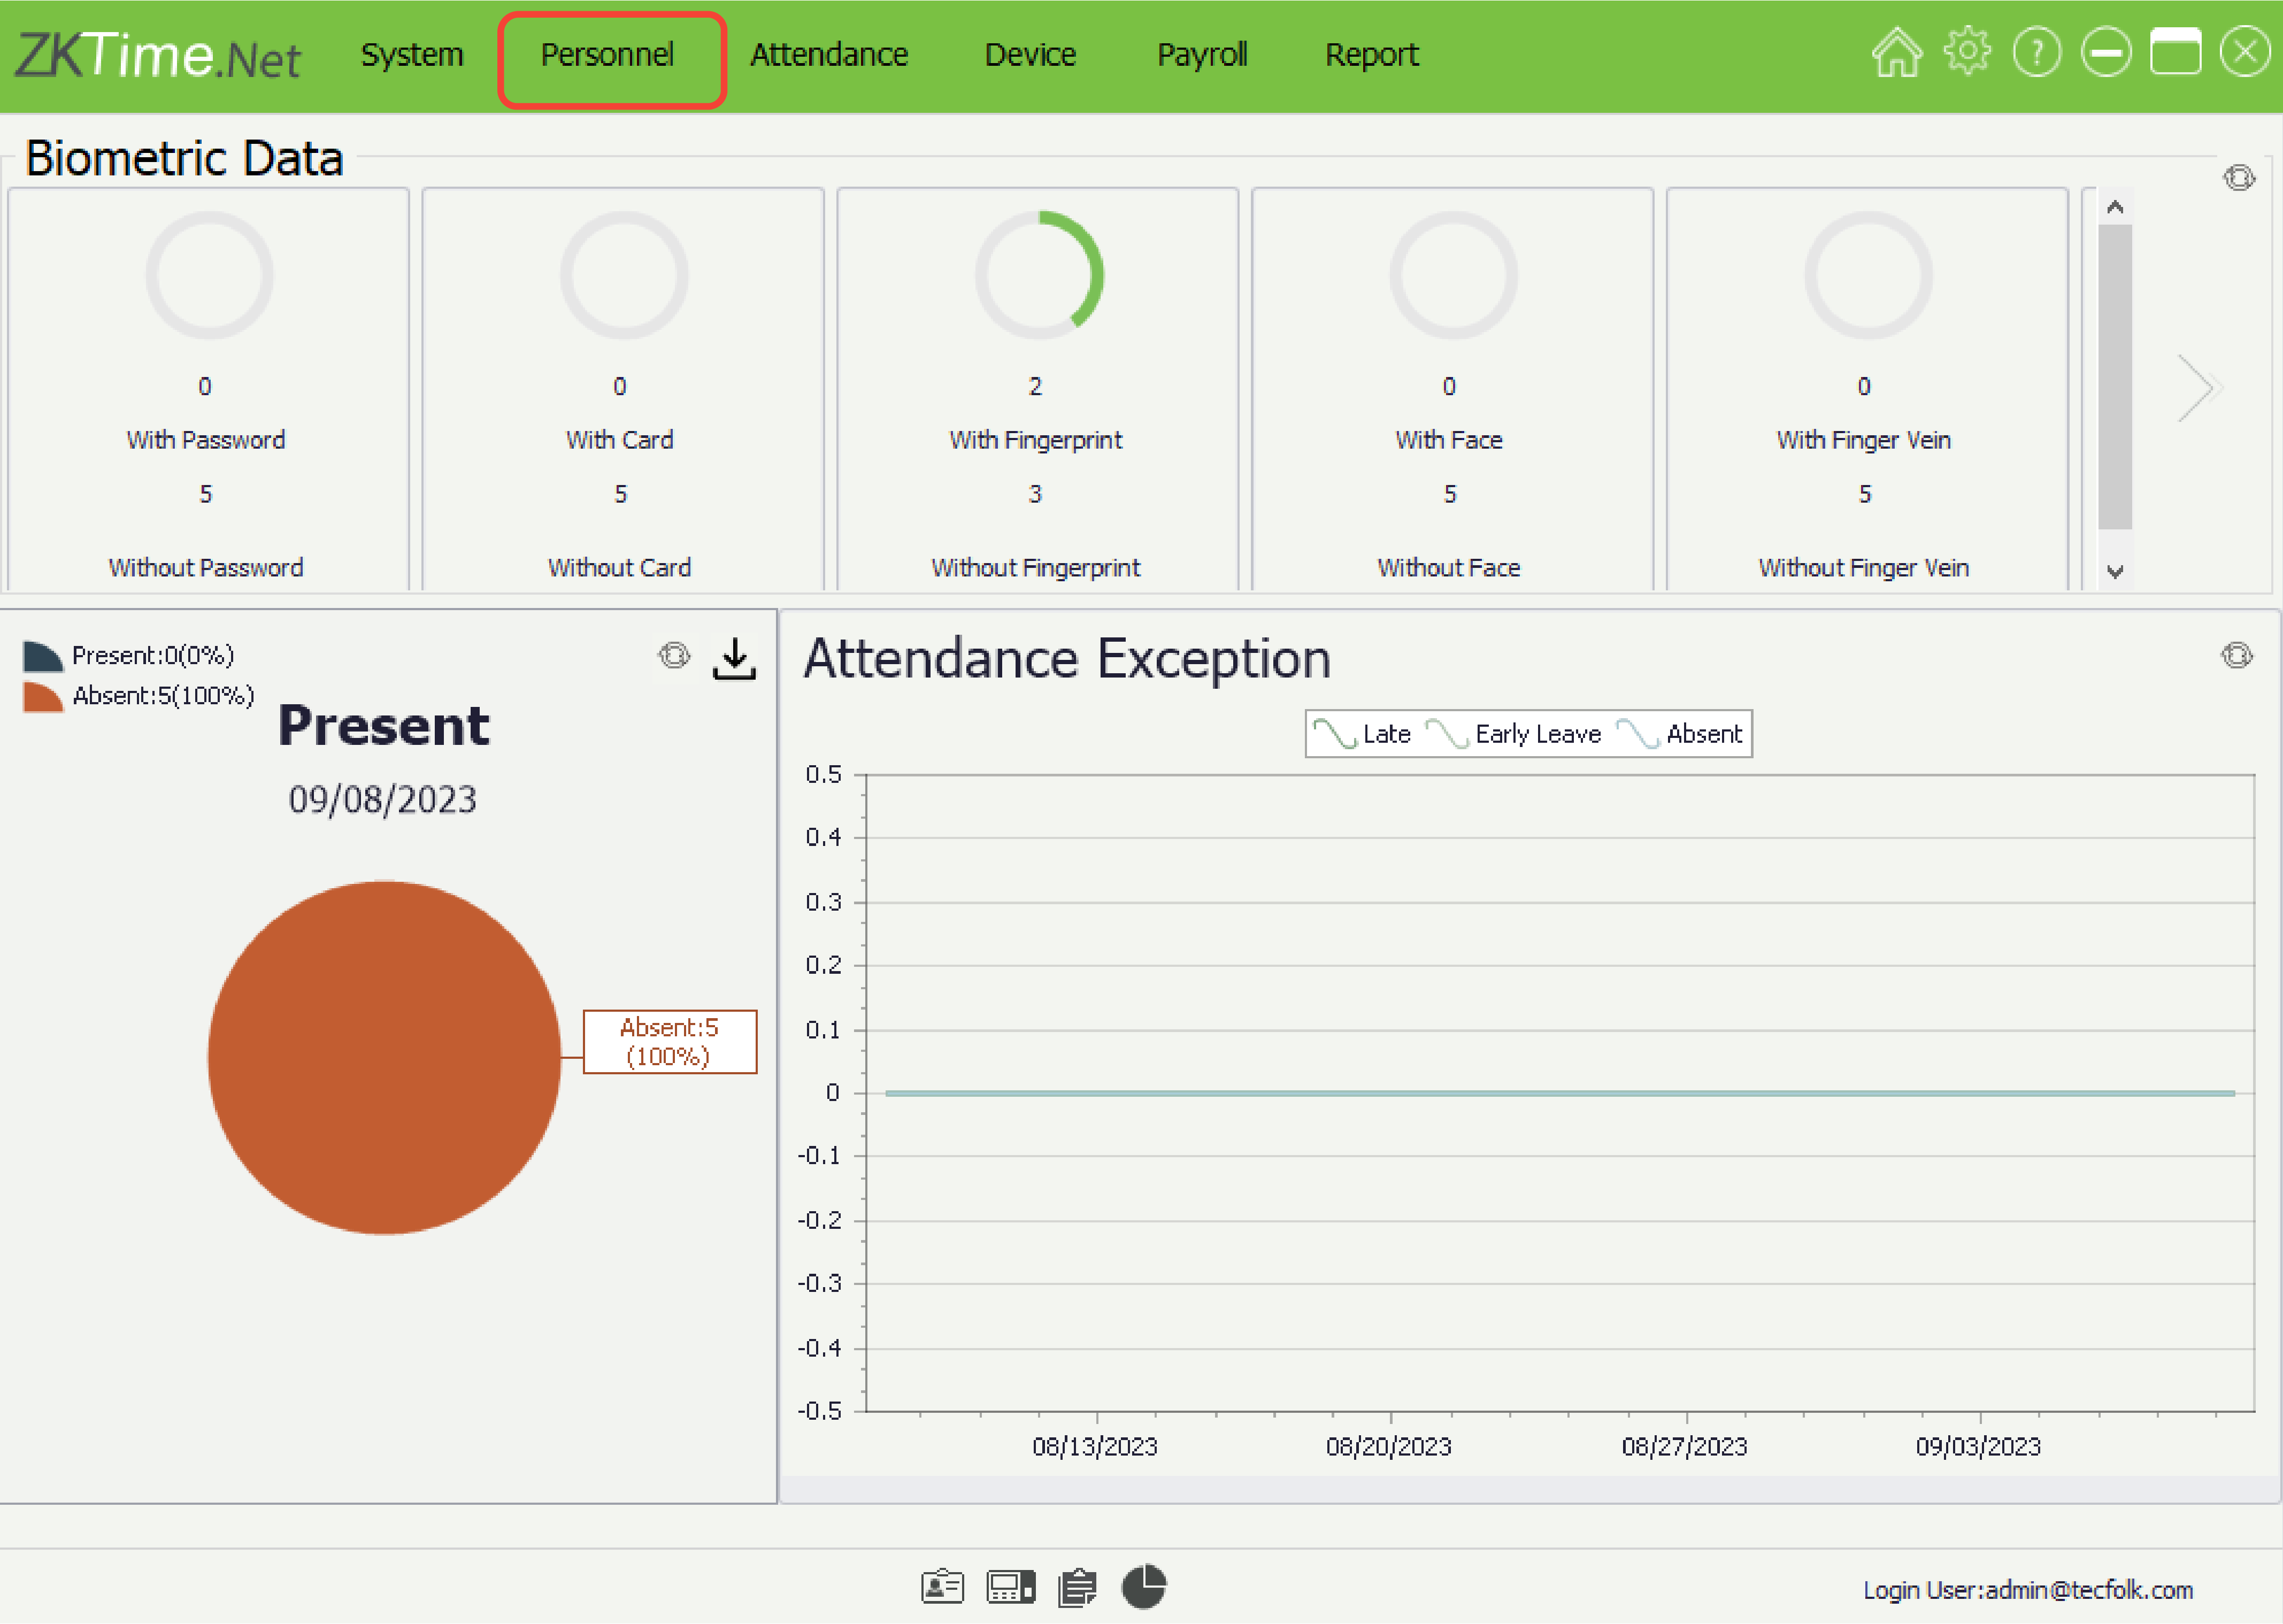
(b) ZKTimes Application
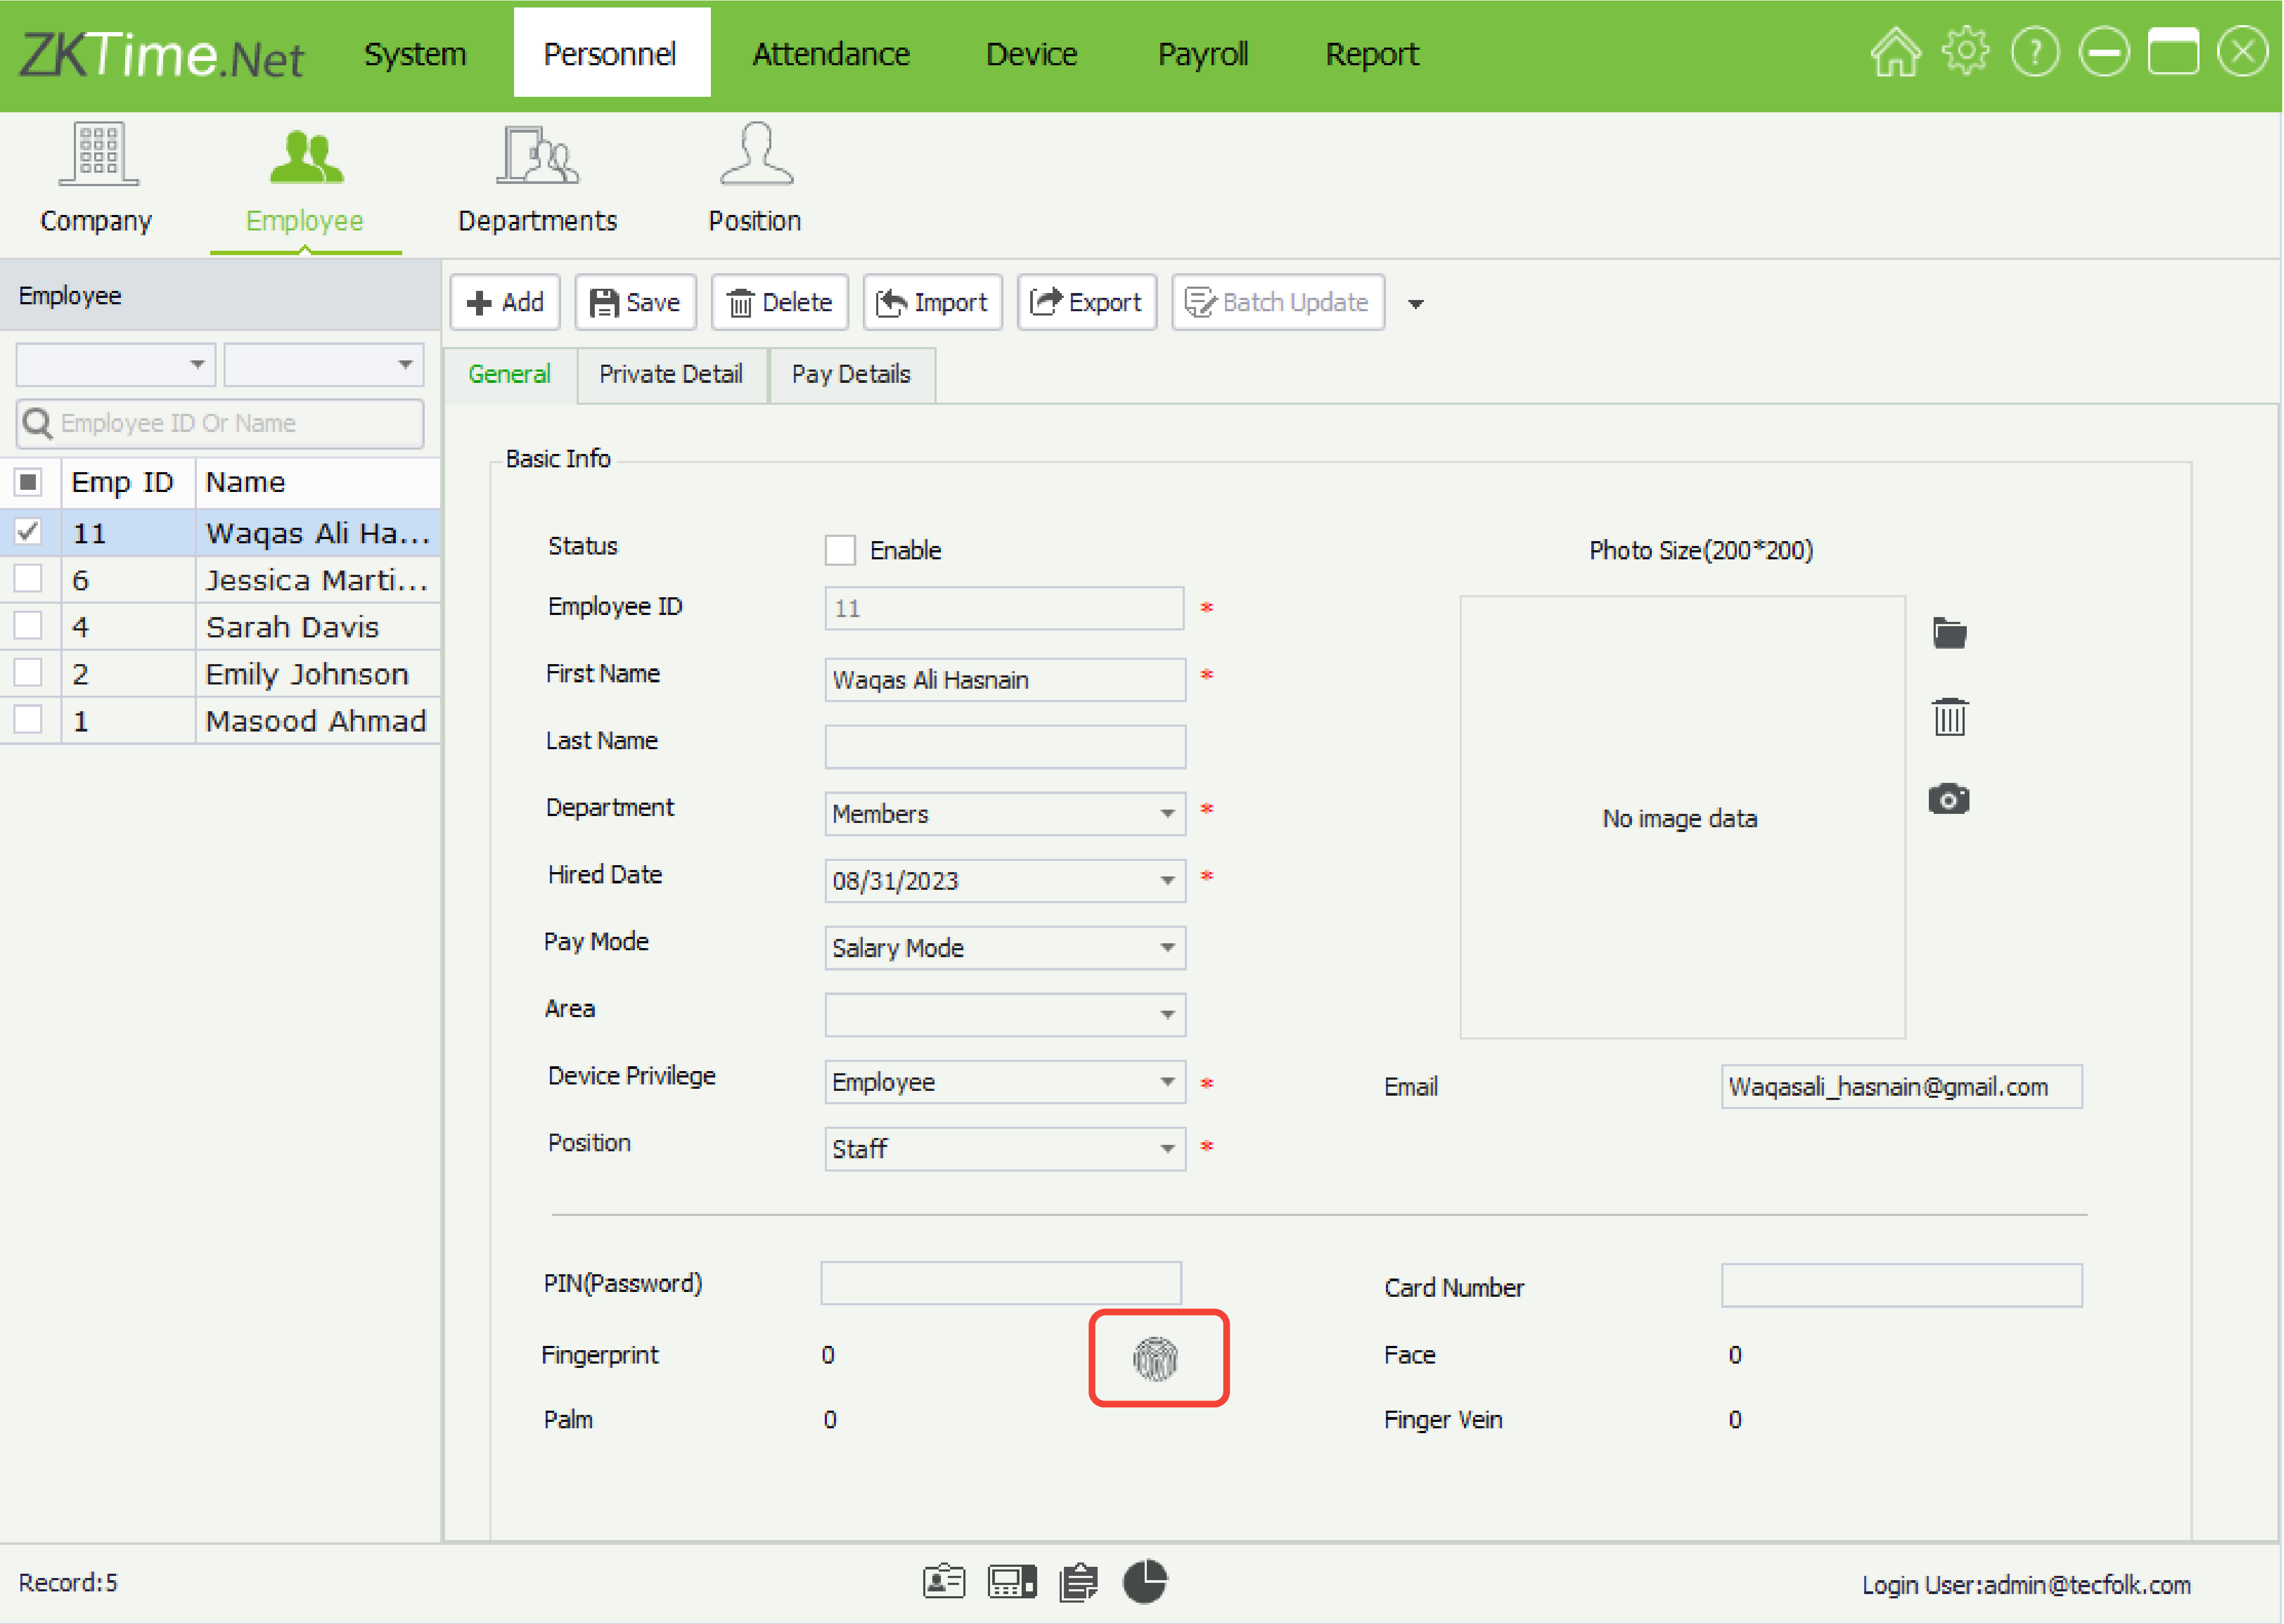
(c) Biometric
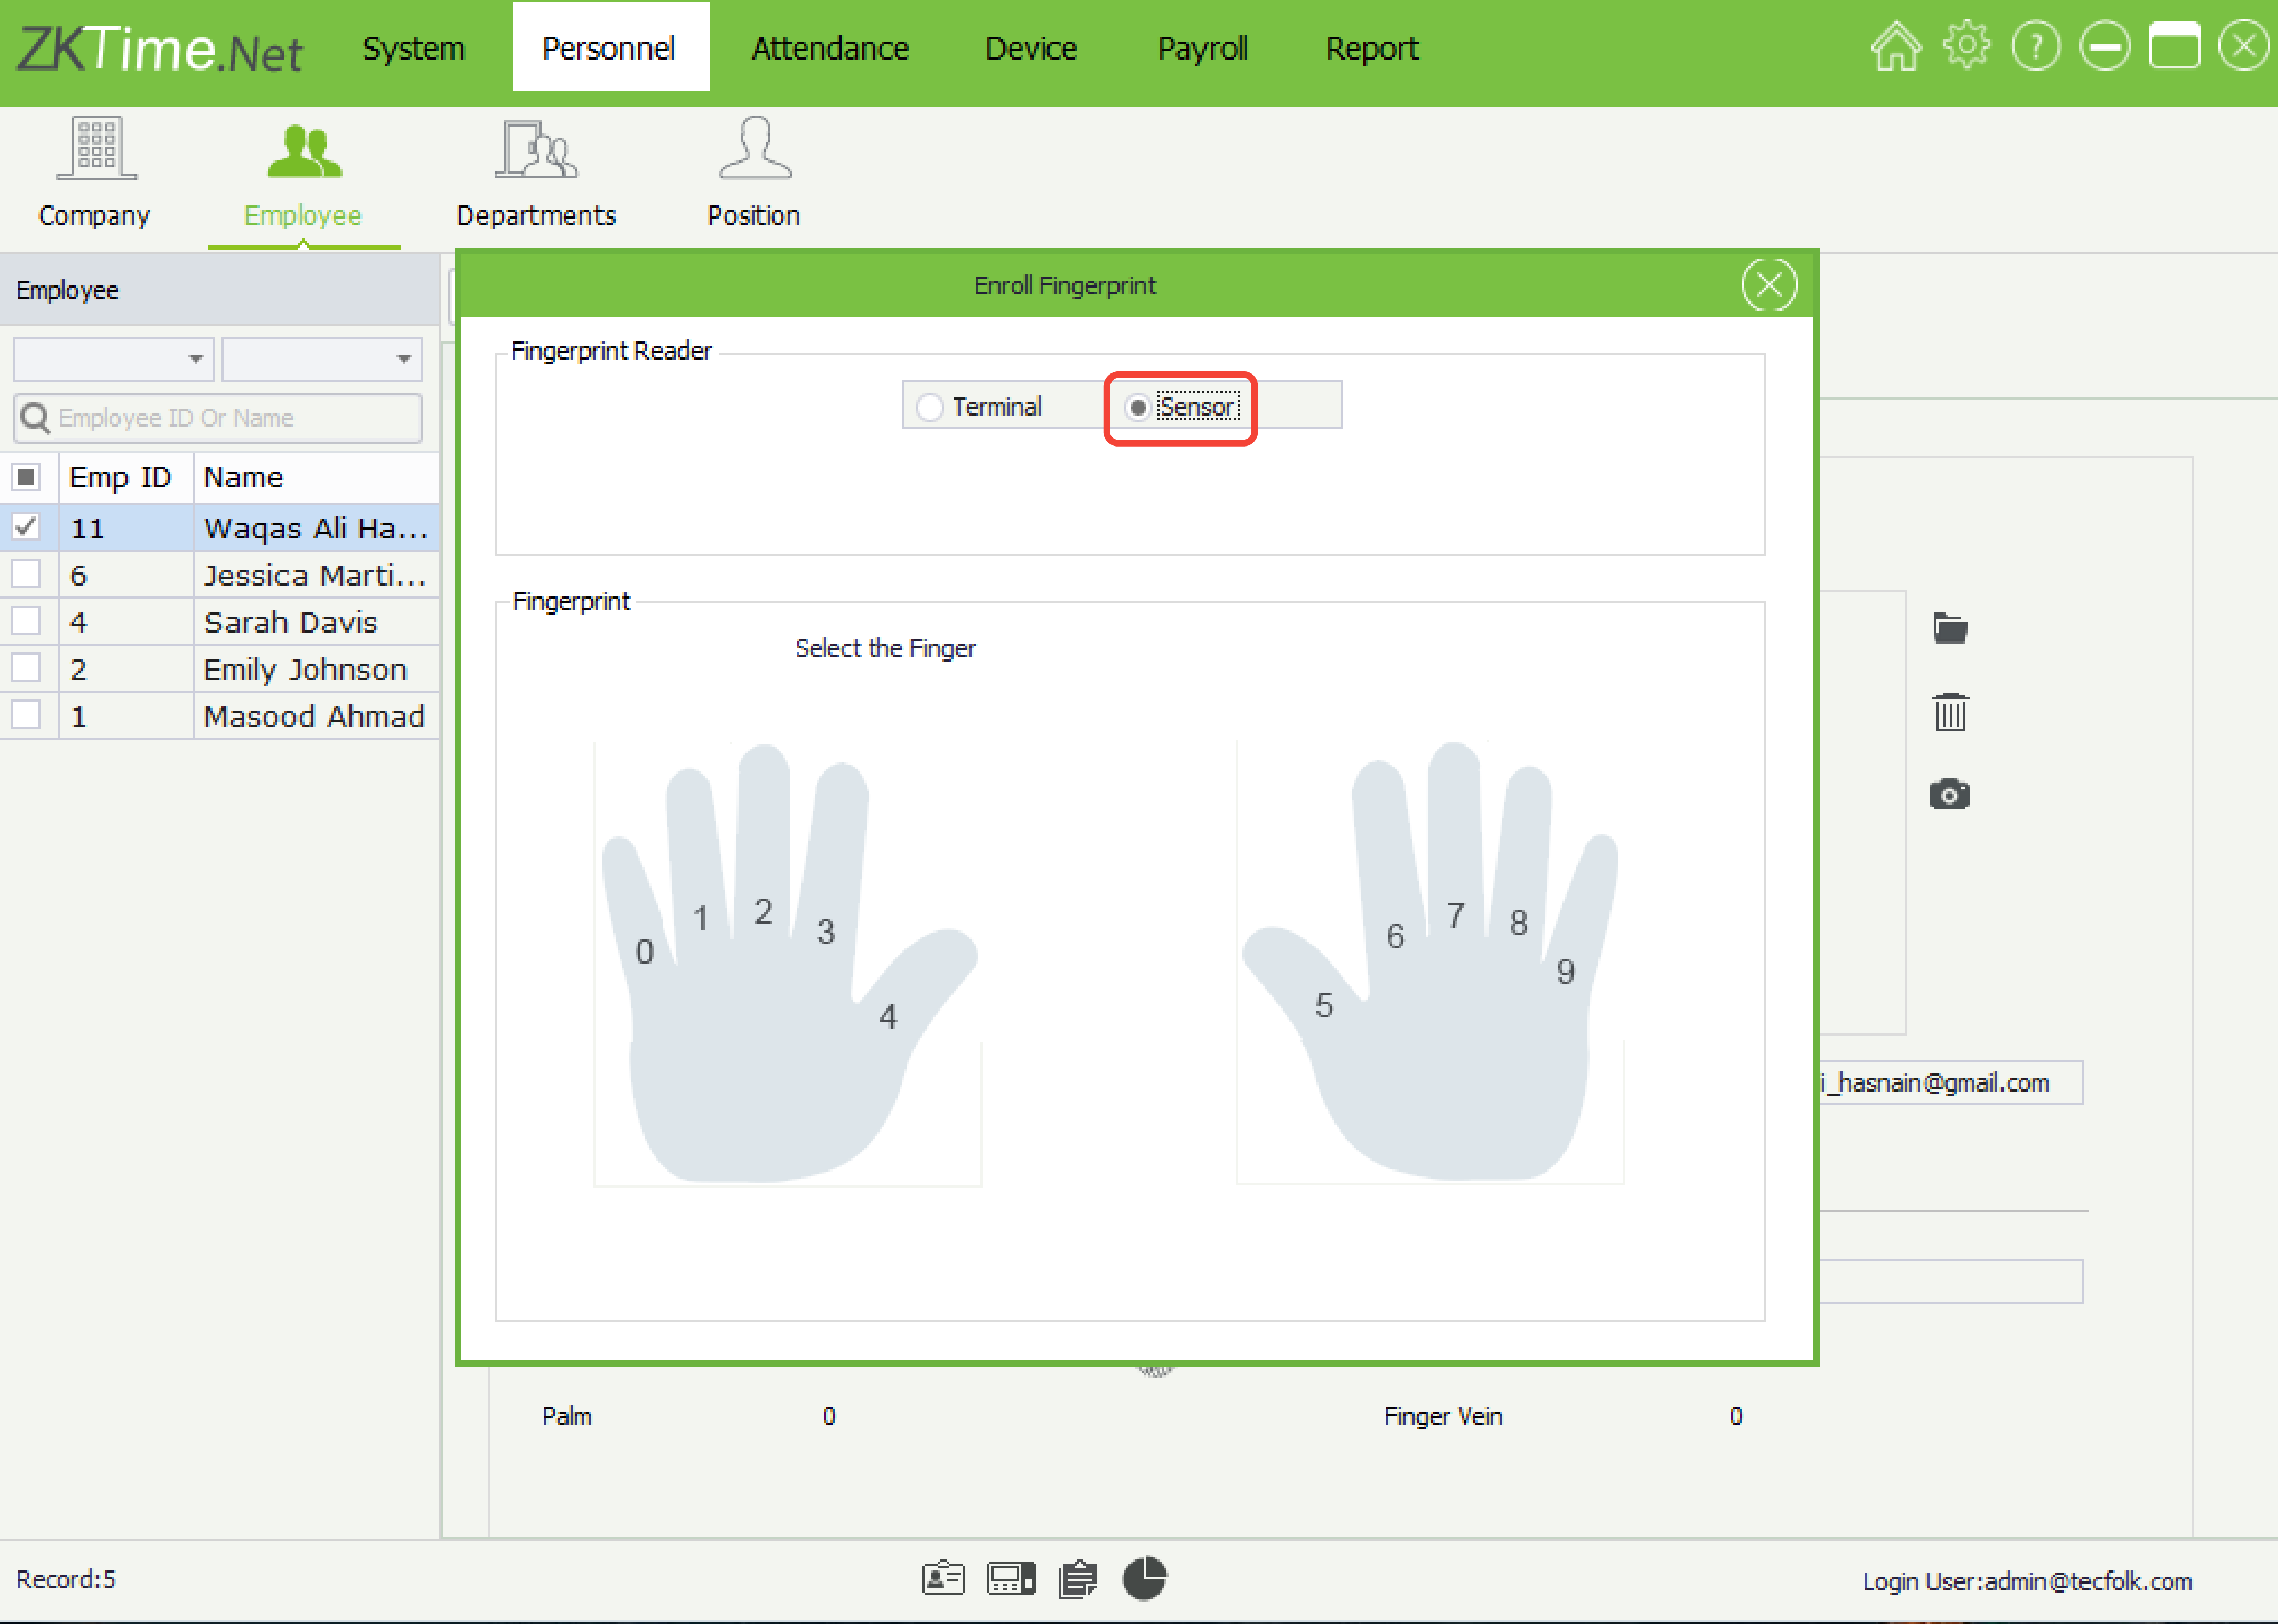
(d) Register Fingerprint
If you are facing any problem, please contact the support team for further assistance.
Click here to watch the video explanation.You should verify the following things:
- Ensure the Tecgym Console App on the desktop is up and running.
- Confirm that the Tecgym Console App is displaying a green connectivity message as shown in
screenshot (a).
(a) Tecgym Console App
- Ensure your internet connection is active.
- Go to the Member's Detail page and click on the Sync Again button in the tecgym.app as shown in the screenshot (b) and within few seconds Access Control Terminal (ACT) icon will change to Green.
(b) Sync again
If you are facing any problem, please contact the support team for further assistance.
Click here to watch the video explanation.- Ensure the Tecgym Console App on the desktop is up and running.
- Confirm that the Tecgym Console App is displaying a green connectivity message.
(a) Tecgym Console App
- Ensure your internet connection is active.
- Go to the Member's Detail page and click on the Sync Again button in the tecgym.app as shown in the screenshot (b) and within few seconds Access Control Terminal (ACT) icon will change to Red.
(b) Sync again
If you are facing any problem, please contact the support team for further assistance.
TecGym is a gym management software that provides a complete solution for gym owners to run their gyms smoothly, automate gym operations, and offer 24/7 gym access. Tecgym is recognized as one of the best and top gym management systems in Pakistan and the U.A.E., offering an end-to-end (e2e) solution for gyms.
Yes, you can buy gym software online by clicking the link below, and we will contact you shortly to proceed further.
It streamlines the management of gyms and fitness centers, offering a wide range of features that benefit both gym owners and members. With 24/7 Mobile Monitoring, you can have control in the palm of your hand. We've got your back when it comes to dues, with friendly reminders through our WhatsApp and SMS services. Enjoy hassle-free check-ins and check-outs with our integrated Biometric and RFID Card System. Stay on track with Real-Time Attendance Recording. Say goodbye to queues and make payments online with just a few clicks. You'll be able to view detailed revenue reports generated by trainers, members, and visitors. Your gym's new members can skip the lines and unlock their fitness adventure in a snap with Self Registration through QR Code and much more!